Welcome to the EGGhead Forum - a great place to visit and packed with tips and EGGspert advice! You can also join the conversation and get more information and amazing kamado recipes by following Big Green Egg to Experience our World of Flavor™ at:
Want to see how the EGG is made? Click to Watch
Facebook | Twitter | Instagram | Pinterest | Youtube | Vimeo
Share your photos by tagging us and using the hashtag #BigGreenEgg.
Share your photos by tagging us and using the hashtag #BigGreenEgg.
Want to see how the EGG is made? Click to Watch
Permatex Copper Gasket Install w/pics

Botch
Posts: 17,694
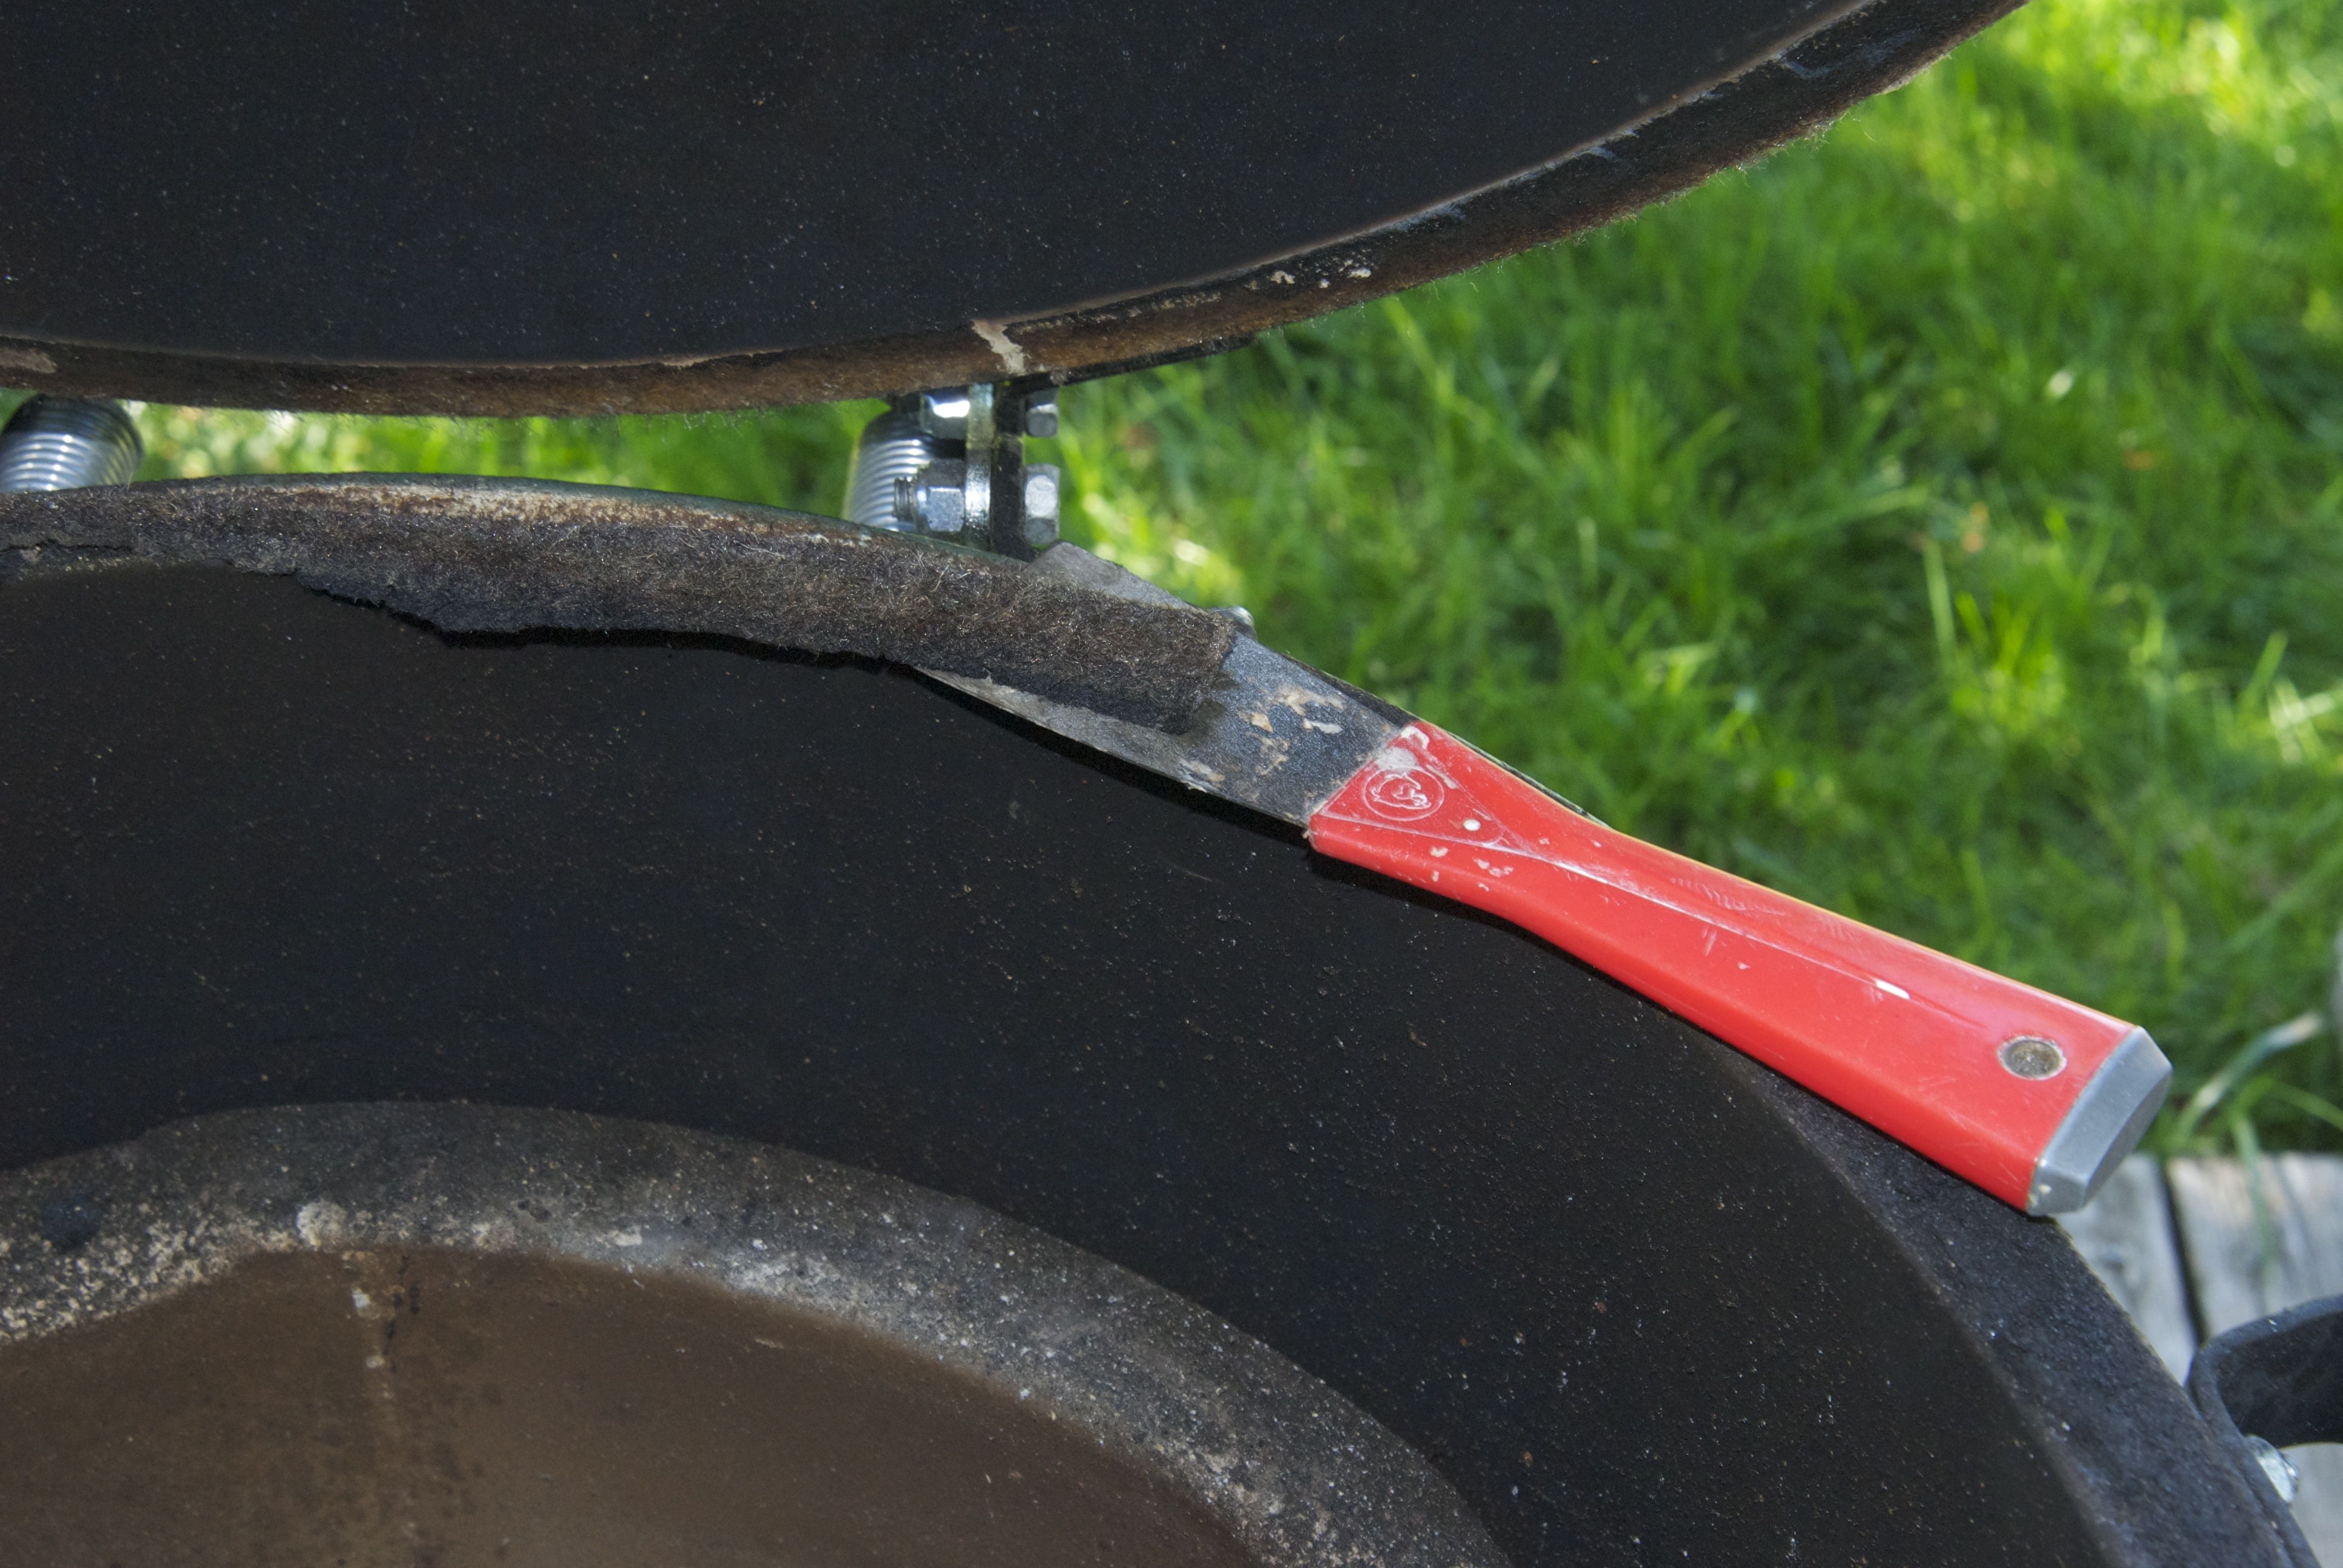
I almost let another winter sneak up on me before replacing my pizza-fried felt gasket. As you can see my gasket was actually falling off in places:

It took me less than two minutes to scrape both top and bottom clean:
 I then sanded the surfaces smooth with 100-grit on a sanding block. Cut through the green glaze in a couple spots but no biggie:
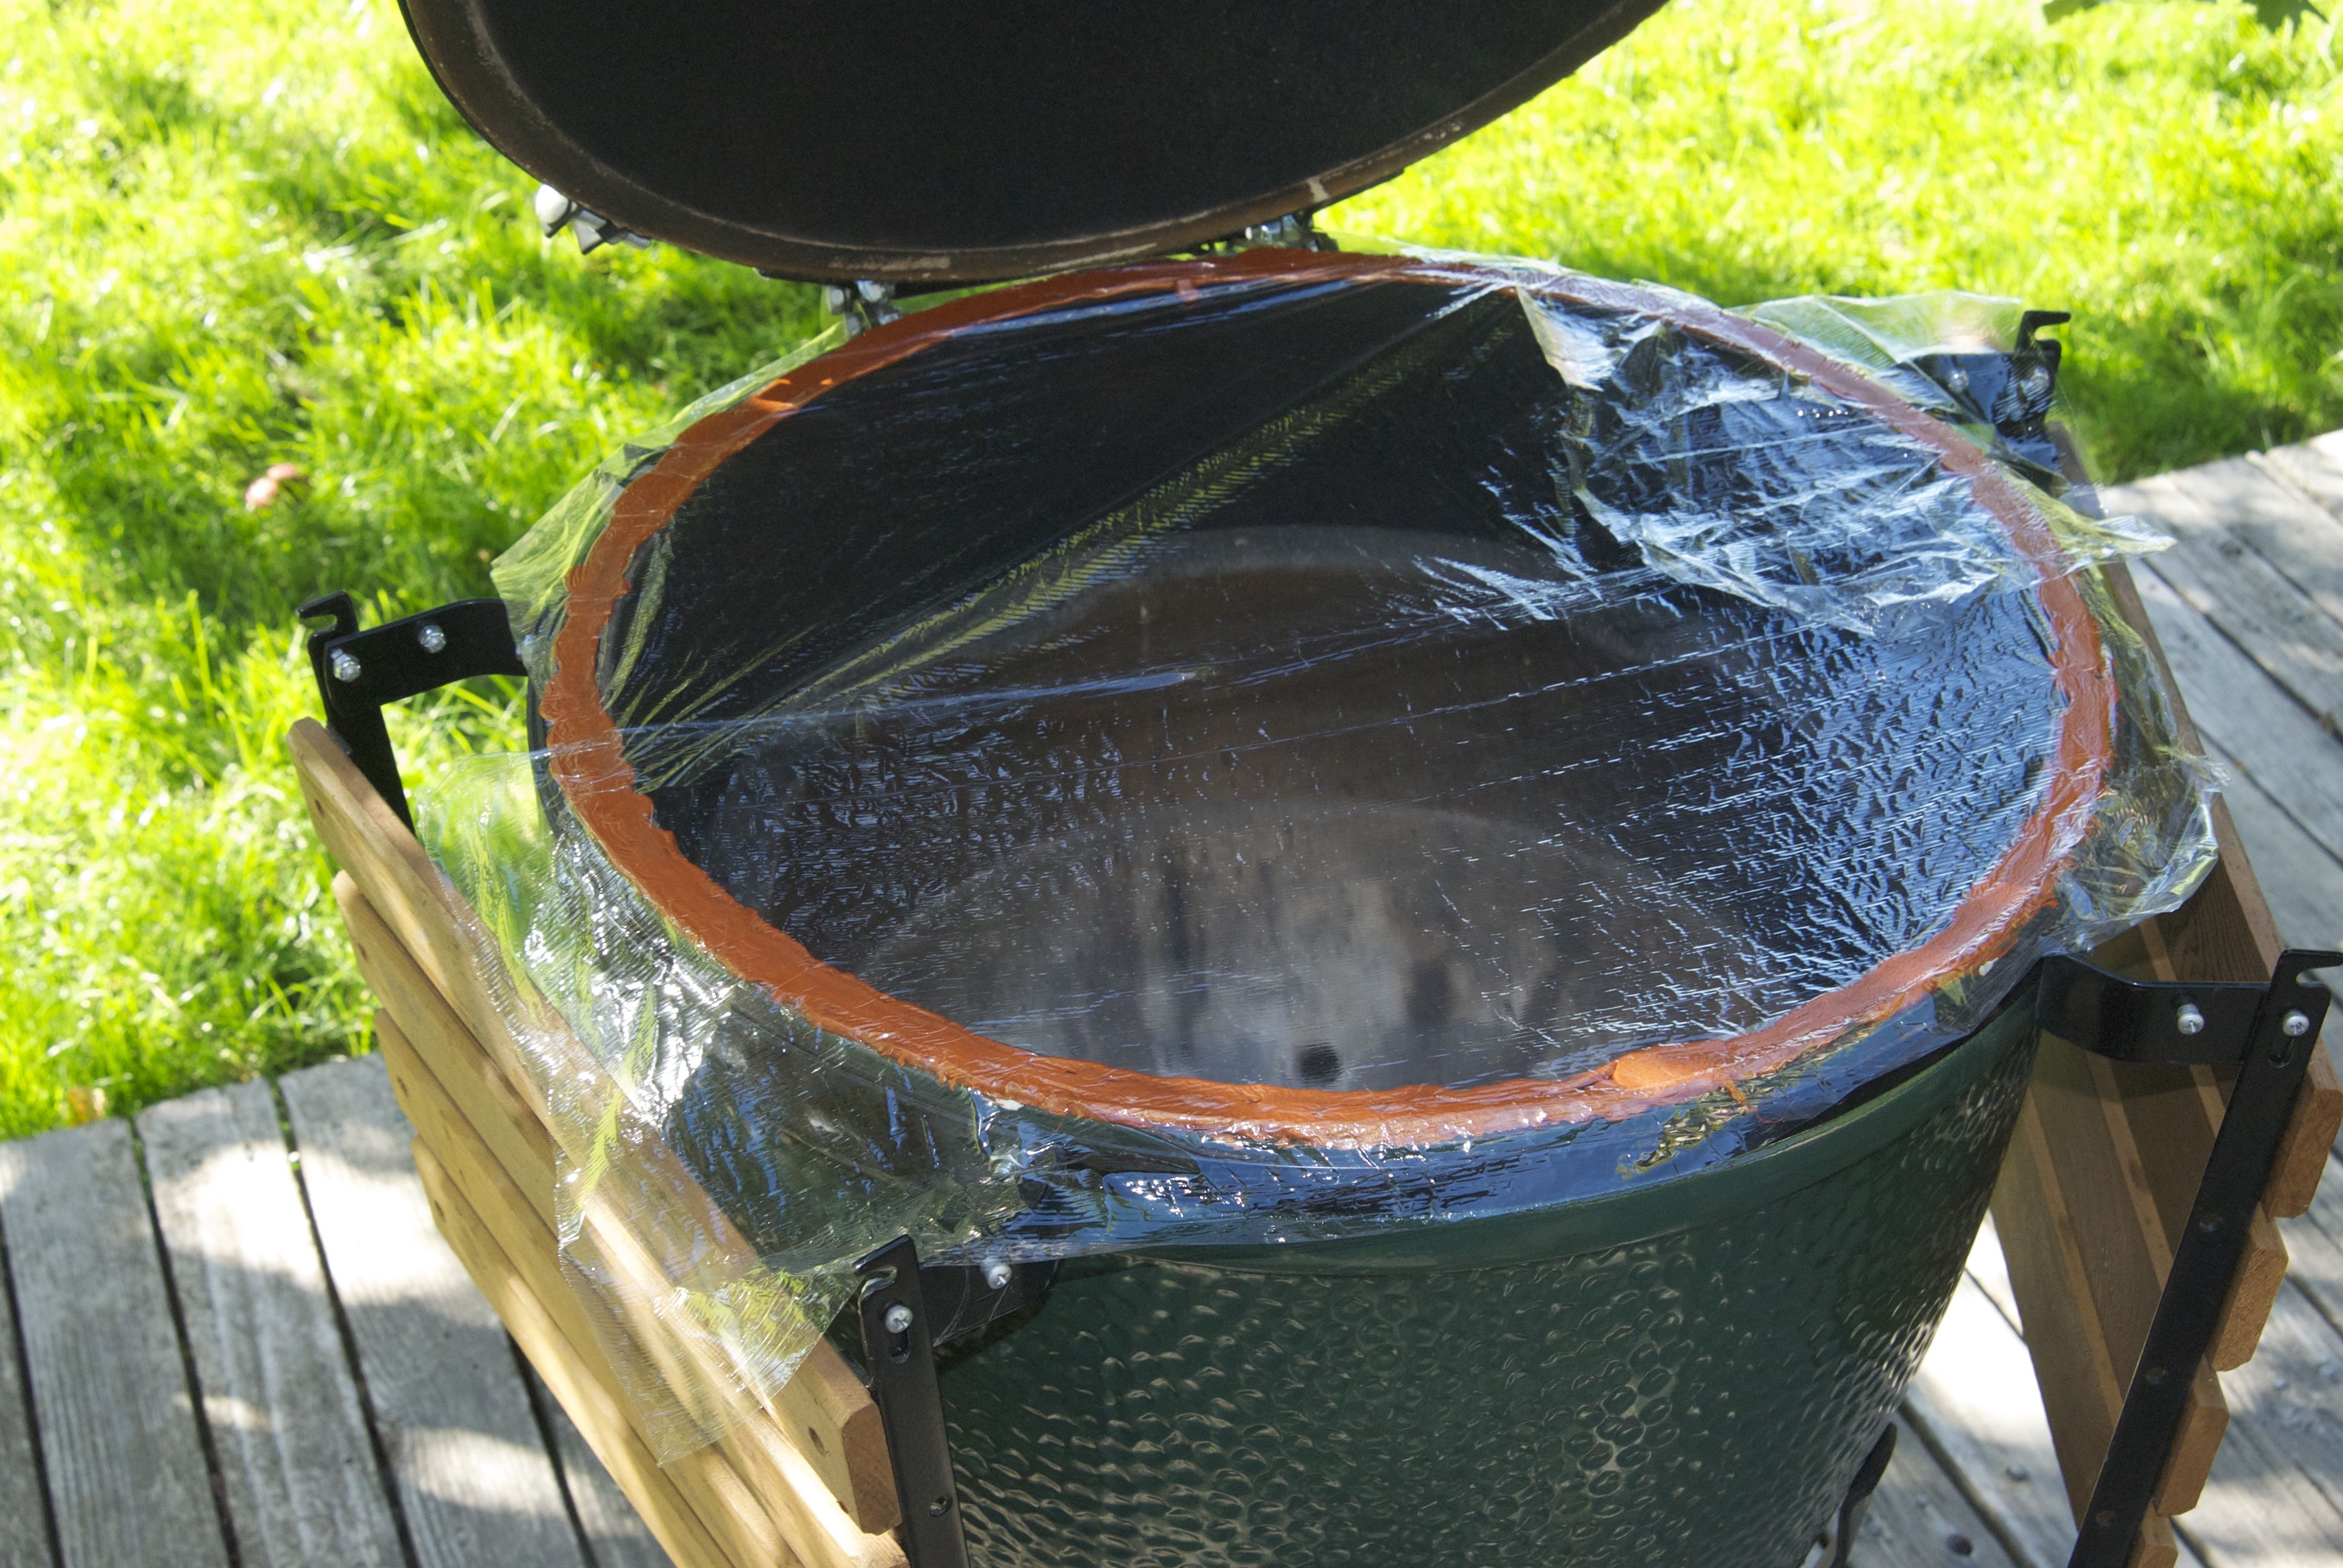
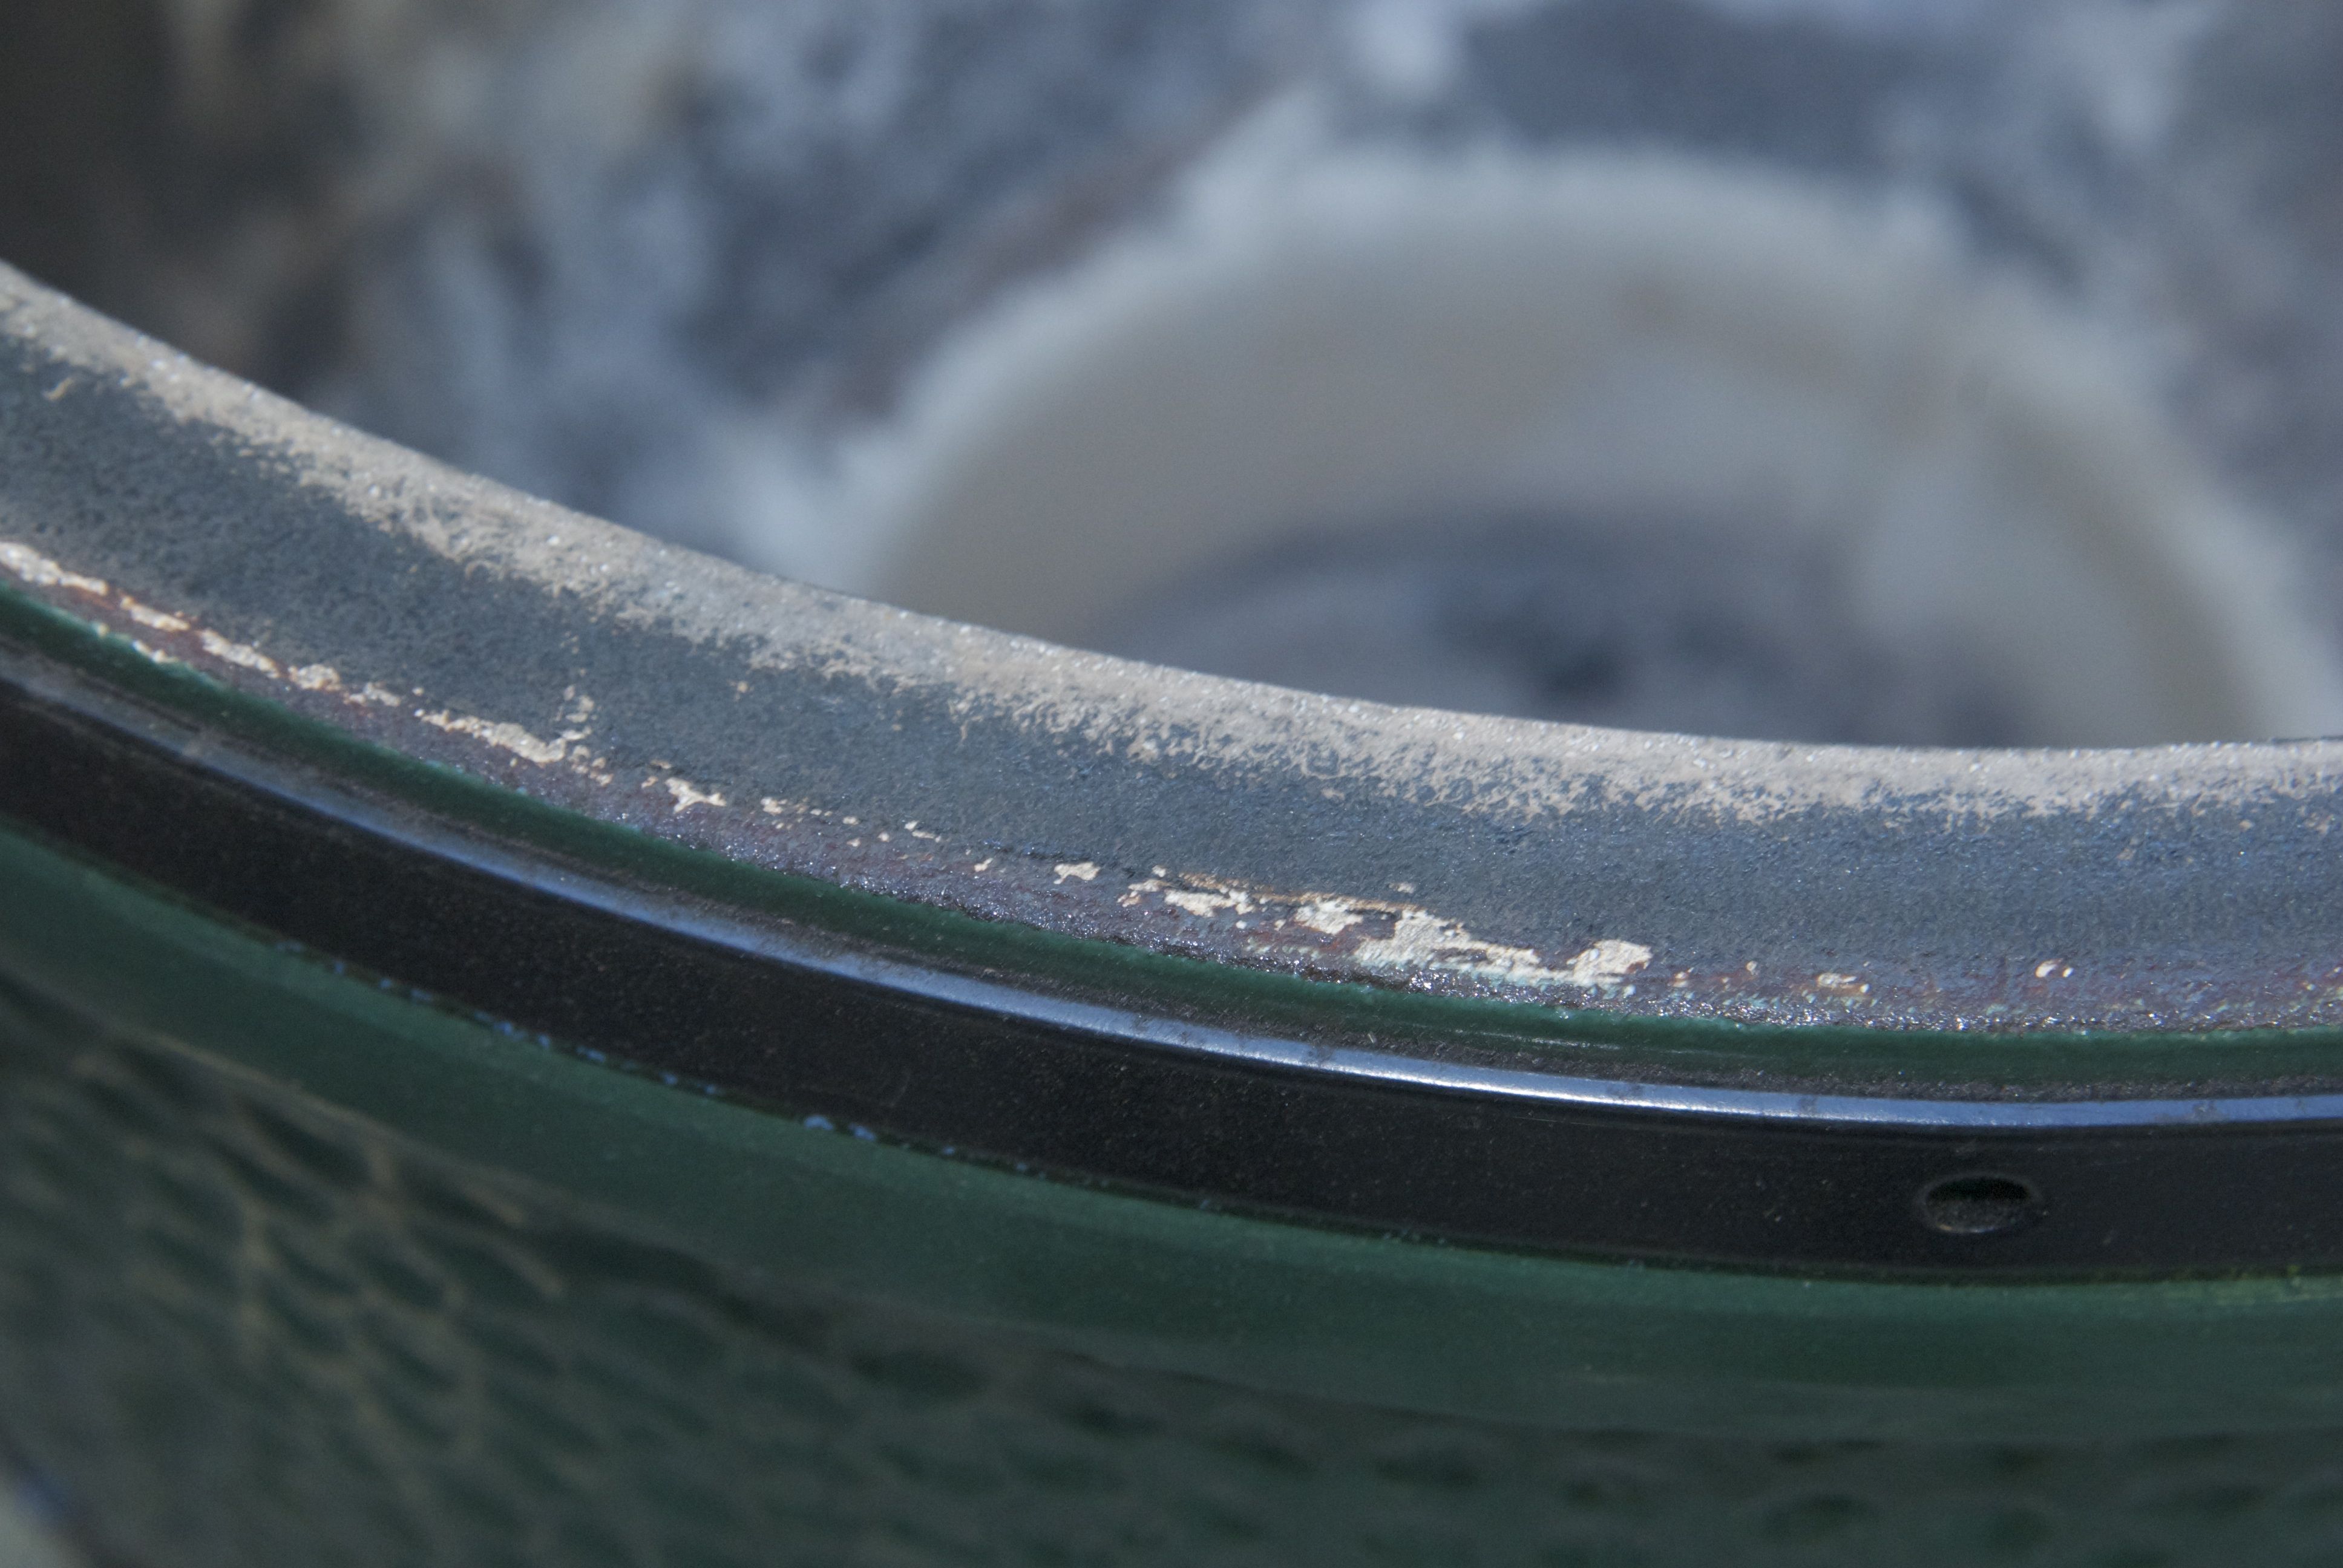 Layed down a thick bead of the gasket maker, leaving a short blank spot in front. Covered with Saran Wrap, then laid a 1/8" stick in the blank spot. I was concerned that the weight of the lid would force too much goop out the sides, the stick ensured the Permatex gasket would be the same thickness as the original felt (in retrospect I'm not sure this was necessary...)
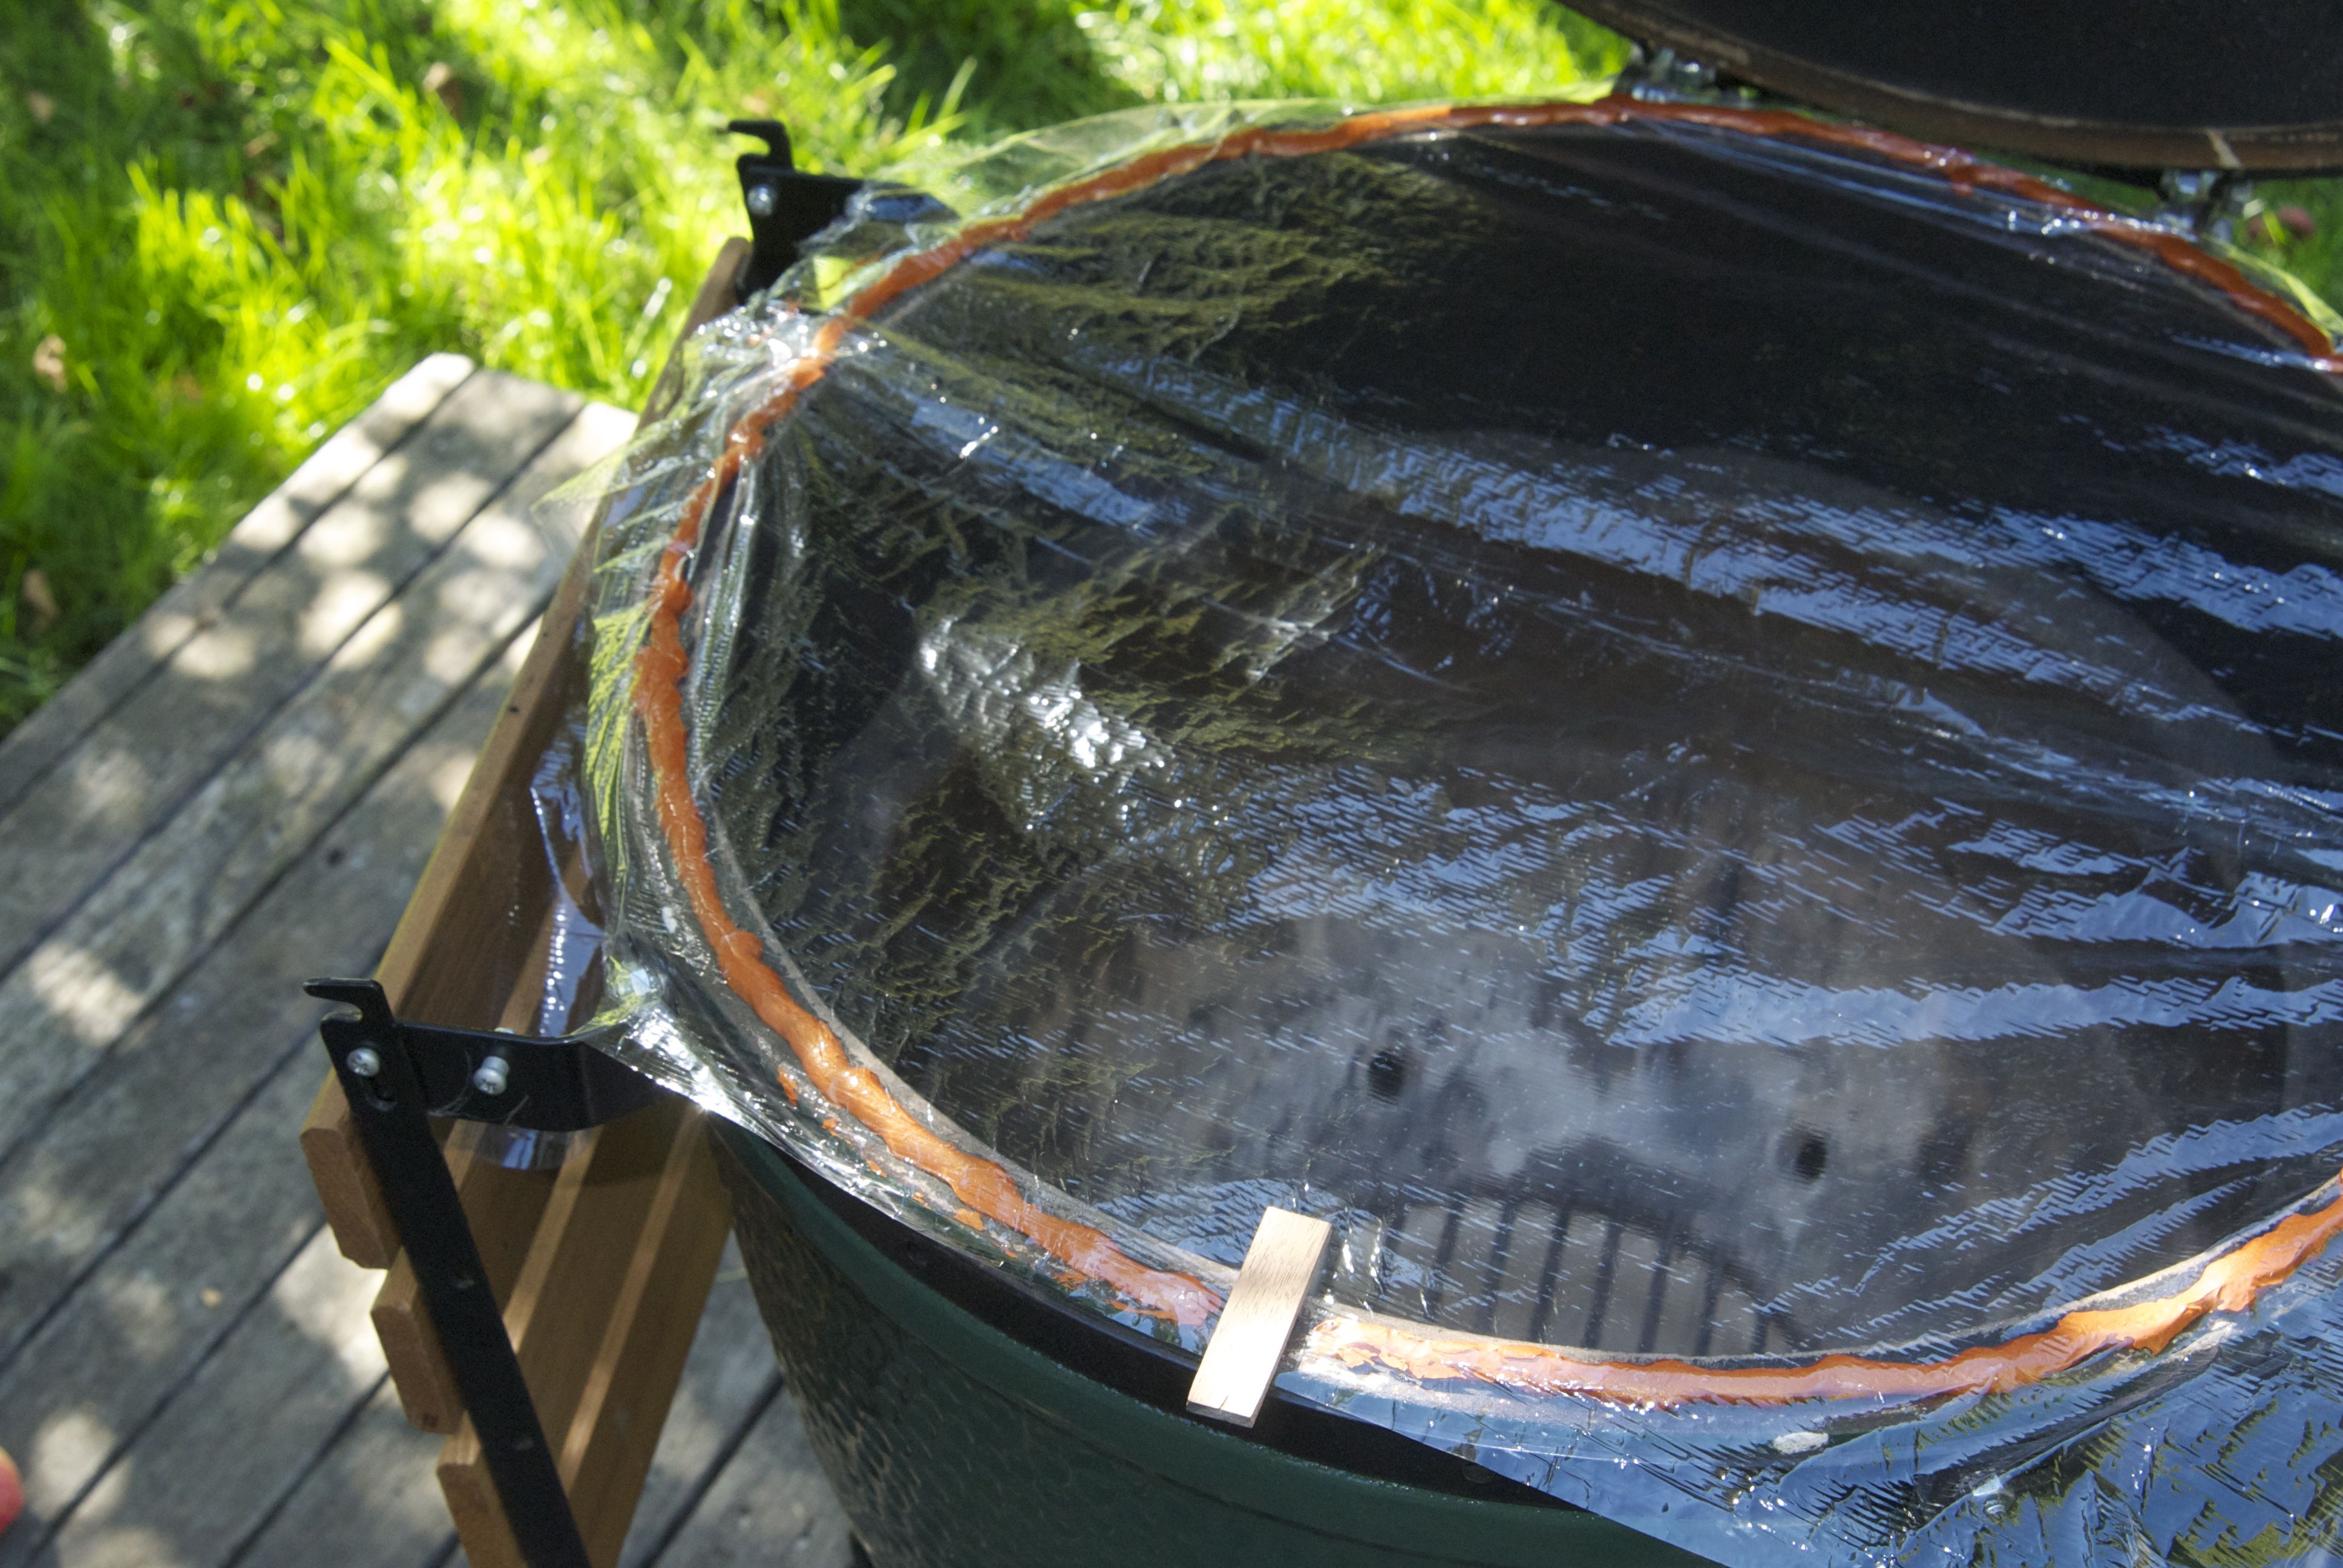
The next day I lifted the lid and removed the Saran Wrap. There were a few thin spots, plus the blank spot where the stick had been. I filled these in with more Permatex (used about a tube and a third here on the Large), layed more Saran Wrap down, lowered the lid and left it for two days this time (parts were still tacky after 24 hours, but it is a bit cool outside now).
This afternoon, I lifted the lid to this:
 Peeled off the Saran Wrap, and it looked like I had good coverage! I'll leave the lid open a couple more days, then trim the Permatex flush, at least on the outside.
 The whole operation didn't take long at all (save letting the stuff cure). I know someone on this forum did a much neater job by routing a ring in a piece of wood and pre-forming the Permatex in the wood, then attaching it later. I chose this method as the seal against the top should be ideal. Was going to lay a bead on the lid surface too, but realized it'll seal just as well this way.
Anxious to try it out this weekend!

“Declare victory when you have retreated past the point where you started” - Don Tzu
Ogden, UT, USA
Comments
-
Egads, I buggered up that post!Can anyone tell me how to remove the two double-posts, and move the bottom pic back into the proper place?8-|
“Declare victory when you have retreated past the point where you started” - Don Tzu
Ogden, UT, USA
-
Can't help with the above request but those who will give it a go will be able to figure it out-I have two tubes of Permatex and a nomex gasket just waiting for the next replacement-may have to give your approach a try. Makes sense to me-but then again...
") >- Louisville; Rolling smoke in the neighbourhood. Life is too short for light/lite beer! Seems I'm livin in a transitional period. CHEETO (aka Agent Orange) makes Nixon look like a saint.
>- Louisville; Rolling smoke in the neighbourhood. Life is too short for light/lite beer! Seems I'm livin in a transitional period. CHEETO (aka Agent Orange) makes Nixon look like a saint. -
The adhesive on my Rutland is failing...I was dumb and used the black Rutland adhesive, not permatex. I am seriously considering going just permatex for the gasket, but will probably do it with some sort of notched wood/foam/cardboard to use as a guide when spreading to keep cleaner edges.
-
Whatever you do, make sure you use a solvent to remove the grease and oil (from cooking) off the ceramic or the adhesive won't stick.
______________________________________________I love lamp.. -
Yeah...that's a given. The black Rutland stuff is water soluble so is destined to fail no matter how clean the surface is.
-
Thanks, forgot to mention that. After sanding the gasket surfaces I wiped them down with denatured alcohol.nolaegghead said:Whatever you do, make sure you use a solvent to remove the grease and oil (from cooking) off the ceramic or the adhesive won't stick.“Declare victory when you have retreated past the point where you started” - Don Tzu
Ogden, UT, USA
-
Duh, so the permatex is the gasket?
-
Yes, its sold in Auto Parts stores to use instead of a paper or other gasket in car engines. It dries to a pencil-eraser consistency.Duganboy said:Duh, so the permatex is the gasket?“Declare victory when you have retreated past the point where you started” - Don Tzu
Ogden, UT, USA
-
@Botch thanks man! I kept looking for a post with the gasket on it!!!!
-
Bump. This is a good way to save 7.82 or whatever.
-
Much less labor intensive than bunching gasket material around the base.
Edit: and applying the same adhesive.Louisville; Rolling smoke in the neighbourhood. Life is too short for light/lite beer! Seems I'm livin in a transitional period. CHEETO (aka Agent Orange) makes Nixon look like a saint. -
This really does seem like the way to go."I've made a note never to piss you two off." - Stike
"The truth is, these are not very bright guys, and things got out of hand." - Deep Throat -
@Eggcelsior Not too sure about the cost savings. He used more adhesive and it is about as expensive as the woven gasket material.
@lousubcap Seems like the labor is actually more intensive than adding the woven gasket material.Southeast Florida - LBGE
In cooking, often we implement steps for which we have no explanations other than ‘that’s what everybody else does’ or ‘that’s what I have been told.’ Dare to think for yourself. -
It fails i think be ause the ceramic wicks some water before it can cure.Mighty_Quinn said:The adhesive on my Rutland is failing...I was dumb and used the black Rutland adhesive, not permatex. I am seriously considering going just permatex for the gasket, but will probably do it with some sort of notched wood/foam/cardboard to use as a guide when spreading to keep cleaner edges.
FWIW, i had installed my rutland with their cement. It came loose in one or two spots within a couple months
One day, buying lump at a small hardware store, i started looking for more rutland cement (the gasket and cement were sold togehery, and I just wanted cement). Then it occurred to me there had to be other solutions.
I checked the automotive aisle, and they had permatex gasket sealer/maker. It said it was good to 600 i think, and i was fairly sure the ceramic didn't get that hot
bought a tube, and headed home
my point in telling this is that i figured my gasket and the cement were already toast. The gasket maker was an experiment. I don't think anyone had used it on the forum, and so I was flying blind. Which meant screw it. Let's see if this works
i literally tore the gasket free. It came up leaving no cement behind, and the entirety of the tutland cement fully adhered to the gasket. It also left the rim clean
shrug
I squirted a straight line down the center if the rim (didn't squiggle). Laid the SAME gasket (with cement attached still) into it, and shut the dome
i am on about yer tean i think
never cleaned it.
Just saying, sanding, obsssing over cleaning, oils, etc are fine. But there is no need for surgical cleanliness and precision
that's if you wanna stick with a rutland gasket if course. If you go all-permatex, then nevvamind
[social media disclaimer: irony and sarcasm may be used in some or all of user's posts; emoticon usage is intended to indicate moderately jocular social interaction; the comments toward users, their usernames, and the real people (living or dead) that they refer to are not intended to be adversarial in nature; those replying to this user are entering into a tacit agreement that they are real-life or social-media acquaintances and/or have agreed to or tacitly agreed to perpetrate occasional good-natured ribbing between and among themselves and others] -
@Botch
Thank you for doing it and reporting, just wondering what your feelings are as far as advantage or disadvantage over a Rutland. I'm not seeing an advantage, but I've only done a couple of them.
Phoenix -
Did you ::
1. De-Gasket the lid?
2. Leave the fried gasket alone?
3. De-Gasket the lid and THAN use Permatex? -
I don't get it....why not put a strip of Rutland on top of that? Seems that the thickness of the weave would do a better job of absorbing any inconsistencies in a not perfectly seated lid. Or in my case, I notice as the egg heats up my lid may seat slightly differently cold than it does hot.
I know, I know...some of you don't use any gasket at all and like it just fine.
In any case, thanks for the pictures and the share. I like the plastic wrap method of smoothing the Permatex.
LBGE/Maryland -
I actually did this, and started this thread, almost 4 years ago; I referenced it in John from Carolina's thread, and this one got bumped.blasting said:@Botch
Thank you for doing it and reporting, just wondering what your feelings are as far as advantage or disadvantage over a Rutland. I'm not seeing an advantage, but I've only done a couple of them.
I've never worked with a Rutland so I can't comment on it directly. It is referred to as "woven" which sounds not quite air-tight to me, but many use them with good results, so either will work.
I bought a two-tube pack for I think around $5 (hey, it was 4 years/many brain cells ago!) and used just a bit out of the second tube. By setting the lid down in the soft glue (the Saran wrap prevents adhering to the lid) the lid "molds" itself into the glue, and creates a custom, air-tight fit. If I ever have a band loosen or have to adjust the hinge, of course this will have to be peeled off and re-done, as the rims won't come together in exactly the same way.
I guess the only reason I did it this way is, it was cheaper, and I've done similar seals on my old R/C aircraft between the wing and fuselage using silicone glue; it worked perfectly there too.
I was concerned that the package claimed it was good to 700 degrees, I used to bring my Large up to 900 for margherita pizzas, but there's been no degradation (and doesn't an engine head get much hotter than that? Will have to measure with my new infrared thermometer thingie). When the original felt gives up on my Small, I'll be doing the same Copper seal on it also (for whatever reason the felt has lasted a long time on my Small).“Declare victory when you have retreated past the point where you started” - Don Tzu
Ogden, UT, USA
-
Is there a down side to replacing with felt gaskets? I moved two of my eggs into tables and about to move a third next week hopefully. I used felt gaskets from smoke ware. Looked a little better then the BGE gaskets. Should I be rethinking this?Bill Denver, CO
XL, 2L's, and MM -
If you've been using them and they work for you, I wouldn't change. I'm sure they look better than the squiggly orange of my solution.
“Declare victory when you have retreated past the point where you started” - Don Tzu
Ogden, UT, USA
-
Botch said:If you've been using them and they work for you, I wouldn't change. I'm sure they look better than the squiggly orange of my solution.
I haven't had mine that long so I don't really know. The factory ones looked bad and I figured I'd replace them while I had them apart. Now I see so many more options. Glad they are out there.
Bill Denver, CO
XL, 2L's, and MM -
The whole issue on gasket replacement is how often do you want to replace them. Some folks are lucky and the OE lasts them for a few years while others need to replace them every 12 to 18 months. Some people want little to think about and will pop for the more expensive peel and stick and their trade off is they have to replace them more often - especially if you do higher heat cooks like steaks and pizzas. Other solutions take longer to apply (as compared to peel and stick) but will last for years. My large gasket - a Rutland - just passed its 13th year, so the call is strictly what amount of maintenance time, frequency and cost YOU are willing to commit to.Re-gasketing the USA one yard at a time
-
To each their own. Very creative @botch. I've been using the Nomex for 6yrs on my large but I won't put you down for not going my direction. Matter of fact if and when I need to replace my gaskets I will go your way with permatex only.-----------------------------------------analyze adapt overcome2008 -Large BGE. 2013- Small BGE and 2015 - Mini. Henderson, Ky.


Categories
- All Categories
- 184.1K EggHead Forum
- 15.8K Forum List
- 460 EGGtoberfest
- 1.9K Forum Feedback
- 10.4K Off Topic
- 2.2K EGG Table Forum
- 1 Rules & Disclaimer
- 9K Cookbook
- 13 Valentines Day
- 93 Holiday Recipes
- 224 Appetizers
- 520 Baking
- 2.5K Beef
- 88 Desserts
- 167 Lamb
- 2.4K Pork
- 1.5K Poultry
- 33 Salads and Dressings
- 324 Sauces, Rubs, Marinades
- 548 Seafood
- 175 Sides
- 122 Soups, Stews, Chilis
- 44 Vegetarian
- 102 Vegetables
- 313 Health
- 292 Weight Loss Forum