Welcome to the EGGhead Forum - a great place to visit and packed with tips and EGGspert advice! You can also join the conversation and get more information and amazing kamado recipes by following Big Green Egg to Experience our World of Flavor™ at:
Want to see how the EGG is made? Click to Watch
Facebook | Twitter | Instagram | Pinterest | Youtube | Vimeo
Share your photos by tagging us and using the hashtag #BigGreenEgg.
Share your photos by tagging us and using the hashtag #BigGreenEgg.
Want to see how the EGG is made? Click to Watch
New Guy, New LBGE Pine table with Table Nest

SalukiTrav
Posts: 5
Hello Everyone,
A few weeks ago I decided I needed a Big Green Egg, after a lot of research I decided to pick up a Large Egg. After scrolling through countless pictures and posts on here and other sites I began construction on my custom table. I tried documenting it the best I could and would like to share the build with you all. I would love to answer any questions about the specifics of the build should any come up. Hope you enjoy!
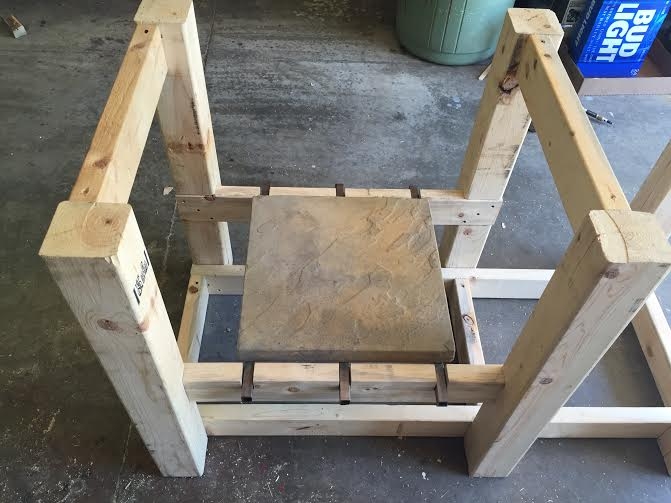
The hardest part was determining the dimensions of the grill shelf. Distance from the top with supports, paver, and top. As well as making sure my wood surface on the grill shelf would be close to flush with the paver for a clean finished look:

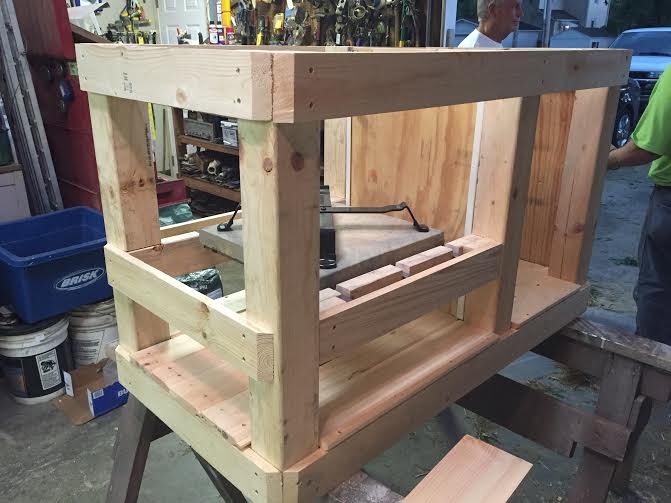
After that was complete, I continued building the frame of the table:

I took a break from the sawdust and cut the 3/4" square tubing that would support the egg and put it in for a test fit:

Time for a test fitting to make sure I was on the right track:


Next up were the outer trim pieces:


I decided to use some C-Channel and plywood to close in the "cabinet" portion of my table because that's what I had laying around the shop:

At this point it was starting to get late and I started to fall off with taking pictures of the step by step processes. I then filled in the spaces around the paver with drop off pieces left over from the bottom shelf. After that, I screwed the top down and cut a 21" hole with a jig saw and smoothed it out with a drum sander placed into a cordless drill. Time for one final test fit:

After I confirmed that the egg fit as it should, I fashioned a door out of some drop off pieces that were now scattered around the floor of the shop:

Before I sanded and stained the table, I added a drop away shelf for added table space on the left side of the egg. Here is the finished product along with a picture of my first cook, 3 racks of baby back ribs.


A few weeks ago I decided I needed a Big Green Egg, after a lot of research I decided to pick up a Large Egg. After scrolling through countless pictures and posts on here and other sites I began construction on my custom table. I tried documenting it the best I could and would like to share the build with you all. I would love to answer any questions about the specifics of the build should any come up. Hope you enjoy!
The hardest part was determining the dimensions of the grill shelf. Distance from the top with supports, paver, and top. As well as making sure my wood surface on the grill shelf would be close to flush with the paver for a clean finished look:
After that was complete, I continued building the frame of the table:
I took a break from the sawdust and cut the 3/4" square tubing that would support the egg and put it in for a test fit:
Time for a test fitting to make sure I was on the right track:
Next up were the outer trim pieces:
I decided to use some C-Channel and plywood to close in the "cabinet" portion of my table because that's what I had laying around the shop:
At this point it was starting to get late and I started to fall off with taking pictures of the step by step processes. I then filled in the spaces around the paver with drop off pieces left over from the bottom shelf. After that, I screwed the top down and cut a 21" hole with a jig saw and smoothed it out with a drum sander placed into a cordless drill. Time for one final test fit:
After I confirmed that the egg fit as it should, I fashioned a door out of some drop off pieces that were now scattered around the floor of the shop:
Before I sanded and stained the table, I added a drop away shelf for added table space on the left side of the egg. Here is the finished product along with a picture of my first cook, 3 racks of baby back ribs.
Comments
-
Welcome! Great table build brother! You're in for some fun!Sandy Springs & Dawsonville Ga
-
Welcome to the OCD team! You have just experienced the least expensive part of owning an egg. Wallet Genocide follows.
Seriously, having fun is what it is all about, and your BGE will provide tons.
Glad you are in!"Knowledge is Good" - Emil Faber
XL and MM
Louisville, Kentucky -
Welcome. Great table build!!Charlotte, NC - Large BGE 2014, Maverick ET 733, Thermopen, Nest, Platesetter, Woo2 and Extender w/Grid, Kick Ash Basket, Pizza Stone, SS Smokeware Cap, Blackstone 36"
-
Good looking table. I did similar supports under my egg. Worked great for me so far.Aledo, Texas
Large BGE
KJ Jr.
Exodus 12:9 KJV
Eat not of it raw, nor sodden at all with water, but roast with fire; his head with his legs, and with the purtenance thereof. -
Welcome. Great detailed table build !!! Those ribs don't look to shabby either. Have fun and enjoy..Greensboro North Carolina
When in doubt Accelerate.... -
Welcome and great looking table. It's also nice to see a fellow Saluki in the house! Where are you located?Large and Small BGECentral, IL
-
I'm currently living in South Bend, IN. Go Dawgs!
-
-
That's a great build man! Nice work and thanks for sharing. Do you have a link with the plans and materials you used? This is exactly what I was trying to do
-
Did you stain and seal the table? Polyurethane? How well will the pine hold up? I've heard a lot of eggers are using cypress or cedar for longevity. Thanks again. Table looks great!
-
@Cojak52 I chose to use pine for a few reasons: 1) it is cheap, I have right around $100 in this table build. 2) I wasn't sure if I would prefer a different set up or more space etc in the future so another reason for me to keep it cheap 3) this table is stored in my garage so the only time it will have to endure the "elements" is while I am actually using the egg.
I did stain the table and then seal it with Spar Urethane. Urethane is meant for outdoor use whereas Polyurethane is more geared toward interior surfaces.
Here are my general plans I made prior to building via PowerPoint so they are not to scale just wanted to get the measurements out of my head and onto a screen:

A few notes about the measurements:
-The 4x4 legs are 30", that measurement on the plans does not depict the overall height of the table.
-The egg shelf dimension ended up being 16.5" which I would suggest as opposed to 17" if you are using a 21" hole.
If you have any other questions about it feel free to ask, I would love to help.


Categories
- All Categories
- 184.1K EggHead Forum
- 15.8K Forum List
- 460 EGGtoberfest
- 1.9K Forum Feedback
- 10.4K Off Topic
- 2.2K EGG Table Forum
- 1 Rules & Disclaimer
- 9K Cookbook
- 13 Valentines Day
- 93 Holiday Recipes
- 224 Appetizers
- 520 Baking
- 2.5K Beef
- 88 Desserts
- 167 Lamb
- 2.4K Pork
- 1.5K Poultry
- 33 Salads and Dressings
- 324 Sauces, Rubs, Marinades
- 548 Seafood
- 175 Sides
- 122 Soups, Stews, Chilis
- 44 Vegetarian
- 102 Vegetables
- 313 Health
- 292 Weight Loss Forum