Welcome to the EGGhead Forum - a great place to visit and packed with tips and EGGspert advice! You can also join the conversation and get more information and amazing kamado recipes by following Big Green Egg to Experience our World of Flavor™ at:
Want to see how the EGG is made? Click to Watch
Facebook | Twitter | Instagram | Pinterest | Youtube | Vimeo
Share your photos by tagging us and using the hashtag #BigGreenEgg.
Share your photos by tagging us and using the hashtag #BigGreenEgg.
Want to see how the EGG is made? Click to Watch
New Gasket & Hinge/Band Installation with pics

ChrisgrillsSTLMO
Posts: 401
Greetings-
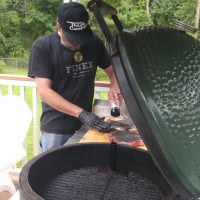
First of all, big thanks to @NPHuskerFL and @RRP for their pictures, instructions, and guidance in doing this project; I couldn't have done this without them. My hinge had gotten so out of whack that I had almost no contact between the dome and the base; I got a replacement from my dealer with a warranty claim. So while I was going to have to replace the hinge/bands I figured it was a good time to replace the factory gasket with a nice Rutland gasket. Ron came through and delivered it to my door quite quickly with the great instructions. So I laid out the tools and new bands...

And then removed the lid and old bands/hinge and went to work removing the old gasket and adhesive. This took a fair amount of elbow grease and determination, I think I got down to the ceramic pretty well, it felt pretty smooth.


Ron's idea of marking the new gasket at the 1/4 points was a big help, I would also say that doing a couple of practice runs of scrunching the gasket together to see how it will play out on the Egg was a good idea. It seemed that the gasket developed a bit of a memory of the curvature of the Egg, making it easier to make the gasket follow the rim of the Egg when I did start using the adhesive. I did three practice runs to make sure I knew how to hold the gasket and apply adhesive at the same time and then push the gasket into the bed of adhesive. I also made sure I had enough gasket to make it all the way around noting how wide the new gasket should be to make it all the way around. I cut notches into a plastic trowel to help create the bed of adhesive (@NPHuskerFL tip).

At the end of the installation I had ZERO gasket left over, which seemed a little unusual based on what others have posted, but no way to fix it now")

Then I (carefully) placed the dome back on the base with parchment paper between to prevent sticking.

After curing for 24 hours (ok a week later, work was crazy busy and we had lots of rain) came the installation of the new bands/hinge. I used the video on the Mothership website and NPHuskerFL's tips. I found that you only need the four spacers to hold the hinges in place, any more and it was tough to get the dome on the same plane as the base. The picture below was taken with 5 in place and I had to readjust with just 4 spacers due to a big gap just in front of the hinge.

With everything tightened down the bands had the same spread on the top and bottom.

After the hour long burn at 400° as recommended by Ron I had no leaks and it stayed in alignment, no underbite that I could detect. I used my old handle, 'cause, well, I had it broken in just right and now I have a spare.")

Three cooks in and no problems thus far. Looking forward to the holiday season with my upgraded Egg. Thanks for reading, hope this helps you be successful doing the same operation.
Cheers,
First of all, big thanks to @NPHuskerFL and @RRP for their pictures, instructions, and guidance in doing this project; I couldn't have done this without them. My hinge had gotten so out of whack that I had almost no contact between the dome and the base; I got a replacement from my dealer with a warranty claim. So while I was going to have to replace the hinge/bands I figured it was a good time to replace the factory gasket with a nice Rutland gasket. Ron came through and delivered it to my door quite quickly with the great instructions. So I laid out the tools and new bands...
And then removed the lid and old bands/hinge and went to work removing the old gasket and adhesive. This took a fair amount of elbow grease and determination, I think I got down to the ceramic pretty well, it felt pretty smooth.
Ron's idea of marking the new gasket at the 1/4 points was a big help, I would also say that doing a couple of practice runs of scrunching the gasket together to see how it will play out on the Egg was a good idea. It seemed that the gasket developed a bit of a memory of the curvature of the Egg, making it easier to make the gasket follow the rim of the Egg when I did start using the adhesive. I did three practice runs to make sure I knew how to hold the gasket and apply adhesive at the same time and then push the gasket into the bed of adhesive. I also made sure I had enough gasket to make it all the way around noting how wide the new gasket should be to make it all the way around. I cut notches into a plastic trowel to help create the bed of adhesive (@NPHuskerFL tip).
At the end of the installation I had ZERO gasket left over, which seemed a little unusual based on what others have posted, but no way to fix it now
Then I (carefully) placed the dome back on the base with parchment paper between to prevent sticking.
After curing for 24 hours (ok a week later, work was crazy busy and we had lots of rain) came the installation of the new bands/hinge. I used the video on the Mothership website and NPHuskerFL's tips. I found that you only need the four spacers to hold the hinges in place, any more and it was tough to get the dome on the same plane as the base. The picture below was taken with 5 in place and I had to readjust with just 4 spacers due to a big gap just in front of the hinge.
With everything tightened down the bands had the same spread on the top and bottom.
After the hour long burn at 400° as recommended by Ron I had no leaks and it stayed in alignment, no underbite that I could detect. I used my old handle, 'cause, well, I had it broken in just right and now I have a spare.
Three cooks in and no problems thus far. Looking forward to the holiday season with my upgraded Egg. Thanks for reading, hope this helps you be successful doing the same operation.
Cheers,
Chris
St. Louis, MO
Unit 1: LBGE, cedar table Unit 2:Akorn
St. Louis, MO
Unit 1: LBGE, cedar table Unit 2:Akorn
Comments
-
Thanks for your post, Chris! I'm sure it will be of help to others on their journey with hassle free years of gasket problems! Myself and others have a ten year head start on you!Re-gasketing the USA one yard at a time
-
Great tutorial! How long should you go until you replace the gasket? Mine has seen heavy long use in long cooks."Knowledge is Good" - Emil Faber
XL and MM
Louisville, Kentucky -
Cool deal. Glad it worked out for you.LBGE 2013 & MM 2014Die Hard HUSKER & BRONCO FANFlying Low & Slow in "Da Burg" FL
-
I went gasket less for 2 years. No timetable sir. But the Rutland is nice for sureYukonRon said:Great tutorial! How long should you go until you replace the gasket? Mine has seen heavy long use in long cooks.Columbia, SC --- LBGE 2011 -- MINI BGE 2013 -
I haven't done this yet - I have installed the new rutland but haven't installed my new band that I got through a warranty claim due to the fact that the spacers I thought would only work if u used the old gaskets? the rutland is only on the bottom and the spacers would only work with 2 gaskets (top and bottom). However, from your tutorial it seems like that doesn't matter?
-
I had no issue using the red spacers with just the Rutland, it seemed to let the dome settle a little closer to the base, making an even tighter fit once the bands were tightened. Hope that helps!blakeas said:I haven't done this yet - I have installed the new rutland but haven't installed my new band that I got through a warranty claim due to the fact that the spacers I thought would only work if u used the old gaskets? the rutland is only on the bottom and the spacers would only work with 2 gaskets (top and bottom). However, from your tutorial it seems like that doesn't matter?
Cheers,
Chris
St. Louis, MO
Unit 1: LBGE, cedar table Unit 2:Akorn -
Mine seem to be in bad shape on the XL. My MM is still doing great. For some reason I thought it might be the other way around.Chubbs said:
I went gasket less for 2 years. No timetable sir. But the Rutland is nice for sureYukonRon said:Great tutorial! How long should you go until you replace the gasket? Mine has seen heavy long use in long cooks."Knowledge is Good" - Emil Faber
XL and MM
Louisville, Kentucky -
This is a very helpful post. I bought my rutland in March (thanks again @RRP
!!) and *intend* to install it tomorrow. This time I really mean it! I may document the job, but then again . . . maybe not. Looking most forward to *carefully* getting down to the ceramic with the recommended 3M stripper, which has been sitting in my garage with the other rutland stuff since Spring. If anyone sees this and has thoughts/suggestions for proper use, feel free to post it up.
It's a 302 thing . . . -
Do you still have the set of instructions I sent with the gasket? May I suggest that you re-read them to refresh your memory? As for using the 3M wheel it will work quickly and you need not horse it! Let the wheel do the work! Just remember my warning about the removal being messy.HendersonTRKing said:This is a very helpful post. I bought my rutland in March (thanks again @RRP
!!) and *intend* to install it tomorrow. This time I really mean it! I may document the job, but then again . . . maybe not. Looking most forward to *carefully* getting down to the ceramic with the recommended 3M stripper, which has been sitting in my garage with the other rutland stuff since Spring. If anyone sees this and has thoughts/suggestions for proper use, feel free to post it up.Re-gasketing the USA one yard at a time -
I do have the instructions! Will stare at them for a bit and then commence work. Thanks again for the support! (And the reminder about the mess -- will either lay down a tarp and/or remove the egg from the paver patio. Looking forward to not only owning a rutland, but to actually egging with it!RRP said:
Do you still have the set of instructions I sent with the gasket? May I suggest that you re-read them to refresh your memory? As for using the 3M wheel it will work quickly and you need not horse it! Let the wheel do the work! Just remember my warning about the removal being messy.HendersonTRKing said:This is a very helpful post. I bought my rutland in March (thanks again @RRP
!!) and *intend* to install it tomorrow. This time I really mean it! I may document the job, but then again . . . maybe not. Looking most forward to *carefully* getting down to the ceramic with the recommended 3M stripper, which has been sitting in my garage with the other rutland stuff since Spring. If anyone sees this and has thoughts/suggestions for proper use, feel free to post it up.It's a 302 thing . . . -
I got my gasket from Ron at the end of July. I just installed it after seeing this thread. Used the Egg for about 8 months without the gasket. Cooking without the gasket was about the same. My issue was shutting down the Egg. Without a tight seal the lump would still burn.


Categories
- All Categories
- 184.1K EggHead Forum
- 15.8K Forum List
- 460 EGGtoberfest
- 1.9K Forum Feedback
- 10.4K Off Topic
- 2.2K EGG Table Forum
- 1 Rules & Disclaimer
- 9K Cookbook
- 13 Valentines Day
- 93 Holiday Recipes
- 224 Appetizers
- 520 Baking
- 2.5K Beef
- 88 Desserts
- 167 Lamb
- 2.4K Pork
- 1.5K Poultry
- 33 Salads and Dressings
- 324 Sauces, Rubs, Marinades
- 548 Seafood
- 175 Sides
- 122 Soups, Stews, Chilis
- 44 Vegetarian
- 102 Vegetables
- 313 Health
- 292 Weight Loss Forum