Share your photos by tagging us and using the hashtag #BigGreenEgg.
Want to see how the EGG is made? Click to Watch
BGE Cabinet Completed & Checked Out


As promised, I wanted to share my design thoughts and lessons learned from my table build. As noted in an earlier post (posted under browntw79), I was inspired to go crazy after seeing the tables of @cazzy and @PMG. I was especially impressed with @PMG’s build pictures. When I decided that I needed to replace my existing table I also decided to document the build for future wood working enthusiast that might be looking to build a BGE table. Besides a few pages of rough sketches and dimension calculations I had no real plans other than some ideas. I started with some simple specifications for this project to include:
- Can bear the weight of the concrete pad and the BGE
- Table height of about 36” (personal preference)
- Fits under a custom cover I had made for original stand
- Fits within the deck bump out space (76” wide)
- Is mobile enough to move around the deck
- Has 3 to 4 drawers
- Has an area that could take hot items without damaging the wood
The Frame (aka the Skeleton): I used stock pressure treated 2x4 lumber that I selected for straightness. The PT lumber was extremely wet when I started with some of the 8 footers weighing close to 20 pounds. I calculated the height of the BGE shelf with the plan of using a 16x16 inch concrete paver block. My first revelation was this was quickly getting to be extremely heavy. I used my Festool Domino 500Q jointer for all the frame joints with 10 x 50mm exterior grade Dominos. All the joints were glued using Titebond III wood glue. Even with the wet wood the glue appeared to create a solid bond. Most of the joints include a long decking screw as well to hold them tight as the glue dried.
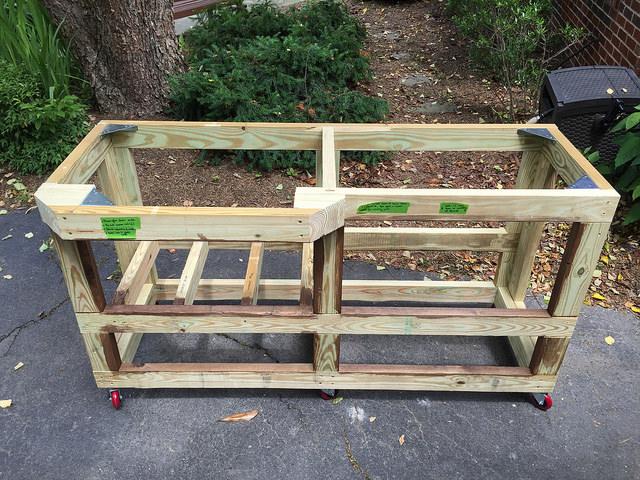
Redesign Note: The largest weight bearing section of the table is the “cube” under the Egg. If I were to do the design over I would use PT 1x4 for all the framing and only use 2x4 for the BGE shelf cube.
Exterior Wood: After consulting with my local hardwood supplier (Colonial Hardwood in Springfield, VA) I selected to go with African Sapele that is a member of the mahogany family. It is very dense weighing about 3.4 pounds per board foot (similar to red oak). As you can see the featuring in the wood is stunning. I had the mill shop plane and sand the boards I selected. Started with a purchase of 100 bf based on some of those scribbled calculations. I actually was pretty close to being correct. All the boards were milled down to ¾” thickness. I did end up going back to Colonial for a couple more pieces for the top and had them milled to 7/8” (which created another problem down stream).

For the Exterior Walls I decided to make 3 1/4” wide wanes coat slats with a V-notched tongue and groove that interlock on the sides and are tacked at the top and bottom with galvanized staples. The effect of the wanes coating turned out very nice with the v-notch breaking up the visual difference between boards.

The Face Frame was fairly straightforward to assemble after I decided on the dimensions of the pieces. Because I was covering “the Skeleton” I had to make some of the pieces wider than I would prefer. I literally sat in front table one night for hours clamping on various sizes of boards to see what worked best. I decided on making the two outside vertical pieces the same width for symmetry and I eliminated the cross member on “the skeleton’s” right side.

Note: I stained the concrete block with some walnut stain to allow it to blend into the cabinet better.
The Drawers: Once the face frame was completed I knew the opening dimensions so I could work the drawers. Last December I rebuilt all my drawers in our kitchen using half blind dovetails for the 5/8” maple boxes with a birch bottom. I repeated this design for this table and used the Blum Tandem concealed full extension sliders with Blumotion (soft close) feature for all the drawers. The slides are spec’d for up to 100 lbs so holding Eggcessories is no problem. For the fronts, I had set aside some select pieces for appearance. The fronts are simply rounded over with a 3/8” round-over bit and drilled for the stainless steel (288mm center-to-center) handles. I have lined three of the drawer bottoms with a cork sheeting and the fourth with a non-slip kitchen drawer liner. I will watch the drawers over time for any evidence of water damage. I’m hoping to keep most water out of the drawer using three methods . . . .
- Keep it covered with my Sunbrella custom cover (unfortunately my supplier is out of business)
- Wide lip on the top (2 ½ inches at the front)
- Metal flashing over the left drawer (below the concrete block)

For the Top I wanted two layers to form a 1 ½” top more for visual effects than strength. At $8.00 bf (milled) I didn’t want to waste Sapele wood on the bottom layer. I decided to build a frame for the bottom and then fill it in with cheaper poplar. But I knew I wanted it to appear like two layers of Sapele at the opening for the Egg as well. This ended up proving to be time consuming and tricky. In the end wasting $8.00 bf for the center “core” might have been more economical. On the top layer I needed only to factor in the framed area for the four granite tiles. Once completed, I cut the circle for the Egg opening (based on calculations). Next was time for finishing.


Finish: I started with sanding everything with 220 grit paper. Then I applied two coats of Watco Teak Oil finish followed by two coats of marine grade spar vanish. For the top I applied three coats but was not satisfied with the sheen. I ended up lightly sanding it with 220 grit sandpaper and then spraying on two additional thin layers of spray vanish. I am very please with the results.
LED Lighting: I noticed several members had included various forms of lighting on their Egg. I selected an outdoor 3528 daylight white LED tape. I routed in a channel following the contour of the front edge and inserted bright white LED lights tied into a dimmer remote. This provides great lighting at night to see in the drawers as well as an impressive visual effect at night.

Post Fit Check Modifications: I dropped my large BGE in on Friday evening and opened it for the first time. Ouch! I had interference under the hinge marring that fine finish. Crap! Remember when I changed the thickness of the top’s upper layer? Clearly I didn’t. I ended up removing the concrete block and shimming it up and reinstalling the entire Egg. I also was uncomfortable with the Egg opening and decide to cut out an additional ½” of radius. At 21 ¾” diameter it provides me with ¾” to 1” of an air gap around the Egg. I have also noticed the casters are hard to get rolling. I might be switching them out for a set of 2” solid steel casters.
Water Test: On the 4th of July, during my first smoke, the heavens above my house opened up and poured on my new creation during the smoke. Surprisingly, there was only minimal water in the left drawer (my son claimed it was because I peaked three times) and none in the right drawers. Design success?!?! We will see.

Final Specifications:
Length: 71 ½”
Depth: 33”
Height: 37”
Weight: Very Heavy (estimate 400 to 500 lbs)
Power:
- 120V outlet located inside near top drawer
- 12V for LED Lighting
- 5V for Stoker controller
Supplies List (Suppliers):
- 10 – 2” x 4” pressure treated pine (Home Depot)
- 120 board feet – African Sapele (Colonial Hardwood)
- 8 board feet – Poplar (Home Depot)
- 20 board feet – Maple (Home Depot)
- 4 – 12” x 12” Granite tiles, Ubatuba (Floors & Decors)
- ¼” Backerboard (Home Depot)
- Black silicone caulk (Floors & Decors)
- 12V Flexible LED Strip Lights with power supply & RF dimmer (Amazon)
- Big Green Egg large table nest
- Custom Walnut Handle (AMLWoodart.com)
- Tongue and Groove V-Notch Router Bit set (Amazon)
- Festool Domino tenons, Sipo Mahogany (Local Woodcraft Store)
- Polished Stainless Steel Starr “X” bottle opener (Amazon)
- 6 – 3 inch 150-pound swivel polyurethane plate casters (Amazon)
- 4 pairs of 21” Blum Tandem with Blumotion 563H sliders (Amazon)
- 6 - Stainless Steel hooks (GreenBoatStuff.com)
- 4 - Stainless Steel handles, 288mm center-to-center (CabinetParts.com)
- 1 quart of Watco Teak Oil Finish (Home Depot)
- 1 quart of System Three Marine Spar Varnish, Satin (Local Woodcraft Store)
Please check out the photos of all stages of the build on my Flickr page.
Enjoy and good luck with any new builds this inspires! Feel free to post questions or PM me.
Cheers!
Tom
P.S. I managed to post this under my @browntw79 persona by accident; I meant to post it using my @EggHeadDad account. Oops! Too much beer last night perhaps?

Springfield, VA
Egghead Since 2010
Comments
-
When can you come south an build me one?
LBGE since 2014
Griffin, GA
-
That's a fantastic looking table man! Thanks for all of the great detail you put into this post. I really enjoyed reading about your project. I don't think I could tackle that but I'm glad other people have woodworking skills that I don't have!1 large BGE, Spartanburg SC
My dog thinks I'm a grilling god. -
Freaking beautiful man! All the more impressed that you did it yourself. Great pics and write-up too!
I would consider putting some fire cloth (think that is the name) under the stone. Even with my custom stand, I have nice dark spot on the base under my large. Your paver will get hot and uniformly heat the base underneath. Through time, this "could" slowly become a problem. Better safe than sorry to protect your beautiful table!
Again, incredible job man!! Just a hack that makes some $hitty BBQ....
 -
Thanks. Yours was the first stand that caught my eye and got my creativity juices flowing. Thanks for the suggestion on the fire cloth. I have seen it in Home Depot near the welding supplies. Sounds like a project for next weekend.cazzy said:
I would consider putting some fire cloth (think that is the name) under the stone.Tom
Springfield, VA
Egghead Since 2010 -
Check with @PMG as I think he has tried a couple things. I think he even got stainless trays, but I would avoid metal as that just transfers heat. You need something to absorb heat.browntw79 said:
Thanks. Yours was the first stand that caught my eye and got my creativity juices flowing. Thanks for the suggestion on the fire cloth. I have seen it in Home Depot near the welding supplies. Sounds like a project for next weekend.cazzy said:
I would consider putting some fire cloth (think that is the name) under the stone.Just a hack that makes some $hitty BBQ.... -
The BGE stand has the bottom off the concrete by about 1.5 to 2 inches and has plastic tips on the ends in contact with the pad. I plan on monitoring the temperature inside the cabinet and at the stone for the first few cooks.cazzy said:
Check with @PMG as I think he has tried a couple things. I think he even got stainless trays, but I would avoid metal as that just transfers heat. You need something to absorb heat.browntw79 said:
Thanks. Yours was the first stand that caught my eye and got my creativity juices flowing. Thanks for the suggestion on the fire cloth. I have seen it in Home Depot near the welding supplies. Sounds like a project for next weekend.cazzy said:
I would consider putting some fire cloth (think that is the name) under the stone.Tom
Springfield, VA
Egghead Since 2010 -
-
So many of you people are so blasted talented! Awesome.Best - Jack
-
Beautiful table and nicely documented. Thanks for sharing. Enjoy it.
Aledo, Texas
Large BGE
KJ Jr.
Exodus 12:9 KJV
Eat not of it raw, nor sodden at all with water, but roast with fire; his head with his legs, and with the purtenance thereof. -
That is a thing of beauty, sir. Can you build me one for my XL?XL, WSM, Coleman Road Trip Gas GrillKansas City, Mo.
-
The wife says no business . . . she wants her garage back.Ladeback69 said:Can you build me one for my XL?") Tom
Tom
Springfield, VA
Egghead Since 2010 -
That's ok. I have some good ideas, just need to get to work on them. My truck would sit outside and leave room for the wife's car for sure.browntw79 said:
The wife says no business . . . she wants her garage back.Ladeback69 said:Can you build me one for my XL?XL, WSM, Coleman Road Trip Gas GrillKansas City, Mo. -
ummm, okay...wow!! Very nicely done. I know enough about wood working to be dangerous. I could never pull that off without losing my mind first. Nice job.
Fish, Hunt, Cook....anything else?
1LBGE, 1MMBGE, somewhere near Athens GA -
Beautiful craftsmanship - world class! Too nice to leave that sucker outdoors.
I sure hate to see the egg closed in on 3 sides though, just seems like an invitation for trouble due to heat buildup. -
Fantastic!
- Bettendorf, Ia with lots of time in Chattanooga, Tn. LBGE, plate setter, ar, Looft lighter, maverick et-735, Rutland gasket, Smokeware SS cap, Kickash basket, and lots of cast iron.
-
-
-
great write up, love to see a nighttime shot with the leds !!
Tulare, CA - Large BGE -
Thanks for posting your build! I looked at your flickr page the other day and it's a very good looking build. Reminds me that I need to buy a bunch more clamps. But you did a dang fine job on the table AND the writeup.
Edit: Almost forgot... I'd be shocked if you have any heat issues since you are running a table nest on top of masonry. Apply a heat blanket under there if it makes you feel better but I just can't see the need with that air gap and the thickness of your block. It should have no problem absorbing and dissipating the convective heat off the legs. -
One of the nicest tables I have ever seen. I would love to see a picture of it at night with the LED lights on.1 XXL BGE, 1 LG BGE, 2 MED. BGE, 1 MINI BGE, 1 Peoria custom cooker Meat Monster.Clinton, Iowa
-
Thanks. I'm going to be monitoring the temperatures over the next few cooks to see the effects of the heat.Spaightlabs said:Beautiful craftsmanship - world class! Too nice to leave that sucker outdoors.
I sure hate to see the egg closed in on 3 sides though, just seems like an invitation for trouble due to heat buildup. -
Ivanhoe said:great write up, love to see a nighttime shot with the leds !!

That is taken with no flash. Really hard to tell but they are really bright. -
More pictures with LEDs on taken near dusk.

The lights only become more effective the darker it gets. They are actually distractingly bright when it's fully dark so the dimmer is a nice feature for toning the brightness down.
Lights the drawer up very well.
-
@Ivanhoe - here are some additional LED pictures for you.
-
That's one bada** table. Wish I had the woodworking skills to create that!
-
Where's the dimmer controls located?Aledo, Texas
Large BGE
KJ Jr.
Exodus 12:9 KJV
Eat not of it raw, nor sodden at all with water, but roast with fire; his head with his legs, and with the purtenance thereof. -
This is one of, if not the nicest table I have seen to date. Great job!LBGE | DigiQ | SW Cap | KAB | iGrill2 | CI PS | PSWoo2 | HQ Grid | Extender
Mini Max | PartyQ | KAB | CGW 2-Tier (Mod) | Woo w/Stone | SW Cap (mod) | CI13
Location: NoVA -
-
One of the nicest tables I have seen... My BGE XL will be delivered next week and the table is the main thing I want to compliment it with.... Great ideas on here. Love the LED's... About how much did it run to construct?
-
That is crazy beautiful, and the LEDs are awesome!


Categories
- All Categories
- 183.3K EggHead Forum
- 15.8K Forum List
- 460 EGGtoberfest
- 1.9K Forum Feedback
- 10.4K Off Topic
- 2.2K EGG Table Forum
- 1 Rules & Disclaimer
- 9K Cookbook
- 12 Valentines Day
- 91 Holiday Recipes
- 223 Appetizers
- 517 Baking
- 2.5K Beef
- 88 Desserts
- 167 Lamb
- 2.4K Pork
- 1.5K Poultry
- 32 Salads and Dressings
- 320 Sauces, Rubs, Marinades
- 544 Seafood
- 175 Sides
- 121 Soups, Stews, Chilis
- 38 Vegetarian
- 102 Vegetables
- 315 Health
- 293 Weight Loss Forum