Welcome to the EGGhead Forum - a great place to visit and packed with tips and EGGspert advice! You can also join the conversation and get more information and amazing kamado recipes by following Big Green Egg to Experience our World of Flavor™ at:
Want to see how the EGG is made? Click to Watch
Facebook | Twitter | Instagram | Pinterest | Youtube | Vimeo
Share your photos by tagging us and using the hashtag #BigGreenEgg.
Share your photos by tagging us and using the hashtag #BigGreenEgg.
Want to see how the EGG is made? Click to Watch
Best way to cook Chuck Pot Roast on EGG

Luscombe
Posts: 34
Hi All,
I got carried away at Costco yesterday :silly: while shopping for Christmas dinner. I picked up a 6# chuck pot roast because it looked terrific.
I am not sure of the best way to prepare it and would like some suggestions from those who have cooked this cut before. Let me know what has worked for you. I could do it in the dutch oven, cast iron skillet or low and slow.
Thanks in advance.
Gary
Comments
-
this one is pretty popular::
Beef, Roast, Pot, Grandpas Grub
The how too's... Topless (no lids allowed) DO Pot Roast. This is a longer read but a very easy method. The following is a great Dutch Oven (D0) pot roast recipe OR fantastic for making sub sandwiches. There are notes at the end for changes when making sub’s. The egg makes it all that much better.
1 boneless chuck-eye roast apx. 3 1/2 pounds ( I don’t worry too much about the cut but I try to get a large piece)
2 tsp vegetable oil
1 medium onion, chopped (up to 3 onions see note)
6 red potatoes quartered (or baker potatoes)
2 medium garlic cloves, minced or pressed
1 cup low-sodium chicken broth ( I use as needed see note)
1 cup low-sodium beef broth ( I use as needed see note)
1 small celery rib, chopped medium
1 sprig fresh thyme ( or 1/2 tsp thyme)
1 small carrot, chopped medium (2 or 3 see note)
2 tsp sugar
1 – 1 1/2 cup water
1/4 cup dry red wine (optional – I don’t use) I use more broth
Note: If there is enough room in my DO I will add more onion, potatoes, carrots and more chicken & beef broth in equal amounts. The veggies will be as good as the finished roast and will add great flavor to the resulting gravy or juice depending on what y
1 Pat meat dry with paper towels
2 Salt (natural or kosher) and ground pepper (as fresh as you can get) generously.
3 Put DO on egg (or stove top). Heat the oil (not to smoke point) and brown the meat on all sides apx 7 minutes each side. At times I will sear the meat I like the ‘goodies’ in the bottom of the DO which will add great flavor in the cook.
4 Transfer the meat to a plate and set aside. Your egg should be about 300° grid (or stabilized dome at about 330°) the grate temp is what’s important here.
5 Put the DO on the egg. You may need to add a little more vegetable oil or (EVOO) to the pan. Add the onions, carrots and potatoes to the DO. Cook with some occasional stirring for about 7 minutes – soften the vegies. Push the mix away from a spot in the center of the pan.
6 Add the sugar and garlic to the bare spot with continuous stirring for about 30 seconds – we don’t want the garlic/sugar to burn. Add some of the chicken/beef broth and thyme. Scrape the bottom of the DO with a wooden spoon to loosen those browned bits.
7 Add the roast to the DO add enough chicken, beef broth & water up to the center of the meat. All veggies should be covered with the liquid. You will have pre judge to see how many veggies to add and brown in the previous step.
8 Your egg setting is set to maintain 300° at the grid level, don’t play with the vents as it is going to take some time for the egg to bring the liquid up to our desired 300°. We do not want the mixture boiling just a simmer (almost but not boiling).
9 At any point add your flavor wood if you are going to use it, I like cherry. Do not lid the DO.
10 The following takes me about 5 to 6 hours to complete.
11 Cook for about 1 hour. Making sure you are not at a boil and the liquid is still at about ½ way up the meat. Grid temp at 300° If you feel you need to, you can turn the meat. Check the liquid level and let cook another hour. Turn the roast and let cook another hour.
12 Now at the 3 hour point.
13 Check liquid levels and meat temp – don’t panic here as you can’t over cook with this method. At this point begin to pay more attention to the meat temps.
14 We want to get the meat to a target meat temp of 210° and to cook at that temp for 1 hour for me this takes another 1 to 3 hours. The time is not all that critical, it is critical to let the meat get to 210° and cook for an hour.
15 You can begin to check the meat tenderness at any time. We are looking for it to be very easy to insert a fork or knife in the meat with very little or no resistance. The meat will literally cut with a spoon.
16 When done remove the DO from the egg (leave vent settings alone for now unless you want to complete over the stove). Pull the meat and set aside, tent or wrap in AF depending on eat time.
17 Remove the veggies from the DO they will be extremely soft and flavorful. Now while the liquid is warm add S&P to taste. Let the liquid sit for awhile and spoon off any grease (I seldom find much grease).
18 What you do from here will depend on what your cooking intent is.
19 For gravy, use a roux (mix warm water to corn starch or flour) then add the roux to the liquid to make gravy. You will need to bring the entire mixture to a boil to thicken so keep stirring so you don’t burn the liquid.
20 OR if making sandwiches/subs:
21 S&P to taste and keep cooking to reduce the liquid to get a very rich and flavorful taste for the subs. You may want to thicken the liquid a little with a roux to give some body to the juice.
22 Notes for making subs…
23 For vegetables use more onions (4 or 5) & slice, no potatoes, carrots 1 and dice small, celery 1 rib and dice very small or cut in 3rds and remove and toss when pulling the meat.
24 I will leave it to you on how you want to build the sandwich other than to say if you want less of a soggy bun use mayo or butter as a moisture barrier for the liquid in the meat. If you want soggy sandwich’s then add more juice as the bread will have a tendency to take the moisture out of the meat.
25 S&P the onion (veggies) to taste before building sandwich’s. Use a good amount of your favorite cheese mozzarella mixed with other cheeses is great.
26 The juice will add great flavor to the sub.
Recipe Source
Author: Grandpas Grub
Source: BGE Forum on 2008/09/06happy eggin
TB
Anderson S.C.
"Life is too short to be diplomatic. A man's friends shouldn't mind what he does or says- and those who are not his friends, well, the hell with them. They don't count."
Tyrus Raymond Cobb
-
Thanks tb!
I like the sound of that recipe. We will have a lot of family for the Holidays so I think I will use the DO and do sandwiches.
Last year I did Cuban sandwiches on Ciabatta and everyone loved them. I'll mix it up this year.
Gary -
you got room for more? :laugh:
happy eggin
TB
Anderson S.C.
"Life is too short to be diplomatic. A man's friends shouldn't mind what he does or says- and those who are not his friends, well, the hell with them. They don't count."
Tyrus Raymond Cobb
-
Hey Guys! I'm doing that exact cook right now. Sort of improvising a little. I don't have a DO yet (have a feeling Santa might help me out in a few weeks
") ), so had to use an aluminum pan/pot from my turkey frier. Made browning a little difficult, but it's out there simmering right now. May have some pics later.
), so had to use an aluminum pan/pot from my turkey frier. Made browning a little difficult, but it's out there simmering right now. May have some pics later.
Brian in Wernersville, PA -
If you are in Cumming, GA, stop by!
")
-
You can always brown inside to make life easier. good luck to you. Tom
-
Ok, that's a penalty!

Teasing with the promise of maybe showing pictures of a cook we are talking about, that's gotta be unnecessary celebration or something. :silly:
Submit the pictures and nobody will get hurt :P
Gary -
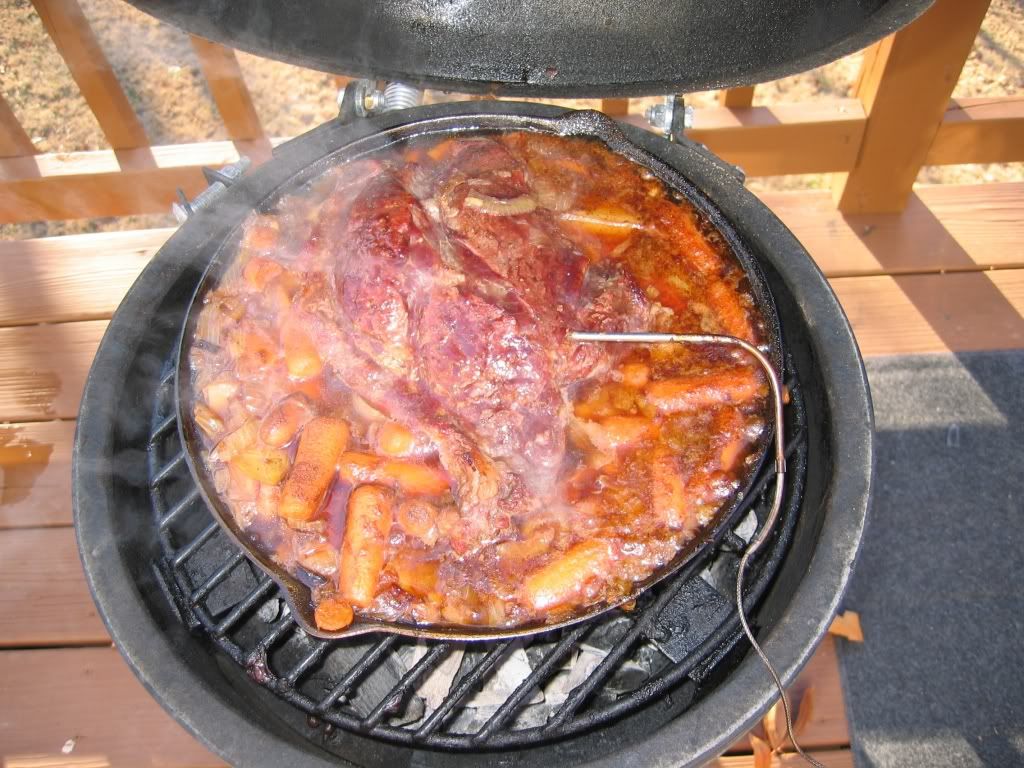
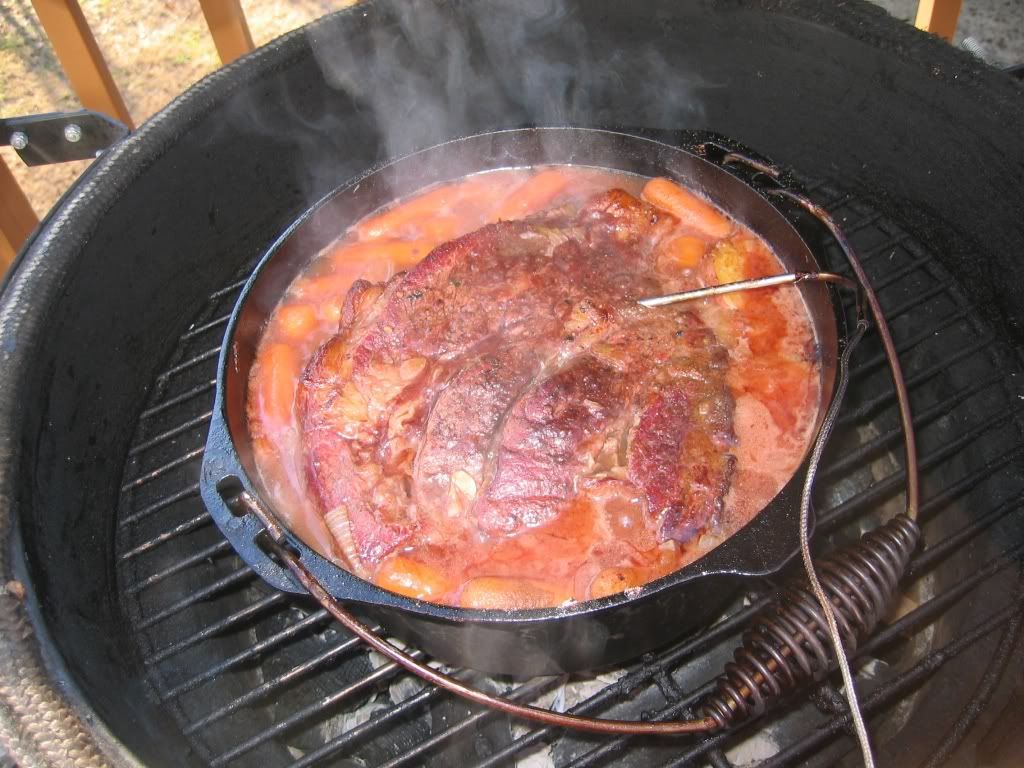
Never one to disappoint.....Pics will come up after dinner
Brian -
The Grandpas Grub recipe works great if it is a fairly well marbled piece of meat.
I got a couple chuck roasts that were quite lean- came out tasty, but kind of tough on the first one. With a few suggestions from here on the board, the second went into the DO with a large can of diced tomatoes, onion, Italian seasonings and red wine- lots of acid. It came out great, just not the usual brown gravy pot roast.
Good luck with yours.
Al -
Al,
Thanks for the suggestions. The slab I have is well marbled so I hope to be ok.
If it is really good, I will do more.
Gary -
Couple of Chuck Roasts cooking now.
Thanks
Using Grandpa Grubs' recipe


Categories
- All Categories
- 184.1K EggHead Forum
- 15.8K Forum List
- 460 EGGtoberfest
- 1.9K Forum Feedback
- 10.4K Off Topic
- 2.2K EGG Table Forum
- 1 Rules & Disclaimer
- 9K Cookbook
- 13 Valentines Day
- 93 Holiday Recipes
- 224 Appetizers
- 520 Baking
- 2.5K Beef
- 88 Desserts
- 167 Lamb
- 2.4K Pork
- 1.5K Poultry
- 33 Salads and Dressings
- 324 Sauces, Rubs, Marinades
- 548 Seafood
- 175 Sides
- 122 Soups, Stews, Chilis
- 44 Vegetarian
- 102 Vegetables
- 313 Health
- 292 Weight Loss Forum