Welcome to the EGGhead Forum - a great place to visit and packed with tips and EGGspert advice! You can also join the conversation and get more information and amazing kamado recipes by following Big Green Egg to Experience our World of Flavor™ at:
Want to see how the EGG is made? Click to Watch
Facebook | Twitter | Instagram | Pinterest | Youtube | Vimeo
Share your photos by tagging us and using the hashtag #BigGreenEgg.
Share your photos by tagging us and using the hashtag #BigGreenEgg.
Want to see how the EGG is made? Click to Watch
1/4 inch space between the grate and firebox for better cooking

Darnoc
Posts: 2,661
This is a must try for everyone.First off my grate is concave/convex depending upon which side you put your grate down.I tried to use the bolts which were recommend to be four inch bolts on the large.Because my grate was so warped I did a jury rig to obtain the 1/4 inch gap between the grate and the firebox.I just put three 1/4 inch bolts with a nut on the top of the bolt and put them at a 4/8/12 o'clock position.I then lowered the grate and put the bolts with the nut above the grate times three.Then pushed the bolts down on top of the grate to keep it level.I use a weed burner to start the lump but let me tell you this is the first time that I had a full spread of hot coals going on all 18" wide.I also found that the vents do not have to be open as much as in prior cooks.My bottom vent was open 1/4' and the daisy 1/2way open and held a steady 350 degree temp through the cook.This set up seems to a minimal amount of extra lump but I might be wrong on that count.The big thing that was immediately apparent was the faster time time it took to get up to temperature and the main thing was the absence of the hot spots.It seems like the critical step in the procedure is to maintain the 1/4 inch EVEN space between the grate and the firebox.
Comments
-
Darnoc,[p]Maybe I'm not understanding what you're saying....but I can't see any logical explaination for your reported results.[p]No disrespect intended...honest question...what am I missing here?[p]Maybe a pic (id possible) might help me.[p]Evans
I spent most of my money on good bourbon, and bad women...the rest, I just wasted!! -
Darnoc,[p]I had to read it twice before I figured out you are talking about the grate in the bottom and not the cooking grid. This makes an approximate 1/4" gap all the way around the grate allowing more air to flow around to the edges of the lump it would seem.[p]So your premise is that by raising the edges 1/4" above the firebox the air flow is that much improved that you got up to temp much faster? [p]Interesting.
-
Fidel,[p]I see...you're on to it! [p]I thought he was talking anbout the cooking grate also.[p]Evans
I spent most of my money on good bourbon, and bad women...the rest, I just wasted!! -
Chubby,
This was in reference dealing with the Turbo Grate controversy on 09/25/07.When your comment was a picture with a cigar in a comfortable easy chair.It is in reference to the distance between the bottom fire grate and the side of the fire box.The fire grate sets down flush with the fire box in normal operation.
-
Fidel,
For sure.When you level it out it works like a champ.If it is not level you will get what I had for the first time ever a hot spot in the front of the dome.So be accurate in the measurements all the way around will be 1/4 inch.
-
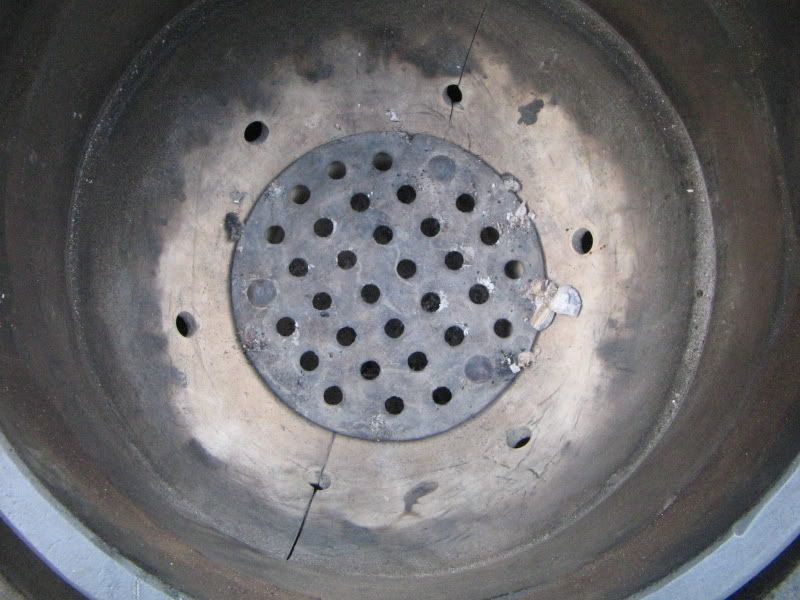
<p />Fidel,

like this?
ed egli avea del cul fatto trombetta -Dante -
<p />Darnoc,

Mine has a 1/8" gap between the fire box and all around the top edge of the grate. This setup does help air to filter past the grate to the lump.
Clay
-
<p />Darnoc,
Here is my grate installed.
-
Darnoc,
What dia. of bolt did you use? I'm definetly trying that.
One other thought that might be worth trying is to put one bolt through the center coming out the top. Use that to grab ahold of and shake the ash down before lighting your fire.
-
ClayQ,[p]Your firebox is only in two pieces? What's wrong?
-
<p />Sundown,

Nothin. This is my personal test for a split fire box design that will help prevent fire box cracking. So far, my fire box has not cracked in two years of hard use. Stresses are relieved with a two part design. Many years ago I was a product designer and that has never left me.
-
Darnoc,
Good job!
-
Darnoc,
Just saw your thread. Sounds like a great idea, one question.... do the bolts below the grid and in the firebox obstruct the removal of ash from below? or do you have to get to it from the top?
Mike


Categories
- All Categories
- 183.1K EggHead Forum
- 15.7K Forum List
- 460 EGGtoberfest
- 1.9K Forum Feedback
- 10.3K Off Topic
- 2.2K EGG Table Forum
- 1 Rules & Disclaimer
- 9K Cookbook
- 12 Valentines Day
- 91 Holiday Recipes
- 223 Appetizers
- 517 Baking
- 2.5K Beef
- 88 Desserts
- 167 Lamb
- 2.4K Pork
- 1.5K Poultry
- 32 Salads and Dressings
- 320 Sauces, Rubs, Marinades
- 543 Seafood
- 175 Sides
- 121 Soups, Stews, Chilis
- 37 Vegetarian
- 102 Vegetables
- 314 Health
- 293 Weight Loss Forum