Welcome to the EGGhead Forum - a great place to visit and packed with tips and EGGspert advice! You can also join the conversation and get more information and amazing kamado recipes by following Big Green Egg to Experience our World of Flavor™ at:
Want to see how the EGG is made? Click to Watch
Facebook | Twitter | Instagram | Pinterest | Youtube | Vimeo
Share your photos by tagging us and using the hashtag #BigGreenEgg.
Share your photos by tagging us and using the hashtag #BigGreenEgg.
Want to see how the EGG is made? Click to Watch
Concrete top Cedar Table

SaltySam
Posts: 887
About four or five years ago, I built a cedar table with a concrete top. It was...okay. I stained and sealed it, and put it on casters. I just screwed the support bracing directly to the 4x4’s. It wasn’t incredibly stable, and suffered from slight racking. Also, the concrete top was 6 feet wide, 24” deep and two inches thick. The top alone weighed 150 lbs.

It did the trick, but then we moved. I tried to disassemble everything but the top broke. The Egg was fine, but I figured I’d start from scratch at the new place.
So on in early September, I took down the Large, and the temporary table. Stained the deck, and then started a new plan. The new table needed to be: stable, have storage, have a prep area/table top, and be mobile. We only plan to be in this house for about four years, and I’d like to take it with us when we go.
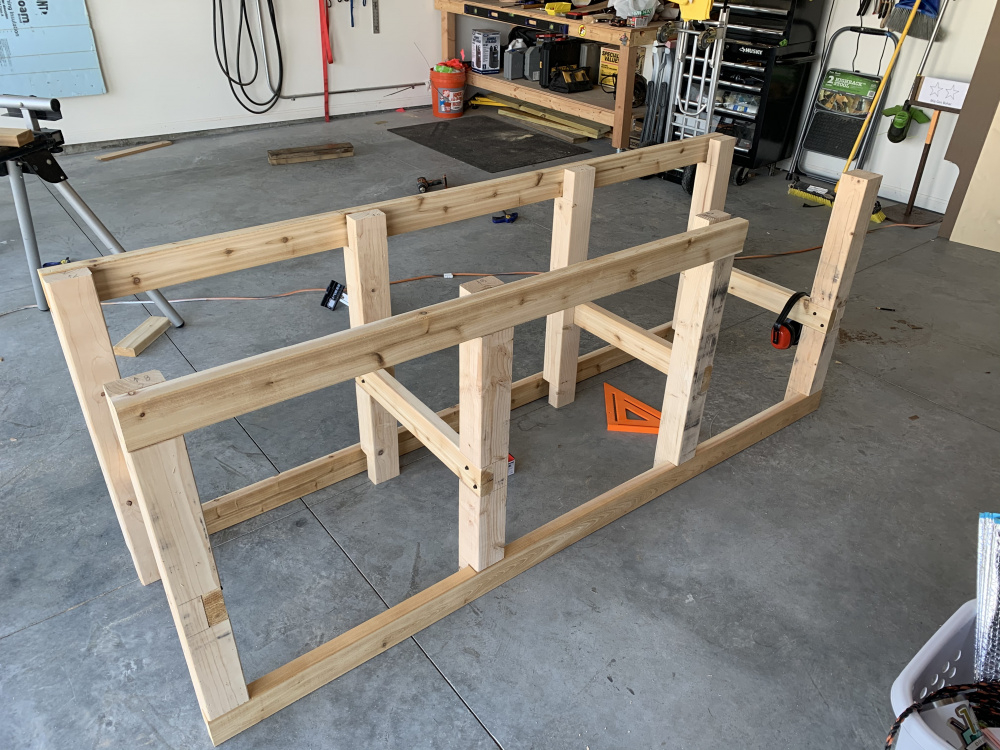
I cut eight 4x4’s, and joined them with half lap joints and lag screws. The frame is exceptionally rigid and light.


I cut melamine and created some molds for concrete 1.5” thick. I sealed the edges with silicone and then mixed up concrete and poured it in each of the three molds. (two for the table top, one for the large) Then I shook the bejesus out of them to get the air bubbles out. The table top is actually face down in the mold, so it takes on the smoothness of the melamine. My garage floor isn’t level, so I had to use braces and shims to get it close. I screeded off the excess concrete and then let it cure for three days.

Once I got the table and concrete finished, I moved it to the covered deck. Everything fit snugly, and I sealed it with a product called General Finishes Exterior 540. Then I put 1x4’s around the exterior to wrap it.

I didn’t like the way everything was open, but I didn’t want to add doors and hinges. My solution was to add a rolling barn door. Everything still accessible, but hidden. I was pretty happy with how it turned out.
Finally, after two freaking months of tinkering, parking in the driveway and waiting for a special order large table nest to arrive, I pulled Judith Large out of the shed and got everything installed.
The center section holds my 17” Blackstone, propane tank and a bag of Rockwood. Under the Egg, I have bags of wood chunks/chips, and the left side holds grid grippers, an ash tool and some griddle spatulas. The Mini Max lives on that left side, but when I cook on it, I’ll move it to the center section since it’s close to the house. Otherwise, that center section is a great spot for the griddle or (potentially) my Ooni pizza oven. Although, I might opt against that.


Pretty pumped about this. I like the look of it, and it’s functional. Looking forward to cooking on the Large for the first time in a while.

It did the trick, but then we moved. I tried to disassemble everything but the top broke. The Egg was fine, but I figured I’d start from scratch at the new place.
So on in early September, I took down the Large, and the temporary table. Stained the deck, and then started a new plan. The new table needed to be: stable, have storage, have a prep area/table top, and be mobile. We only plan to be in this house for about four years, and I’d like to take it with us when we go.
I cut eight 4x4’s, and joined them with half lap joints and lag screws. The frame is exceptionally rigid and light.


I cut melamine and created some molds for concrete 1.5” thick. I sealed the edges with silicone and then mixed up concrete and poured it in each of the three molds. (two for the table top, one for the large) Then I shook the bejesus out of them to get the air bubbles out. The table top is actually face down in the mold, so it takes on the smoothness of the melamine. My garage floor isn’t level, so I had to use braces and shims to get it close. I screeded off the excess concrete and then let it cure for three days.

Once I got the table and concrete finished, I moved it to the covered deck. Everything fit snugly, and I sealed it with a product called General Finishes Exterior 540. Then I put 1x4’s around the exterior to wrap it.

I didn’t like the way everything was open, but I didn’t want to add doors and hinges. My solution was to add a rolling barn door. Everything still accessible, but hidden. I was pretty happy with how it turned out.
Finally, after two freaking months of tinkering, parking in the driveway and waiting for a special order large table nest to arrive, I pulled Judith Large out of the shed and got everything installed.
The center section holds my 17” Blackstone, propane tank and a bag of Rockwood. Under the Egg, I have bags of wood chunks/chips, and the left side holds grid grippers, an ash tool and some griddle spatulas. The Mini Max lives on that left side, but when I cook on it, I’ll move it to the center section since it’s close to the house. Otherwise, that center section is a great spot for the griddle or (potentially) my Ooni pizza oven. Although, I might opt against that.


Pretty pumped about this. I like the look of it, and it’s functional. Looking forward to cooking on the Large for the first time in a while.
LBGE since June 2012
Omaha, NE
Comments
-
Beautiful results. That is some nice craftsmanship.
LBGE, LBGE-PTR, 22" Weber, Coleman 413GGreat Plains, USA -
Outstanding!
-
Nice setup Sam!-----------------------------------------analyze adapt overcome2008 -Large BGE. 2013- Small BGE and 2015 - Mini. Henderson, Ky.
-
Nice...you make it look easy!
______________________________________________I love lamp.. -
Well done, and thanks for the narrative. Congrats on that setup.
-
Beautiful table! Really like the top done in sections.
I would rather light a candle than curse your darkness.
-
thanks Ozzie. After breaking the last table top, I wanted more of a modular system. These are durable and beefy enough for hot items, but I can move/replace them easily if needed. I’d definitely like the cleaner look of a single slab better, but function wins over fashion nowadays.
That might explain my recent interest in Skechers slip on shoes and a wardrobe strictly from Costco. 👍🏻LBGE since June 2012
Omaha, NE
-
Get the slip-on shoes with the steel toe if you're casting concrete.
______________________________________________I love lamp.. -
I love that table! Nice work dude
-
That is sweet!
-
For some reason I was just thinking you could extend the bar for the rolling door across the egg opening and put two doors on it. That way you have, well, two doors.
______________________________________________I love lamp..
Categories
- All Categories
- 184K EggHead Forum
- 16.1K Forum List
- 461 EGGtoberfest
- 1.9K Forum Feedback
- 10.5K Off Topic
- 2.4K EGG Table Forum
- 1 Rules & Disclaimer
- 9.2K Cookbook
- 15 Valentines Day
- 118 Holiday Recipes
- 348 Appetizers
- 521 Baking
- 2.5K Beef
- 90 Desserts
- 167 Lamb
- 2.4K Pork
- 1.5K Poultry
- 33 Salads and Dressings
- 322 Sauces, Rubs, Marinades
- 548 Seafood
- 175 Sides
- 122 Soups, Stews, Chilis
- 40 Vegetarian
- 103 Vegetables
- 315 Health
- 293 Weight Loss Forum


