Welcome to the EGGhead Forum - a great place to visit and packed with tips and EGGspert advice! You can also join the conversation and get more information and amazing kamado recipes by following Big Green Egg to Experience our World of Flavor™ at:
Want to see how the EGG is made? Click to Watch
Facebook | Twitter | Instagram | Pinterest | Youtube | Vimeo
Share your photos by tagging us and using the hashtag #BigGreenEgg.
Share your photos by tagging us and using the hashtag #BigGreenEgg.
Want to see how the EGG is made? Click to Watch
New (soon to be) Egger, refinishing a used egg table (Pic Heavy)

Zacharyaln08
Posts: 13
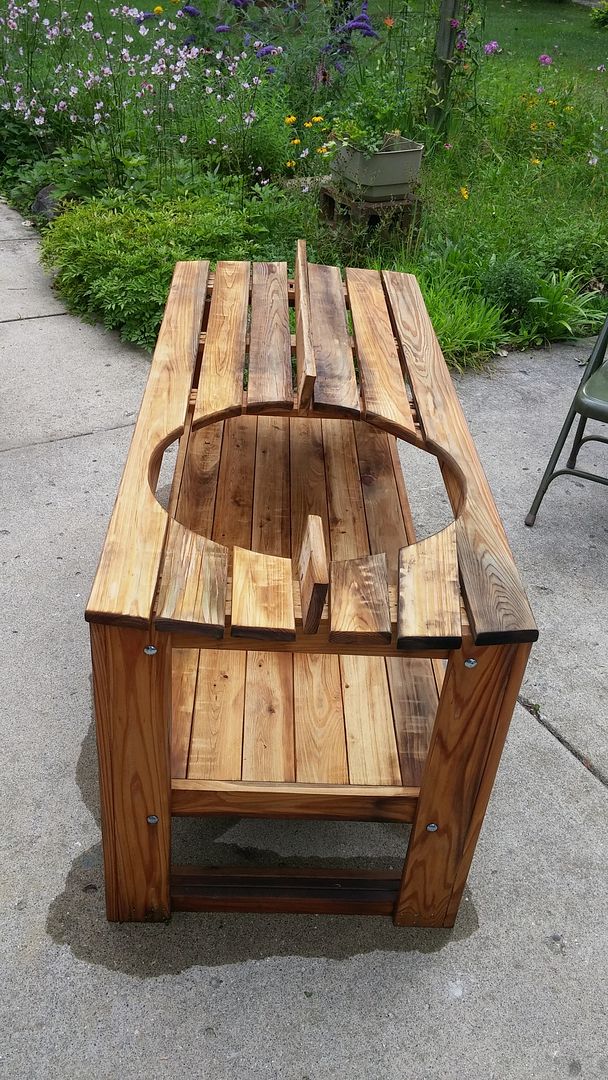
Hey guys, new guy here from Michigan. I actually work at an egg dealer, and I can't believe I've waited this long to get an egg. I've been wanting one for a while but when I had an opportunity to get a used large egg table for free (needed refinishing) I decided it was time to pull the trigger.
So I thought I'd post some pics of the refinishing project, and get some help, tips, and ideas along the way.
So so here we go...
This was me bringing the table home (very excited)
http://i1378.photobucket.com/albums/ah100/Evans2888/Mobile Uploads/0808151811_zpsyxgm16bc.jpg
Heres the contrast after I started sanding to top couple boards
[URL=http://s1378.photobucket.com/user/Evans2888/media/Mobile Uploads/0808151513_zpshe9y0ubo.jpg.html][IMG]http://i1378.photobucket.com/albums/ah100/Evans2888/Mobile Uploads/0808151513_zpshe9y0ubo.jpg[/IMG][/URL]
[URL=http://s1378.photobucket.com/user/Evans2888/media/Mobile Uploads/0808151513a_zpsiwgutjvc.jpg.html][IMG]http://i1378.photobucket.com/albums/ah100/Evans2888/Mobile Uploads/0808151513a_zpsiwgutjvc.jpg[/IMG][/URL]
Couple more before pictures...
[URL=http://s1378.photobucket.com/user/Evans2888/media/Mobile Uploads/0808151513b_zpsf9pv2c2a.jpg.html][IMG]http://i1378.photobucket.com/albums/ah100/Evans2888/Mobile Uploads/0808151513b_zpsf9pv2c2a.jpg[/IMG][/URL]
[URL=http://s1378.photobucket.com/user/Evans2888/media/Mobile Uploads/0808151513d_zpsg2km6xi7.jpg.html][IMG]http://i1378.photobucket.com/albums/ah100/Evans2888/Mobile Uploads/0808151513d_zpsg2km6xi7.jpg[/IMG][/URL]
Many of the top boards were loose and coming off so I decided to remove them to make for easier prep and fresh staples.
[URL=http://s1378.photobucket.com/user/Evans2888/media/Mobile Uploads/0808151549_zpscbfwicwd.jpg.html][IMG]http://i1378.photobucket.com/albums/ah100/Evans2888/Mobile Uploads/0808151549_zpscbfwicwd.jpg[/IMG][/URL]
Of of course this meant removing all the old staples.
[URL=http://s1378.photobucket.com/user/Evans2888/media/Mobile Uploads/0808151603_zpsoaaq9w5k.jpg.html][IMG]http://i1378.photobucket.com/albums/ah100/Evans2888/Mobile Uploads/0808151603_zpsoaaq9w5k.jpg[/IMG][/URL]
Got the first batch of sanding done and followed by a power washing. Gonna finish up with a good final sanding and then get to staining.
[URL=http://s1378.photobucket.com/user/Evans2888/media/Mobile Uploads/0808151749_zpsx4uskaij.jpg.html][IMG]http://i1378.photobucket.com/albums/ah100/Evans2888/Mobile Uploads/0808151749_zpsx4uskaij.jpg[/IMG][/URL]
[URL=http://s1378.photobucket.com/user/Evans2888/media/Mobile Uploads/0808151749a_zpsvzw65xdt.jpg.html][IMG]http://i1378.photobucket.com/albums/ah100/Evans2888/Mobile Uploads/0808151749a_zpsvzw65xdt.jpg[/IMG][/URL]
Letting it dry out for a couple days after the power washing before the staining can begin.
[/IMG] [URL=http://s1378.photobucket.com/user/Evans2888/media/Mobile Uploads/0808151811_zpsyxgm16bc.jpg.html][IMG]http://i1378.photobucket.com/albums/ah100/Evans2888/Mobile Uploads/0808151811_zpsyxgm16bc.jpg[/IMG][/URL] [/IMG]
Comments
-
The table is going to be nice. It is plenty big. Where are you located?
 Louisville, GA - 2 Large BGE's
 -
I'm in Pinckney, but I work at a dealer in Mason, MI. Are the pics working I can't get them to show up right on my end?
-
The pics aren't coming up right. I still saw them tough. Copy the image url and post that.

 Louisville, GA - 2 Large BGE's
 -
Thanks johnkitchens I got it figured out now at least. Appreciate it. I wish I could delete all those useless links in my opening post. It looks ridiculous haha.
-
-
-


There we go... Now we're coking with charcoal! -
Welcome. That will be a nice table!
Now, what sort of employee pricing can you offer us fellow-eggers? ---------------------------------------------------------------------------------Well, "spa-Peggy" is kind of like spaghetti. I'm not sure what Peggy does different, if anything. But it's the one dish she's kind of made her own.____________________Aurora, Ontario, Canada
 -
Man, I wish. My boss is fantastic at taking care of his employees, I actually get stuff at cost... : ) Beyond that I get about 10% for family and that's about it.
-
I can handle that, step-brother.Zacharyaln08 said:Man, I wish. My boss is fantastic at taking care of his employees, I actually get stuff at cost... : ) Beyond that I get about 10% for family and that's about it.
Aledo, Texas
Large BGE
KJ Jr.
Exodus 12:9 KJV
Eat not of it raw, nor sodden at all with water, but roast with fire; his head with his legs, and with the purtenance thereof. -
Look at that I've only been here 2 days and we're like family already lol
-
Speaking of family. I am now going to give you some good sound fatherly advice. Get the XL.Columbus, Ohio--A Gasser filled with Matchlight and an Ugly Drum.
-
I'm kinda stuck on the Large, got the table for free and all. Should be plenty big for my needs. Plus I plan on adding a Mini-Max along with it in the future : )
Categories
- All Categories
- 184.1K EggHead Forum
- 16.1K Forum List
- 461 EGGtoberfest
- 1.9K Forum Feedback
- 10.5K Off Topic
- 2.4K EGG Table Forum
- 1 Rules & Disclaimer
- 9.2K Cookbook
- 16 Valentines Day
- 118 Holiday Recipes
- 348 Appetizers
- 521 Baking
- 2.5K Beef
- 90 Desserts
- 167 Lamb
- 2.4K Pork
- 1.5K Poultry
- 33 Salads and Dressings
- 322 Sauces, Rubs, Marinades
- 548 Seafood
- 175 Sides
- 122 Soups, Stews, Chilis
- 42 Vegetarian
- 103 Vegetables
- 315 Health
- 293 Weight Loss Forum


