Welcome to the EGGhead Forum - a great place to visit and packed with tips and EGGspert advice! You can also join the conversation and get more information and amazing kamado recipes by following Big Green Egg to Experience our World of Flavor™ at:
Want to see how the EGG is made? Click to Watch
Facebook | Twitter | Instagram | Pinterest | Youtube | Vimeo
Share your photos by tagging us and using the hashtag #BigGreenEgg.
Share your photos by tagging us and using the hashtag #BigGreenEgg.
Want to see how the EGG is made? Click to Watch
Ciabatta bread the easy way... For beginning bakers.

Ciabatta bread... Fast and easy in your Kitchen Aid mixer.
It should take about 4 to 5 hours from the time you start. It will be more than that if your house is cold and less if you house is hot. I've done it in 3 hours start to finish and that includes the baking time. Sometimes its taken 5 hours.
Recipe:
*500 grams of bread flour. I use King Arthur's bread flour.
*450 grams of water. This is a 90% hydration recipe. Very sticky!
*1 packet of active dry yeast... Like you buy at the grocery store. 7grams.
*10 grams of salt.
*Equipment preference ... Use whatever you have
*Standup Mixer... I use a 5 quart Kitchen-Aid - mixer with the dough hook.
https://www.flickr.com/photos/food_pictures/9178138985/
*Digital scale that weighs small quantities.
https://www.flickr.com/photos/food_pictures/8734937890/
*Baking stone or pizza stone...
*Parchment paper...
*Thermapen - instant read food thermometer.
http://www.thermoworks.com/products/thermapen/
*Spray can of Canola oil...
*Food scraper... I use 2 of them. A small teardrop shaped one to scrape the glop/dough out of the mixing bowl and a 6" straight edge steel one I use to shape and cut the dough.
*A proofing bucket... a barrel shaped plastic container. I put a rubber band at the same level as the dough is when it goes into it so I can measure from the starting point so I know when it has TRIPLED in mass.
http://www.flickr.com/photos/food_pictures/9193052175/
*Pizza peel... http://www.centralrestaurant.com/Pizza+Peels-pl356.html?cid=WSPCBISPPPZL20646&utm_source=bing&utm_medium=cpc&utm_campaign=Specialty+-+Product&utm_term=pizza+peel&utm_content=Pizza+Peels
*An oven... Any kind! I've baked this bread indoors in my kitchen oven and I've baked it in my Big Green Egg which is an outdoor Ceramic oven. You can bake it in any cooking device you can control the temperature in. I've found the preferred baking temp is 465 degrees. Baking time... About 15/16 minutes. It MIGHT take a little longer but when it is at 205 degrees, internal crumb temp, it is done. If you are a few degrees over or under - No big deal.
Outdoor baking... https://www.flickr.com/photos/food_pictures/9178041081/
Notice... No plate setter, no daisy wheel and the pizza stone is above the felt line. That creates maximum airflow.
Method...
1) weigh out 450 grams of water...
2) proof your dry active yeast... 1 package active dry yeast = about 2 1/4 teaspoons = 1/4 ounce = 7 grams. Pour enough water from your 450 grams, about 30 grams, into a very small bowl and microwave it for a few seconds until it is between 95 and 110 degrees. Put a packet of yeast in the warm water and proof it. It's a shame to spend all of this time to mix a dough and find out later your yeast was dead on arrival.
3) determine the temperature of the room you will be cooking in. Not required but handy. You will see why below.
4) determine the temperature of your flour in the bag or canister it is stored in.
Not required but handy. You will see why below.
3) water temperature... The temp of the water you use is the ONLY control you have over the final outcome after the mixing process. Your dough will rise faster and better if it is close to 80 degrees. See below how to determine the correct water temp... It's easy.
4) weigh out 500 grams of bread flour. I do that with the bowl of my kitchen-aid mixer on my digital scale. Fewer dirty dishes is a good thing.
5) once you have determined your yeast is active... Pour it and all of the water you used to proof it into your bowl on top of the flour. You want to use all 450 grams of water.
6) pour in the remaining 420 grams of water...
7) notice... We have not added the salt yet. Salt can kill the yeast when added at the wrong time.
8) turn the mixer on at a slow speed and mix it to just a shaggy state... Just until the vast majority of the water has been absorbed by the flour. You don't want to over mix the dough at this point. Once the vast majority of the flour has been absorbed by the water I shut down the mixer and take the bowl off and scrape the edges and the bottom with my scraper to get all of the flour wet.
9) Let the dough rest for 20 minutes... let the flour, water and yeast work it's magic to comingle and start building the glutton strands. At this point the dough is like a heavy waffle dough consistency ... Not bread dough yet.
10) after the rest I add the salt by sprinkling it all around the top of the dough so it will mix in evenly when you start the high speed mixing process.
11) turn your mixer on to a high speed... I use #8 on my KA mixer which is the second highest speed. The waffle like dough will just mix around for a while -then... It will slowly start sticking to the dough hook and start slapping the side of the mixing bowl. Then as it starts to tighten up and build the glutton strands, the ball building around the dough hook, will start peeling away the sticky dough stuck to the side of the bowl. Then when the side of the bowl is clean it will start picking up the dough from the bottom of the bowl. Once there is NO soft gooey dough left at the bottom of your mixing bowl... It is a done deal! Depending on the heat in your kitchen this process can take 15 minutes and up to 30 minutes. It WILL NOT hurt your Kitchen Aid mixer. You will need to stay close to your mixer it will shake and creep on your counter top some.
12) spray/rub your proofing bucket/bowl with an oil... I use a spray can of canola oil.
13) scrape the dough out of the mixing bowl into your proofing container. Mark the proofing container where your dough is at this point because you want it to rise to 3 times the size it it now. I like to use a barrel shaped container so I can put a rubber band around it and measure the increase during the rise. Remember to place a towel or shower cap over the proofing container.
https://www.flickr.com/photos/food_pictures/9193052175/
14) if your dough came out of the mixer at about 80 degrees and your room temperature is 70ish degrees it will take about 2 hours to rise... Give or take.
15) once your dough has TRIPLED... This is a good time to preheat your oven and baking stone/pizza stone to 465 degrees. 1 hour before baking is best.
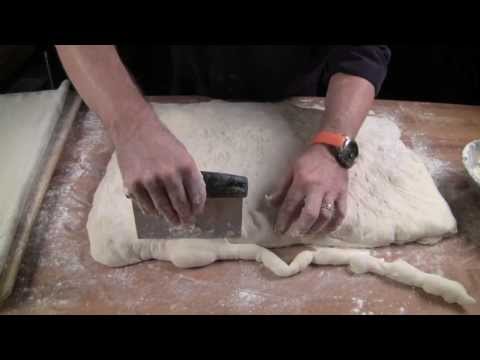
16) Scrape your glop, dough out onto a smooth well floured work surface and then sprinkle it with flour. Get lots of flour on your hands because this is a very sticky dough. Use your hands and your 6" steel scraper to work the dough into a manageable mass. Cut the dough in half - don't worry about pre shaping it much. I just work it in to a ball without deflating it much. Sprinkle it with flour and put a damp towel over it and let it rest for 30 minutes right where it is. You can cut this dough into smaller sizes too. It works well for hoagie rolls, dinner rolls, hamburger buns and it even works for pizza dough. You can even de-gas it and make focaccia bread with it.
https://www.flickr.com/photos/food_pictures/9195867172/
https://www.flickr.com/photos/food_pictures/9195884898/
17) tear a piece of parchment paper twice the width of your loaf and put it on top of your pizza peel... The bottom of a cookie sheet will work too if you don't have a peel. You need a way to get this wet dough into the oven.
18) reshape your loaf to the final shape you want it to be. It does not need to be a perfect shape. I usually shape it into a batard shape... Like a long fat sourdough loaf. You don't want to deflate it during this process. Transfer it on to the parchment paper and put it on the peel, flour the surface and cover it again with the damp towel and let it rise again for 30 minutes. Watch the second video for the tool they use to transfer it to the couch/peel.
http://www.flickr.com/photos/food_pictures/9196044808/
Here's a video of a professional baker cutting and shaping his ciabatta dough.
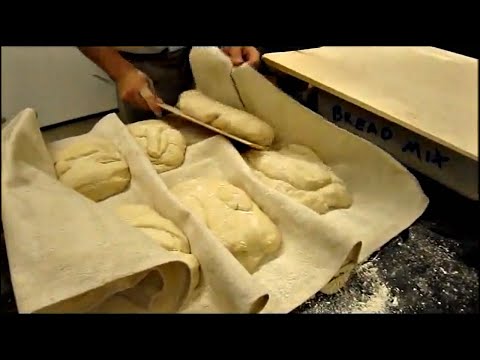 http://www.youtube.com/watch?v=d4NfYiVN_N0&feature=youtube_gdata_player
19) right before I put the dough into the oven I spray the loaf with a light coating of canola oil to help the browning process. Use the parchment paper to transfer the loaf from the peel/cookie sheet to the baking stone/pizza stone. Close the oven door.
20) let the loafs bake at 465 degrees for 8 minutes then open the oven door and use the parchment paper to spin it 180 degrees so you get even cooking/browning. You will be amazed at the oven spring this bread gets in those 8 minutes.
21) 15/16 minutes at 465 degrees and your loaf should be browned and at about 200 to 205 degrees Internal temp - it's done! If you have a thermapen you can test that accurately like I do.
22) take your loaf out of the oven and put it on an elevated wire rack so it can cool evenly. Let it cool for at least 30 minutes before slicing. Room temp is best.
https://www.flickr.com/photos/food_pictures/9193566707/
23) slice and enjoy...
https://www.flickr.com/photos/food_pictures/9194092197/
https://www.flickr.com/x/t/0098009/photos/food_pictures/16127976148/
https://www.flickr.com/photos/food_pictures/9194351017/
* Using WATER to control the temperature of the dough during the mixing process.
Water temperature chart by General Mills...
http://www.generalmillsfoodservice.com/~/media/Files/Industry-Resources/Bakery/technical-support/water-temperature-chart.ashx
If your stored stored flour is at 65 degrees, use 75 degree water. If you stored flour is at 75 degrees use 65 degree water. Once mixed you want it to be at 70 degrees.
Your Kitchen Aid mixer for this recipe will add 10 to 12 degrees of heat to the dough from the friction of the high speed mixing process. I know that from the experience of making this recipe about 50 times.
I stumbled on to this chart looking for a good pizza dough recipe. General Mills encourages their customers to get their yeast bread doughs to 80 degrees to decrease the amount of time it takes to rise. They also used this chart to get the same results from customers whether they were in Alaska, Kansas or Arizona... Year round.
Added videos of cutting and shaping...
http://www.youtube.com/watch?v=d4NfYiVN_N0&feature=youtube_gdata_player
19) right before I put the dough into the oven I spray the loaf with a light coating of canola oil to help the browning process. Use the parchment paper to transfer the loaf from the peel/cookie sheet to the baking stone/pizza stone. Close the oven door.
20) let the loafs bake at 465 degrees for 8 minutes then open the oven door and use the parchment paper to spin it 180 degrees so you get even cooking/browning. You will be amazed at the oven spring this bread gets in those 8 minutes.
21) 15/16 minutes at 465 degrees and your loaf should be browned and at about 200 to 205 degrees Internal temp - it's done! If you have a thermapen you can test that accurately like I do.
22) take your loaf out of the oven and put it on an elevated wire rack so it can cool evenly. Let it cool for at least 30 minutes before slicing. Room temp is best.
https://www.flickr.com/photos/food_pictures/9193566707/
23) slice and enjoy...
https://www.flickr.com/photos/food_pictures/9194092197/
https://www.flickr.com/x/t/0098009/photos/food_pictures/16127976148/
https://www.flickr.com/photos/food_pictures/9194351017/
* Using WATER to control the temperature of the dough during the mixing process.
Water temperature chart by General Mills...
http://www.generalmillsfoodservice.com/~/media/Files/Industry-Resources/Bakery/technical-support/water-temperature-chart.ashx
If your stored stored flour is at 65 degrees, use 75 degree water. If you stored flour is at 75 degrees use 65 degree water. Once mixed you want it to be at 70 degrees.
Your Kitchen Aid mixer for this recipe will add 10 to 12 degrees of heat to the dough from the friction of the high speed mixing process. I know that from the experience of making this recipe about 50 times.
I stumbled on to this chart looking for a good pizza dough recipe. General Mills encourages their customers to get their yeast bread doughs to 80 degrees to decrease the amount of time it takes to rise. They also used this chart to get the same results from customers whether they were in Alaska, Kansas or Arizona... Year round.
Added videos of cutting and shaping...
 http://www.youtube.com/watch?v=LFja1ShZFsA&feature=youtube_gdata_player
Once you are done making the dough you can cut it into any size you want so you can make hoagie rolls, dinner rolls, hamburger buns too. You can even de-gas it and make focaccia bread with it.
http://www.youtube.com/watch?v=LFja1ShZFsA&feature=youtube_gdata_player
Once you are done making the dough you can cut it into any size you want so you can make hoagie rolls, dinner rolls, hamburger buns too. You can even de-gas it and make focaccia bread with it.
http://www.youtube.com/watch?v=d4NfYiVN_N0&feature=youtube_gdata_player
19) right before I put the dough into the oven I spray the loaf with a light coating of canola oil to help the browning process. Use the parchment paper to transfer the loaf from the peel/cookie sheet to the baking stone/pizza stone. Close the oven door.
20) let the loafs bake at 465 degrees for 8 minutes then open the oven door and use the parchment paper to spin it 180 degrees so you get even cooking/browning. You will be amazed at the oven spring this bread gets in those 8 minutes.
21) 15/16 minutes at 465 degrees and your loaf should be browned and at about 200 to 205 degrees Internal temp - it's done! If you have a thermapen you can test that accurately like I do.
22) take your loaf out of the oven and put it on an elevated wire rack so it can cool evenly. Let it cool for at least 30 minutes before slicing. Room temp is best.
https://www.flickr.com/photos/food_pictures/9193566707/
23) slice and enjoy...
https://www.flickr.com/photos/food_pictures/9194092197/
https://www.flickr.com/x/t/0098009/photos/food_pictures/16127976148/
https://www.flickr.com/photos/food_pictures/9194351017/
* Using WATER to control the temperature of the dough during the mixing process.
Water temperature chart by General Mills...
http://www.generalmillsfoodservice.com/~/media/Files/Industry-Resources/Bakery/technical-support/water-temperature-chart.ashx
If your stored stored flour is at 65 degrees, use 75 degree water. If you stored flour is at 75 degrees use 65 degree water. Once mixed you want it to be at 70 degrees.
Your Kitchen Aid mixer for this recipe will add 10 to 12 degrees of heat to the dough from the friction of the high speed mixing process. I know that from the experience of making this recipe about 50 times.
I stumbled on to this chart looking for a good pizza dough recipe. General Mills encourages their customers to get their yeast bread doughs to 80 degrees to decrease the amount of time it takes to rise. They also used this chart to get the same results from customers whether they were in Alaska, Kansas or Arizona... Year round.
Added videos of cutting and shaping...
http://www.youtube.com/watch?v=LFja1ShZFsA&feature=youtube_gdata_player
Once you are done making the dough you can cut it into any size you want so you can make hoagie rolls, dinner rolls, hamburger buns too. You can even de-gas it and make focaccia bread with it. Comments
-
Sorry for the formatting... I wrote it with the proper spacing and paragraphs but when it hit post it all got condensed.
Categories
- All Categories
- 184K EggHead Forum
- 15.8K Forum List
- 459 EGGtoberfest
- 1.9K Forum Feedback
- 10.4K Off Topic
- 2.2K EGG Table Forum
- 1 Rules & Disclaimer
- 9K Cookbook
- 13 Valentines Day
- 93 Holiday Recipes
- 224 Appetizers
- 520 Baking
- 2.5K Beef
- 88 Desserts
- 167 Lamb
- 2.4K Pork
- 1.5K Poultry
- 33 Salads and Dressings
- 324 Sauces, Rubs, Marinades
- 548 Seafood
- 175 Sides
- 122 Soups, Stews, Chilis
- 44 Vegetarian
- 102 Vegetables
- 313 Health
- 292 Weight Loss Forum