Welcome to the EGGhead Forum - a great place to visit and packed with tips and EGGspert advice! You can also join the conversation and get more information and amazing kamado recipes by following Big Green Egg to Experience our World of Flavor™ at:
Want to see how the EGG is made? Click to Watch
Facebook | Twitter | Instagram | Pinterest | Youtube | Vimeo
Share your photos by tagging us and using the hashtag #BigGreenEgg.
Share your photos by tagging us and using the hashtag #BigGreenEgg.
Want to see how the EGG is made? Click to Watch
idea for a cast iron grill for a medium BGE

RRP
Posts: 26,137
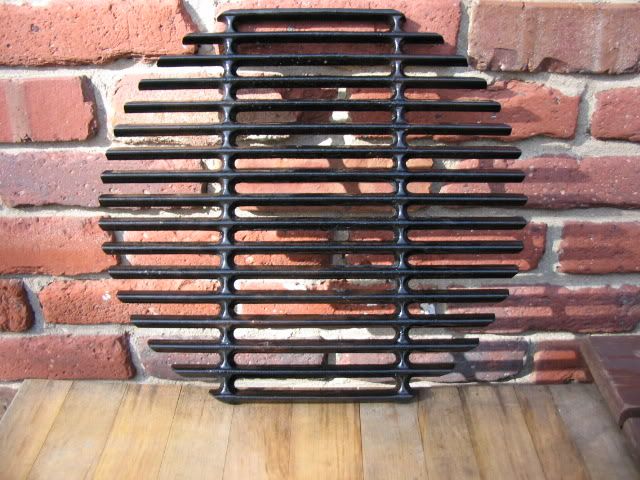
Bear with me people, but I know BGE sells a cast iron grill for a large but that's all - right???[p]Well those of you who have seen my earlier posts saw how I cut a grill for my small that came out like this
and what it was cut from looks like this
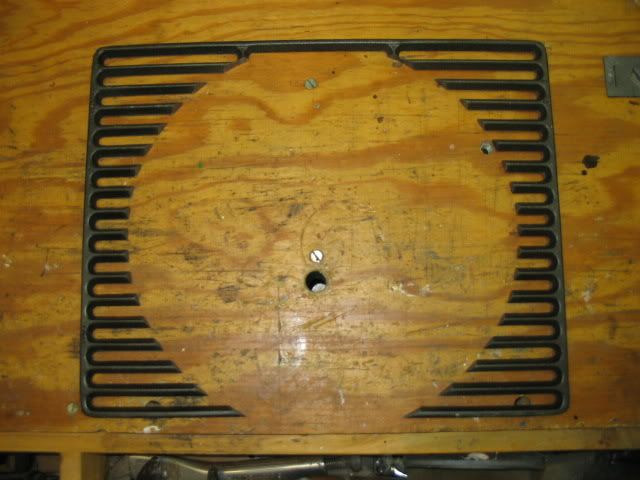
so I got to thinking about one for a medium BGE...The grill area of that 15" grill is about 177 square inches (A = pi x r squared)
now using that same 13 x 16 cast iron grate what could I expect to get from it...so I made a simple pattern from newspaper that is 13 x 16 that looked like this

and then using a compass drew a 15" grill and cut it out like this
Note how little space will be lost let alone the fact that the thicklness of the fire ring makes that unusable cooking area anyway! To prove that here is the paper inside my medium.

So...where there is a will there is a way! As for ordering the 13 x 16 grate they come in pairs. I used a couple metal cutting blades in my saber saw to cut the cast iron and then ground off the sharp edges.
PS it's great being retired and being able to do fun thinking like this!!!
[ul][li]pair of grates are available here[/ul]
and what it was cut from looks like this
so I got to thinking about one for a medium BGE...The grill area of that 15" grill is about 177 square inches (A = pi x r squared)
now using that same 13 x 16 cast iron grate what could I expect to get from it...so I made a simple pattern from newspaper that is 13 x 16 that looked like this
and then using a compass drew a 15" grill and cut it out like this
Note how little space will be lost let alone the fact that the thicklness of the fire ring makes that unusable cooking area anyway! To prove that here is the paper inside my medium.
So...where there is a will there is a way! As for ordering the 13 x 16 grate they come in pairs. I used a couple metal cutting blades in my saber saw to cut the cast iron and then ground off the sharp edges.
PS it's great being retired and being able to do fun thinking like this!!!
[ul][li]pair of grates are available here[/ul]
Comments
-
RRP,
my grid on the large was probably dropped during shipping. on the first cook it cracked and i lost a small chunk on the edge. i thought of sending it back, but the mising piece comes in handy for adding smoking wood after every thing is hot. if you cut out just so its round on one side, you could use the opening to add wood.comes in handy when you forget to add while everything now is hot and heavy
fukahwee maineyou can lead a fish to water but you can not make him drink it -
fishlessman,[p]"you could use the opening to add wood.comes in handy when you forget to add while everything now is hot and heavy"[p]OH MY LORD! This has got to be done...no Stump..be good be good..but LOOK WHAT HE WROTE!!..how can I NOT??...easy Stump..easy...HOT AND HEAVY..AND WOOD..AND OPENING!?!?!..no stump no..remember..you've been good for a week..now remember..it's not always about that..WHAT...WOOD???...OPENING???..HOT N HEAVY??...I GOTTA!! I GOTTA!!!...easy stump..easy..remember..you've been good..BUT ...BUT...[p]...the contest continues for almost fiftenn minutes..Stumps eyes rollin back into his giant cranium..his hands tremble over the keyboard..his giant cranium slowly rolls back an forth...ahh the poor creature...[p]StumpBaby
-
StumpBaby,
oops, sorry...i forgot what forum i was on
fukahwee maineyou can lead a fish to water but you can not make him drink it -
RRP, Great idea and nice work. I welded together a stainless grate last weekend. Dang thing weighs about six pounds as it contains about thirty feet of 1/4 inch round stock. Ever thought about making one out of expanded metal? tom
-
Sandbagger,
Not sure the expanded metal would hold up in that size in an inferno - probably would sag after a few uses, maybe not, but what I'm going for is the seared marks that the hot cast iron imparts - and it does!!!
I hear you about the weight - that 13" of mine for the small is a manhole cover and I need both hands on the grillifter to control it.
-
RRP, Ever tried moving it around with just two pieces of picture hanging twine, No knots, just wrap each twine piece through the slats (top/bottom) and hold in your hand to carry. Use the other hand as a guide when setting in place. You can play with the lengths to get the right angle. To remove, just bends the twine in a hook and reverse the process. Just an idea. Tom
-
Sandbagger,
Thanks Tom, but I gotta think this one through as I'm seeing some other issues.


Categories
- All Categories
- 183.3K EggHead Forum
- 15.8K Forum List
- 460 EGGtoberfest
- 1.9K Forum Feedback
- 10.4K Off Topic
- 2.2K EGG Table Forum
- 1 Rules & Disclaimer
- 9K Cookbook
- 12 Valentines Day
- 91 Holiday Recipes
- 223 Appetizers
- 518 Baking
- 2.5K Beef
- 88 Desserts
- 167 Lamb
- 2.4K Pork
- 1.5K Poultry
- 33 Salads and Dressings
- 320 Sauces, Rubs, Marinades
- 544 Seafood
- 175 Sides
- 121 Soups, Stews, Chilis
- 38 Vegetarian
- 102 Vegetables
- 315 Health
- 293 Weight Loss Forum