Welcome to the EGGhead Forum - a great place to visit and packed with tips and EGGspert advice! You can also join the conversation and get more information and amazing kamado recipes by following Big Green Egg to Experience our World of Flavor™ at:
Want to see how the EGG is made? Click to Watch
Facebook | Twitter | Instagram | Pinterest | Youtube | Vimeo
Share your photos by tagging us and using the hashtag #BigGreenEgg.
Share your photos by tagging us and using the hashtag #BigGreenEgg.
Want to see how the EGG is made? Click to Watch
Ping: Whiz - Table Update and Question

Dan in StL
Posts: 254
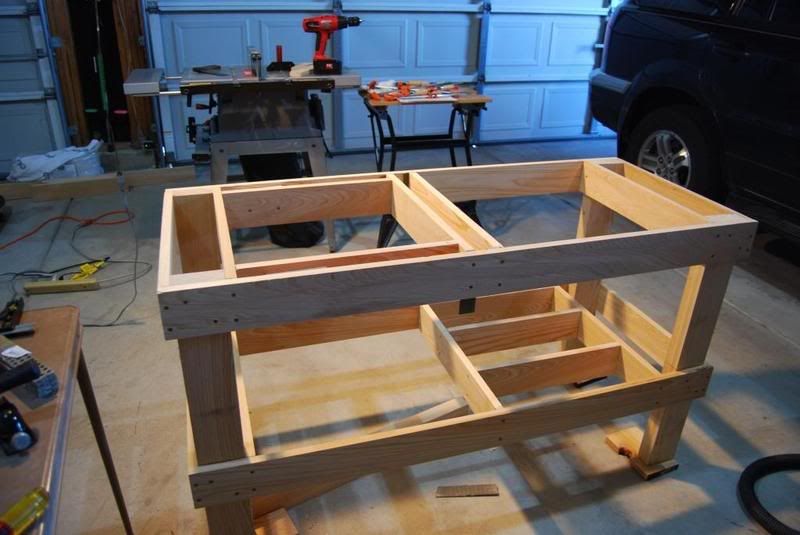
As you can see I'm making fair progress in getting the table built. So far I don't believe I've made any mistakes that I can't recover from, and I'm doing my best to keep it that way. That leads me to my question. . .
I'm struggling with exactly how the 18x18 tile for the top table is supported. In the plans it references "cleats" that can be positioned based on the thickness of the material used for the 18x18. Can you give me a better idea of exactly what you used, how they were attached to the 18-1/8 x18-1/8 frame, and how the tile was positioned on them?
I'm envisioning these things as "feet" upon which the tile rests. These feet would elevate the tile to become flush to the table surface, and the tile would just rest on top. Is that it?
Once again THANKS!!!!
Now just a few notes regarding the building experience so far. . .
This is the first time I've ever attempted anything like this. I'm learning and cursing a great deal and enjoying most of it. I had never owned or used a table saw before. I still have all my fingers, but I have made a lot of really crappy cuts that I'm chalking up to learning. The rip cuts have gone very well. I've been fair to poor at the accuracy on my cross cuts. All I can say is thank God for something I found at Home Depot called "Composite Shims" (or something like that). If you look closely at the pic above you can see one still protruding from the bottom of the top rail that I haven't trimmed off yet.
One of the reasons I chose to build rather than buy a table was cost. For me, that turned out to be a really dumb reason! With the purchase of the cypress lumber, the table saw, clamps, the heavy duty wheels and other miscellaneous stuff, I've now exceeded the entire defense budget of many Central American countries. So I'm paying to teach myself some basic carpentry skills that I hope I can use to make up on this investment somewhere down the line. However, it will probably just lead to buying more tools.
I'm at the point now where a lot of what I've build is still underneath the table tops. I know it's not 100% square and fitting the tops so that they look halfway decent may have its challenges. I am very much open to getting general advice on this from anyone!
Sorry about the long-winded post! :blink:
Comments
-
Dan, as for myself, I'm going to use 3/4" plywood as my tile support. I'll put some blocks around the perimeter of the opening that will contain my tile and set the plywood on them. I'll try to find some moisture-resistant plywood or, barring that, will seal the surface to try to prolong its life.
-
You have me laughing. The reason I build my table was "I can build something for less than THAT!" I ended up spending over $400 I think. DOH!
As to your question, are you following the general instructions on the following web page: The Web Page About The Table? Episode 12 deals with the cleats. Here is a photo showing the installation of the first cleat: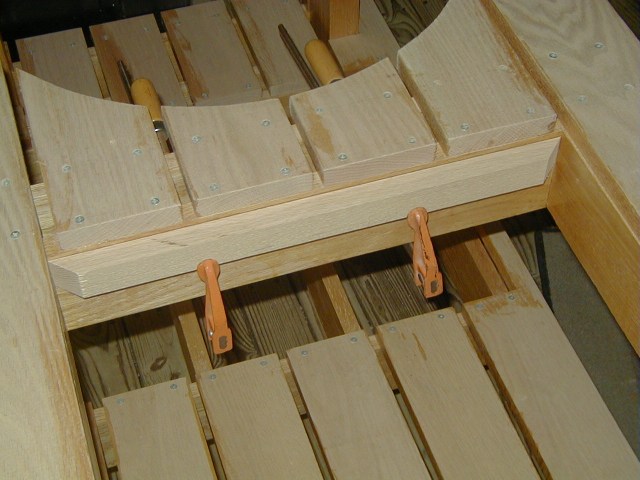
You make four of these and just screw them to the sides of the hole. I then put a 18x18 piece of 3/4" plywood on the cleats and the tile on the plywood. The plywood will eventually rot if you don't really keep after it, so now I use a 18x18 sheet of slate under the tile. Its sole purpose is to raise the tile up to the appropriate height. Good luck!The Naked Whiz -
I know what you mean. I built my table this weekend. I made it a lot more simple than than Whiz's. I used treated 2x4's for the legs and cedar for the rest. I didn't have a table saw, so I had to adapt and use 1x4's. I skipped the 2 insets for the tile and the slate. The only mistake I made was I measured wrong when making the compass. After I cut the worm hole I realized I made it 23" instead of 21". Should have measured twice. Otherwiswe I think it turned out nice. Did the entire job with a miter saw, jig saw, sander and a cordless screw driver.

-
Whiz,
Thanks. I thought I had thoroughly looked at each "Episode" on your site. I downloaded most all of them, printed them out and have them taped up all over my garage where I'm building this thing. Must've overlooked that one.
Crüe-B-Cüe,
By the time the wife starts getting all the credit card statements that have all the tools and supplies on there, I'm REALLY going to be wishing I went your route.
Later! -
That's why I went the way I did. I have $250 total investment.
-
One other thing. All of the plans I found called for 15" from top of bottom shelf to top of upper shelf. With the spring assist hinge, that won't give you enough clearance. From my stone to the top of the upper shelf is 14 3/4". I have 1/4" clearance for the hinge. Had I went 15" it would have hit.
-
Dan, table is shaping up nicely, congrats on the work so far. Thanks for posting an update, I was getting curious. Good luck.
-
Dan
It looks good!
I didn't have the stone picked out or purchased for under the Egg or on the top so I let the boards run straight thru on the top and lower shelf.
I hadn't built anything in a long time and had a lot of fun building it. Had the kids autograph the underside for posterity when I was finished. I am intending for this to last longer than me!
Anyhow, I did a surprisingly good job, but built it with wheels on only one end. My neighbor gave me a pair of casters for the other end, but I measured wrong and now the table is no longer level!
I'm living with it.
Now in my spare time I'm working on a fold up/down leaf for one end. -
Dan,
The table is looking great! Like any project it always takes longer than expected. If you are still looking for slate I picked up a piece at Mid-America Slate over in Chesterfield Valley. It was the best deal of the project, less than $10. It was a little larger than the 18x24 hole waiting for it, but a tile saw purchased for a previous bathroom project fixed that problem.
While I haven't added up the receipts, the wood and screws however, cost an arm and a leg ($300+?).
On the slate front, it probably will split the first time you get in the nuclear temp range, but heeding Whiz's advice I just push the two pieces together.
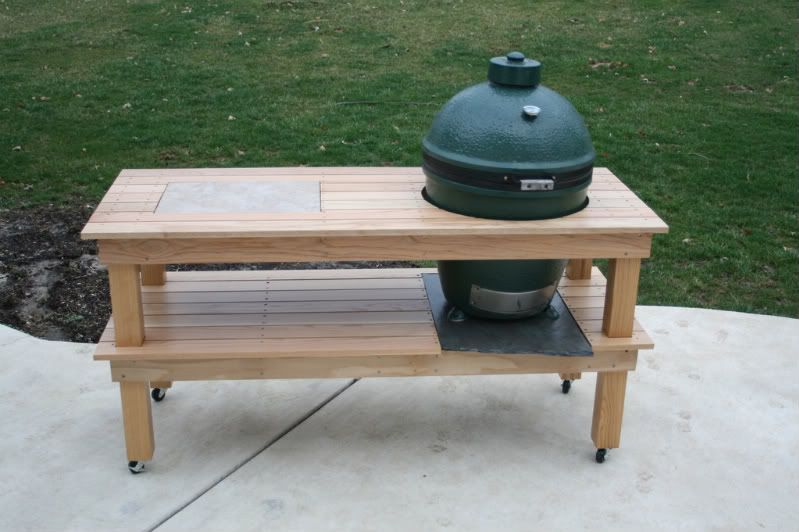
Anyway, here's my result...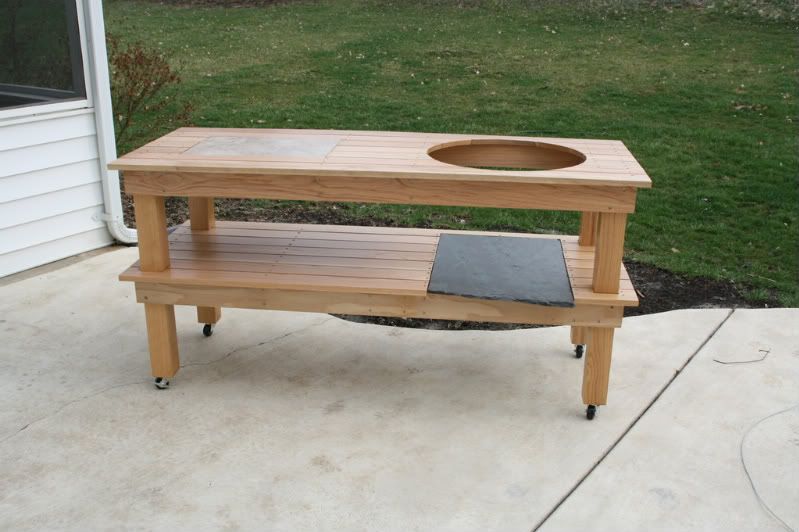
Good luck!
David
P.S. 9-4 isn't a bad start... -
Nosnow2ski,
Thanks for the info. I'll definitely check out Mid America. It's nice to have other local Eggers here to give some advice. I'm probably going to go with slate and some other kind of stone on top of that. I may need the additional height based on where I placed the lower deck.
I also noticed you went with 4 casters rather than 2 of the hand truck wheels. I kinda like that idea. But to go that direction now, I'd have to shorten up one set of legs on the grill side of the table. Those wheels were close to $25 each and I could still return them. . .
Later,
Dan -
Dan,
I went with the four casters because the Home Depot near me only sold the 3x3 legs in 30" lengths. I needed the extra 2" of the casters to get the overall height of work surface up high enough.
Anyway, building a table is like smoking a butt, there is more than one way to get to it done.
Have fun and watch the digits around the power tools...
David


![[Deleted User]](https://secure.gravatar.com/avatar/72d0f3cf94935edd82517c944261e7bc/?default=https%3A%2F%2Fvanillicon.com%2Fec59a68092abc911e04ea514ec094e05_200.png&rating=g&size=200)

Categories
- All Categories
- 184.1K EggHead Forum
- 15.8K Forum List
- 460 EGGtoberfest
- 1.9K Forum Feedback
- 10.4K Off Topic
- 2.2K EGG Table Forum
- 1 Rules & Disclaimer
- 9K Cookbook
- 13 Valentines Day
- 93 Holiday Recipes
- 224 Appetizers
- 520 Baking
- 2.5K Beef
- 88 Desserts
- 167 Lamb
- 2.4K Pork
- 1.5K Poultry
- 33 Salads and Dressings
- 324 Sauces, Rubs, Marinades
- 548 Seafood
- 175 Sides
- 122 Soups, Stews, Chilis
- 44 Vegetarian
- 102 Vegetables
- 313 Health
- 292 Weight Loss Forum