Welcome to the EGGhead Forum - a great place to visit and packed with tips and EGGspert advice! You can also join the conversation and get more information and amazing kamado recipes by following Big Green Egg to Experience our World of Flavor™ at:
Want to see how the EGG is made? Click to Watch
Facebook | Twitter | Instagram | Pinterest | Youtube | Vimeo
Share your photos by tagging us and using the hashtag #BigGreenEgg.
Share your photos by tagging us and using the hashtag #BigGreenEgg.
Want to see how the EGG is made? Click to Watch
DidiQ Adapter

Pickled Egg
Posts: 16
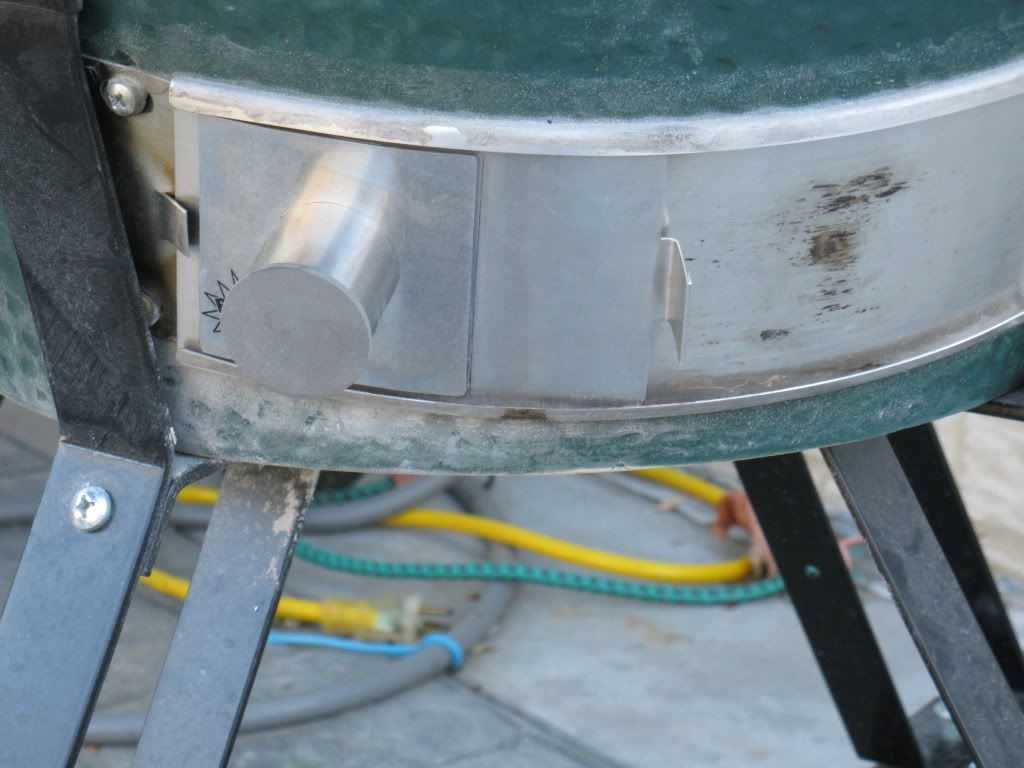
Got tired putting the adapter on the egg. So I set it up to be permanently attached to the door. The good news is the egg works normal when not using the fan.
I did have to remove the screen, but the unit sits on concrete
[img size=150http://s1232.photobucket.com/albums/ff372/xrayu1/[/img][img
I did have to remove the screen, but the unit sits on concrete
[img size=150http://s1232.photobucket.com/albums/ff372/xrayu1/[/img][img
Comments
-
You were so close with that photo. while looking at the photo in PB hover your mouse over the photo there will be a drop down menu that pops open. Right click on the IMG CODE the last one in the group. Select copy then come back to the forum and select paste. No additionl coding is necessary.
Great Idea BTW. How did you achieve this? Did you cut a corresponding hole in the draft door? -
Is that a magnet? Genius!Which came first the chicken or the egg? I egged the chicken and then I ate his leg.
-
No I have attached the adapter to the existing door.
No more taking it on and off. -
So you cut a hole in the door? How is the adapter attached to the door?
-
Place the adapter on the door and draw a circle of the inside diameter.
Drill a hole in the center of the hole you have just drawn.
Now take a Dermel tool and cut it up like a pie from the hole drilled to the outside of the circle you drew. Now bend the pieces that look like small pie shapes to the outside.
Your adapter will slip over the bent pieces. I also applied JB Weld under the adapter just to be sure it stayed in place.
If you want more pictures just let me know. Still trying to figure what I am doing wrong with photo bucket!! -
I'm still tryin to figure out what a "DidiQ" is..
-
Sorry
DigiQ
It is a computer with a blower that controls the temp in the cooker for long smokes. Makes it so you don't have to get out of bed to check the temp in the egg.
It held my temp at 230 for 20 hours no problem
The picture is the adapter for the fan for the fire box.
Can BBQ...can't spell -
LOL...I know...I was just mesin with ya...I owned a competitor and now have a CyderQ...LOL
-
Wess
Retired?
Me 2 in 7 days!
Nice looking BBQ setup ya have there!!")
-
Great idea. You need to patent that baby.
Any road will take you there if you don't know where you're going.
Terry
Rockwall, TX -
7 days.....I'll drink to that...enjoy every minute of it...way more fun than advertised...stop on by tomorrow and enjoy Tikifest with us...the door is always open..
-
I think a few of us would like to see a few more shots. Just go to the photo bucket site and hover your mouse over the photo you want. A list of Code choices will pop up below the photo. Highlight the bottom Code. It should be the the IMG code. Right click and copy that code and come back to the forum and then click paste in the body of your message. No other codes are necessary.
-
Mike
I will take some more pictures for you
May be Sunday before I can get it done
Bear with me
I have tried what you suggested on the pictures and for some reason no luck
Question: Once I copy the link will I see the picture then or only the link?
P.S. I use a MAC -
Only the link code. Kinda looks like this below without all the spaces.
[ I M G ]http://i1232.photobucket.com/albums/ff372/xrayu1/IMG_0320.jpg[ / I M G ] -
I think I got it!!
-
If you left click the word "IMG code" the line to the right of it will high light. Now place your mouse over the high lighted line and right click and now you should get a selection box. In that box left click copy. Now go to the post and left click where you want to place your blinking cursor. Once you have a blinking cursor right click over it and you should get to left click "paste". I then hit my enter key once to move the cursor to the next line and then either go get another pic or type more text. Tim
-
Thanks to all for your help with pictures. I have figured it out.
I will post a step by step of how i hooked the adapter to my egg.
Now with pictures!! What a concept!!
I will have them sometime tomorrow -
Pickle, if you want to preview your image in your post before posting, change the capital


Categories
- All Categories
- 184K EggHead Forum
- 15.8K Forum List
- 459 EGGtoberfest
- 1.9K Forum Feedback
- 10.4K Off Topic
- 2.2K EGG Table Forum
- 1 Rules & Disclaimer
- 9K Cookbook
- 13 Valentines Day
- 93 Holiday Recipes
- 224 Appetizers
- 520 Baking
- 2.5K Beef
- 88 Desserts
- 167 Lamb
- 2.4K Pork
- 1.5K Poultry
- 33 Salads and Dressings
- 324 Sauces, Rubs, Marinades
- 548 Seafood
- 175 Sides
- 122 Soups, Stews, Chilis
- 44 Vegetarian
- 102 Vegetables
- 313 Health
- 292 Weight Loss Forum