Welcome to the EGGhead Forum - a great place to visit and packed with tips and EGGspert advice! You can also join the conversation and get more information and amazing kamado recipes by following Big Green Egg to Experience our World of Flavor™ at:
Want to see how the EGG is made? Click to Watch
Facebook | Twitter | Instagram | Pinterest | Youtube | Vimeo
Share your photos by tagging us and using the hashtag #BigGreenEgg.
Share your photos by tagging us and using the hashtag #BigGreenEgg.
Want to see how the EGG is made? Click to Watch
1st Tri-Tip with pics. I think I have a new favorite cut of red meat!

Pace Yourself
Posts: 42
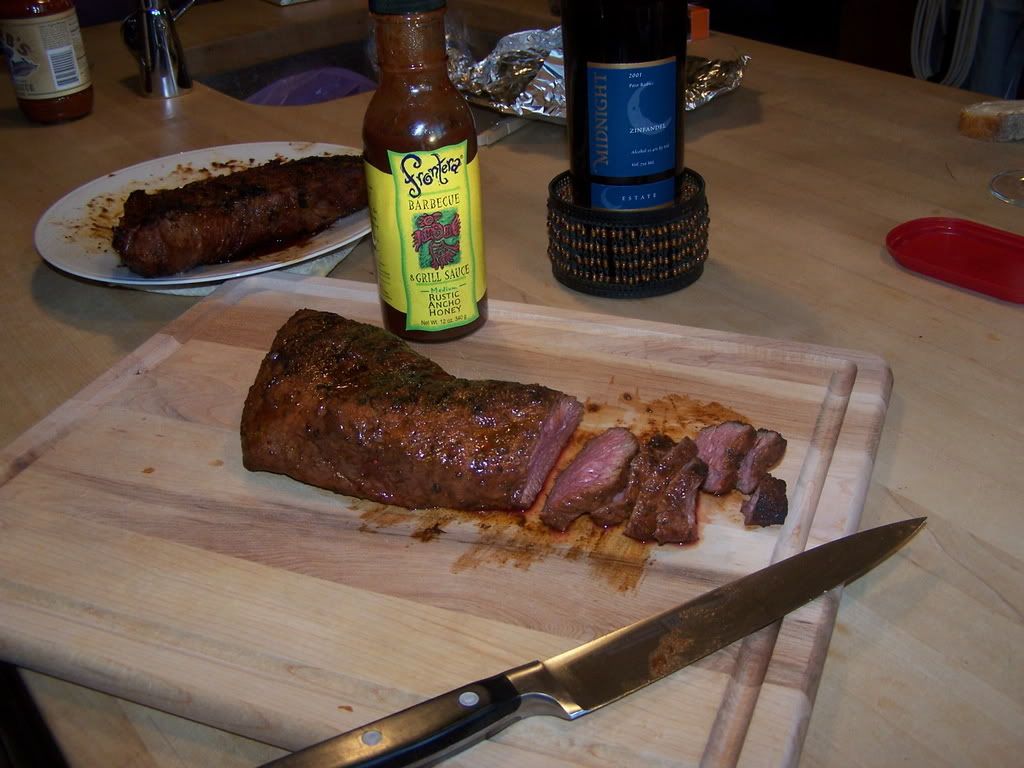
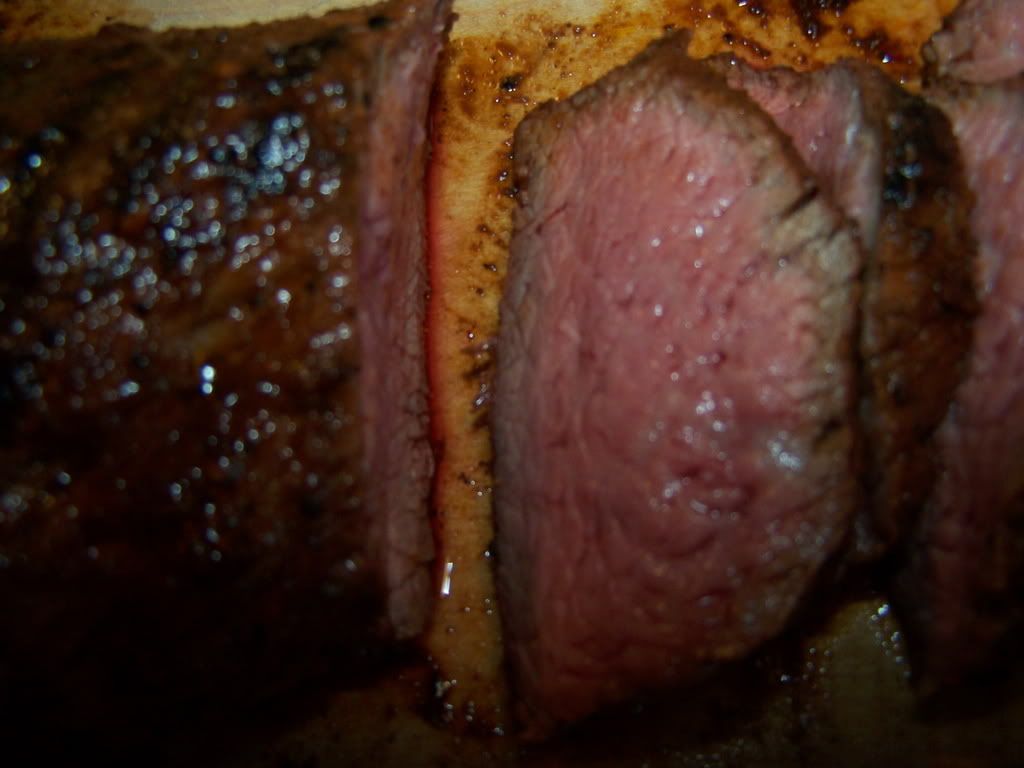
Happy Friday Gang,[p]As I hunted and gathered today a ran across a manageable size package of tri-tip at Costco (2 pieces, 3.4 lbs total) I have read all of your ravings so I figured it was time to jump in the pool[p]I am sure glad I did - my mouth has not been this happy in a long time - I think it was beginners luck with this because it was one of the better red meat experiences I have had.[p]Here are the details:[p]DP Cow lick on both. HOT fire on my small. (I finally get what TRex is talking about when he mentions lava. Up until now I have never got one going quite like tonight. Tonight was also the first time I paid much attention to the way I put the lump into the firebox. It turns out that building it the way TRex and a number of you have recommended works way better than just dumping it in from the bag and stirring around. I know I am no the only one doing that and know I will not be any more - It really made a difference in the fire.)[p]Anyway, both pieces on (Dome was 700ish and the temp at the grate was 650+) for about two minutes a side. (Great char!) Then a rest until the fire came down to 400ish. Next was a few handfuls of cherry chips and the grate put back on in a raised position using the longer GrateMates.[p]The meat went about 10 minutes a side to get to 135. I left one alone during the roasting period and I coated one in the sauce in the picture. (The sauce was real good - Rick Bayless knows his flavors...) Then a 15-minute rest and it was time to eat.[p]The look, smell and taste were unbelievable. This was $5.99 meat done pretty simply and my mouth has rarely been happier.[p]If you have not tried tri-tip on the egg yet you need to find some tomorrow and work it into your egg schedule this weekend. I cannot stress enough how good this was.[p]Cheers![p][p]
 [p]
[p]
 [p]
[p]
[p][p]Comments
-
Pace Yourself,
You betcha, tri-tip is my favorite steak. This cut has a lot going for it. Grilling a whole one this weekend and uncorking a merlot during the cook.
Have a great weekend,
Clay[p]
-
Pace Yourself,
That looks delicious. can you tell me more about how you build the fire. I'm afraid I'm one of the dumpers. Altho I do sometimes rearrange after I dump.[p]Thanks,
Gwen, dumping no more in Seattle
-
Dimples Mom,[p]I use an electric type starter so I started by placing that at the bottom of a clean fire box. Next I grabbed 5-6 or the largest pieces of lump I could find in the bag and kind of built a tee-pee on/around the starter. Then I filled in the rest (around and on top of) with smaller pieces and plugging it in. About 10-12 min later I carfully pulled the starter out and fanned the bottom vent.[p]That was about it. I think the key to the whole thing is the larger pieces near the bottom grate. They keep the air holes clear when smaller pieces might block the air flow. As I build more fires with the egg I am convinced the air flow is the key to the whole program.[p]I hope this helps. If not, here is how TRex does it:[p]"To start the fire, I used to use those self-striking starters which I found at Kroger. They appear to be wood particles held together by a paraffin binder. You can get them at most grocery stores I believe. You can also use those lighter cubes called Encendedores—they work well, but I would use two. The important thing is not to use a huge starter piece that will take forever to burn away. The self-striking starters (which are like 5”x2”x0.5”) work really nicely. Before you light your starter piece, put two small, skinny long pieces of lump on the bottom of your fire box. (The firebox should be clean and your grill grate is off at this point.) You will essentially be making a bridge between these two pieces with your starter piece—hence, they act as shims to let air flow underneath your starter piece to help it burn more efficiently. [p]Now, make sure your bottom air vent is completely open. Light your starter piece and hold it vertically (I use tongs) so that the fire climbs it and the entire piece catches on fire. Now, make your little bridge across the two small pieces of lump. Next, starting with large pieces of charcoal, make a pyramid on top of the starter pieces—just 5 or 6 pieces. Let these get burning well, then start to add more charcoal, 5 pieces or so at a time (more as the pieces get smaller), taking care not to smother your flame. You can gradually use smaller pieces of charcoal as you fill the firebox. Before each addition of charcoal, make sure the previous pieces have started to catch somewhat and that you have a nice flame to set the new pieces into. Continue this process until you have filled your firebox above the level of the airholes and up to the bottom of your firering."
-
Pace Yourself,
Wow, that's really precise! LOL Do I have to do this for every cook, like even burgers and meatloaf and pizzas? I don't empty the egg out every time and start anew. I do stir it and make sure the holes in the grate are all cleared and I rake all the ash out from underneath. I have learned the hard way that I need to do this for every cook.[p]I use the little paraffin things from the grocery store to start the lump.[p]Gwen


Categories
- All Categories
- 184K EggHead Forum
- 16.1K Forum List
- 461 EGGtoberfest
- 1.9K Forum Feedback
- 10.5K Off Topic
- 2.4K EGG Table Forum
- 1 Rules & Disclaimer
- 9.2K Cookbook
- 15 Valentines Day
- 118 Holiday Recipes
- 348 Appetizers
- 521 Baking
- 2.5K Beef
- 90 Desserts
- 167 Lamb
- 2.4K Pork
- 1.5K Poultry
- 33 Salads and Dressings
- 322 Sauces, Rubs, Marinades
- 548 Seafood
- 175 Sides
- 122 Soups, Stews, Chilis
- 40 Vegetarian
- 103 Vegetables
- 315 Health
- 293 Weight Loss Forum