Welcome to the EGGhead Forum - a great place to visit and packed with tips and EGGspert advice! You can also join the conversation and get more information and amazing kamado recipes by following Big Green Egg to Experience our World of Flavor™ at:
Want to see how the EGG is made? Click to Watch
Facebook | Twitter | Instagram | Pinterest | Youtube | Vimeo
Share your photos by tagging us and using the hashtag #BigGreenEgg.
Share your photos by tagging us and using the hashtag #BigGreenEgg.
Want to see how the EGG is made? Click to Watch
Difficulty of Whiz's Table Plans?

Single Action Egger
Posts: 21
Hi.
I need to build a table before winter/snow sets it. The egg will be outside all winter. The hope is for the egg to be off the ground via a table (currently on little feet).
I have minimal carpenter skills. How difficult is it to build the Whiz Flash-Burn table if I follow the instructions EXACTLY?
I need to build a table before winter/snow sets it. The egg will be outside all winter. The hope is for the egg to be off the ground via a table (currently on little feet).
I have minimal carpenter skills. How difficult is it to build the Whiz Flash-Burn table if I follow the instructions EXACTLY?
Comments
-
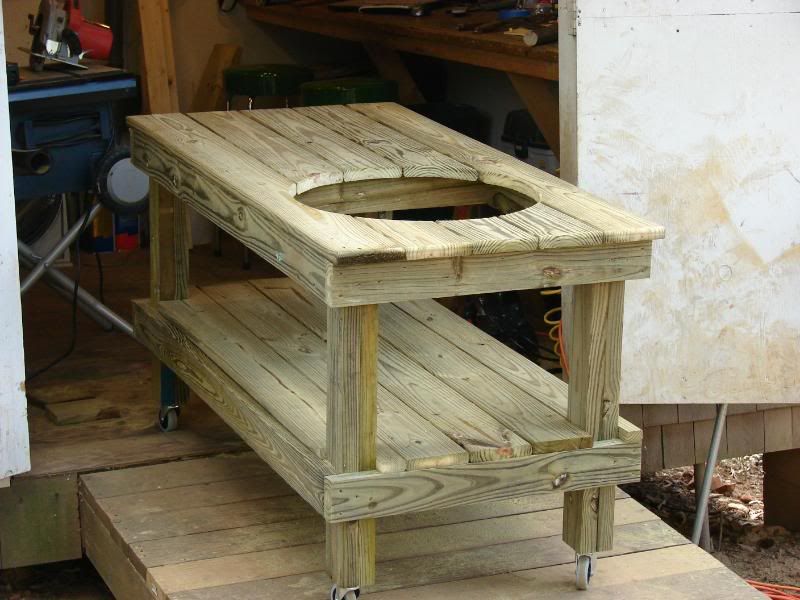
The plans (and photo documentary)a are great!
Depends on how much time you have. I did it spending a few hrs/day for 1 weekend then whenever I got an hour or so during the week and finished it I think, for the next Saturday when we picked up the Egg. Some people do it in a few hours in one afternoon. You don't have to.
Remember to drill pilot holes for your screws! I didn't drill mine deep enough at first and I sheared off a lot of screw heads and wound up with a lot of them just proud of the wood surface.
don't rush. allow plenty of time. Enjoy the experience. do it once and do it right. -
Use good quality deck screws,and they won't snap off.They are pricey,but well worth it
")
-
I built my table in an afternoon. I basically used the plans on BGE website with a couple of mods. I used cedar 1x6s, treated 2x4s, 1" dowel for the handle, and some wheels that mounted up under the left legs. I am now trying to talk the wife into a new back patio with a built in egg station.
")

-
bob used brass... looks great with the mahogany.
so they are soft, but more than enough to hold the decking (as long as you have the pilot hole, i mean).
bob's looks real nice, but he's taking his sweet time making mine. ed egli avea del cul fatto trombetta -Dante
 -
Thanks Stike,I was thinking that he was using drywall screws or something :ohmy:Regular deck screws are plenty strong,and won't break easily,even if not pre-drilled.
-
bob is about as bright as a small appliance bulb, but sometimes he gets things right !
>ducking under a tableed egli avea del cul fatto trombetta -Dante -
If me and Sparky can do one in a few hours and a couple dozen beers then it can't be that hard.
-
Very true Fidel :woohoo: And it came out pretty good to :woohoo: :cheer:


-
Hey, I resemble that!
Actually, for most of the table I used SS deck screws with the square-head slot. If the pilot holes weren't deep enough and the driver had too much torque, I made those square holes round before the screw was home.
Then I found the tool for extracting screwed-up screws at the hardware store!
With age (and stain) the SS screws have come to look like aged brass so for the new drop-leaf I added I went with Brass. Unfortunately I did snap a couple of those.
-
i think the easiest thing would be for you to give me that one and then you can take you time making yours. just a thought.ed egli avea del cul fatto trombetta -Dante
-
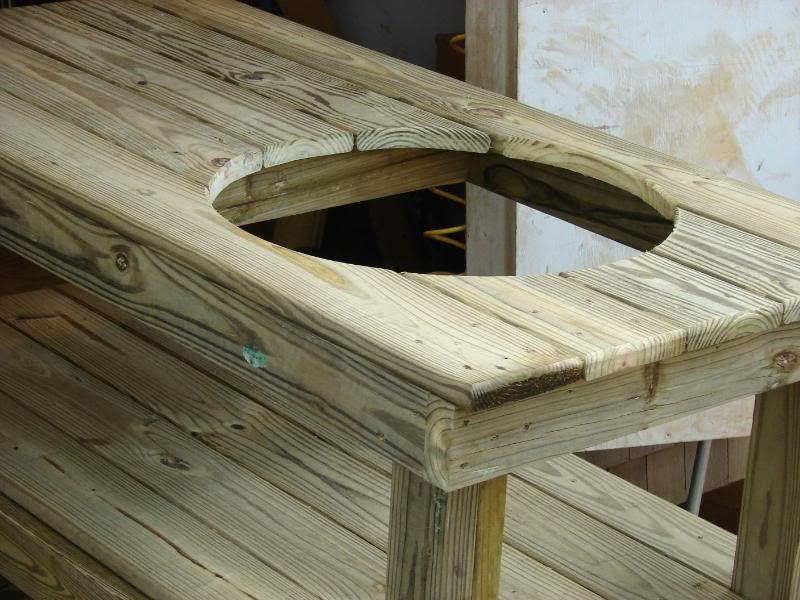
I thought the hardest time was the hole for the egg. I would also suggest making it longer than the plans. I went 70"'s and wish it was bigger.Bone Daddy's Competition BBQ & Catering
-
Some tricks of the trade make it easier:
* Set up a saw station with mitre saw instead of using a handheld circular saw
* Use a "master" board instead of measuring each board individually
* Pre-drill holes
* If using a drill to drive the screws, rub the screws on a wet bar of soap first
* Use a power drill where you can adjust the torque
* Try out drilling and screw driving on scrap wood first to get your torque right
* Have at least 4 good clamps to hold top frame and bottom frame to legs when assembling
* Assemble frames to legs before putting on deck boards
* Using a level, measure the level of your garage/shop floor and then build the table "same level as floor".
* Also use big T-square to check your angles and measurements
* Then use clamps to hold deck boards to frame
* Use deck board spacers for consistent space.
* Know the width of boards + gaps to predict your total width including overhang (helps you place the first deck board). It's easier to do an overhang on front and back than build flush and have to rip cut a board.
also--Kokeman, that cedar looks great on the treated, always wondered what a mix would look like. Nice drawer too. -
No Jefe, I couldn't give you a used table! I'll get to yours right after I finish my wife's mother's day present for 2008.
Bone daddy's- You obviously can use more space but typically with a new table I'd recommend to make it a length that a cover will fit. FWIW -
* Use a "master" board instead of measuring each board individually
What I think works better it to rough cut all the top decking boards and attach them with one end flush, then snap a chalk line on the other end, clamp a guide bar (fence), and use a rip saw to cut a perfectly even edge. Even using a master board can give you some inconsistency in length. Even 1/8" can be a pain to deal with. If you rip them with a fence in place the cut will be straight and all boards will be the perfect length. Unless you let sparky run the saw. -
Wow, my table is getting world wide exposure!
-
It's really not too bad. Balus Creek Egger and I built two tables the week before Eggtoberfest in Atlanta and they came out great. In fact as soon as I figure out how to post pictures online I'll post some.
We modified the Naked Whiz plans somewhat...for example height, spacing of deck boards, etc... If you have the right tools and some time you'll make out just fine.
One suggestion is to really think about the overall height of the table and lower shelf. Depending on how tall you are and what egg you have you may want to adjust those measurements.
![[Deleted User]](https://secure.gravatar.com/avatar/72d0f3cf94935edd82517c944261e7bc/?default=https%3A%2F%2Fvanillicon.com%2Fec59a68092abc911e04ea514ec094e05_200.png&rating=g&size=200)


Categories
- All Categories
- 184K EggHead Forum
- 16.1K Forum List
- 461 EGGtoberfest
- 1.9K Forum Feedback
- 10.5K Off Topic
- 2.4K EGG Table Forum
- 1 Rules & Disclaimer
- 9.2K Cookbook
- 15 Valentines Day
- 118 Holiday Recipes
- 348 Appetizers
- 521 Baking
- 2.5K Beef
- 90 Desserts
- 167 Lamb
- 2.4K Pork
- 1.5K Poultry
- 33 Salads and Dressings
- 322 Sauces, Rubs, Marinades
- 548 Seafood
- 175 Sides
- 122 Soups, Stews, Chilis
- 40 Vegetarian
- 103 Vegetables
- 315 Health
- 293 Weight Loss Forum