Welcome to the EGGhead Forum - a great place to visit and packed with tips and EGGspert advice! You can also join the conversation and get more information and amazing kamado recipes by following Big Green Egg to Experience our World of Flavor™ at:
Want to see how the EGG is made? Click to Watch
Facebook | Twitter | Instagram | Pinterest | Youtube | Vimeo
Share your photos by tagging us and using the hashtag #BigGreenEgg.
Share your photos by tagging us and using the hashtag #BigGreenEgg.
Want to see how the EGG is made? Click to Watch
Nomex installation

Eggspert
Posts: 142
Well I upgraded to the Nomex gasket today, after a little mishap with pizza last week. I had heard a lot of horror stories about gasket replace but, with the help of all of you eggers it was not bad at all. Here was my recipe- scrap old felt off with razor blade, remaining felt heat up with mapp torch and contine scraping, with rag rub acetone on remaining old adhesive (elbow grease required ladies), after clean put the 3m super 77 in a solo cup or dixie cup and brush the obvious gasket area. Put Nomex on ensuring not to strech gasket.Questions are welcome.
Comments
-
Sounds great. Did you replace the top and bottom gasket, and if so did you remove the dome? Was it a pain the the _____ to remove the dome?
-
My top gasket just started to come loose from the dome this afternoon on my 4 month old lrg :(
Does the nomex from BGE come already sized in one piece?
Thank Youaka marysvilleksegghead
Lrg 2008
mini 2009
Henny Youngman:
I said to my wife, 'Where do you want to go for our anniversary?' She said, 'I want to go somewhere I've never been before.' I said, 'Try the kitchen.'
Bob Hope: When I wake up in the morning, I don’t feel anything until noon, and then it’s time for my nap -
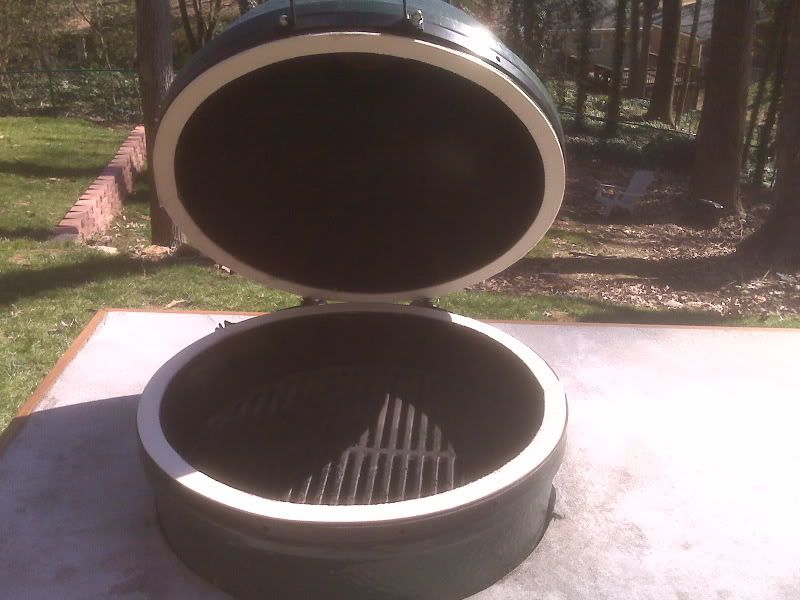
I did the top and bottom gasket because both were needing replacement. By the way, taking the dome off was the easiest part of the task. I just took the bands off and never took the hinge loose. Make sure if you replace the gasket you get the white clips to preserve you vision because the spring is pretty legal. The clips ensure that the spring doesn't unload. I have attach a picture of the finished product.
-
No it does come to fit a particular size. If you tell the mothership what size egg you have they will cut it to the approximate size for you egg but, you will have cut to fit you egg exactly. They really only cut just to help you with the handling on the Nomex gasket. The mothership showed me how to cut the gasket so that was helpful. Cut it at a angle like (\) or (/) instead of straight across, if that make sense to you. Also, make sure you get the Nomex gasket with no adhesive backing and then apply the 3m super 77 for adhesion.
-
I removed the dome, it was easy and it made putting the new gasket on much easier. Just make sure you put on the white plastic retainers before you take the bands off. :blink:
-
how long did it take you start to finish?
I have a replacement Nomex gasket sitting on the counter I need to put on -
Actually, I timed that. It took just under three hours. It could have taken under an hour, but it was my first time and I was very thorough with the cleaning and scraping before putting on the gasket and the aligning after putting on the gasket. It passed the dollar bill test with flying colors. I also waited 20 minutes after scraping and before gluing so that the egg would be completely dry. So I’m proud of the job, but you can figure 3 hours as a high figure. Most people will do it much faster. I waited 24 hours after that to make sure that the Super 77 was completely set.
-
Thanks for the tips...I need to do it.
-
It took me about 3 hours start to finish and I cooked on it about 6 hours later. The key is to have a plan and have all of the materials readily available when you start.


Categories
- All Categories
- 184.1K EggHead Forum
- 15.8K Forum List
- 460 EGGtoberfest
- 1.9K Forum Feedback
- 10.4K Off Topic
- 2.2K EGG Table Forum
- 1 Rules & Disclaimer
- 9K Cookbook
- 13 Valentines Day
- 93 Holiday Recipes
- 224 Appetizers
- 520 Baking
- 2.5K Beef
- 88 Desserts
- 167 Lamb
- 2.4K Pork
- 1.5K Poultry
- 33 Salads and Dressings
- 324 Sauces, Rubs, Marinades
- 548 Seafood
- 175 Sides
- 122 Soups, Stews, Chilis
- 44 Vegetarian
- 102 Vegetables
- 313 Health
- 292 Weight Loss Forum