Welcome to the EGGhead Forum - a great place to visit and packed with tips and EGGspert advice! You can also join the conversation and get more information and amazing kamado recipes by following Big Green Egg to Experience our World of Flavor™ at:
Want to see how the EGG is made? Click to Watch
Facebook | Twitter | Instagram | Pinterest | Youtube | Vimeo
Share your photos by tagging us and using the hashtag #BigGreenEgg.
Share your photos by tagging us and using the hashtag #BigGreenEgg.
Want to see how the EGG is made? Click to Watch
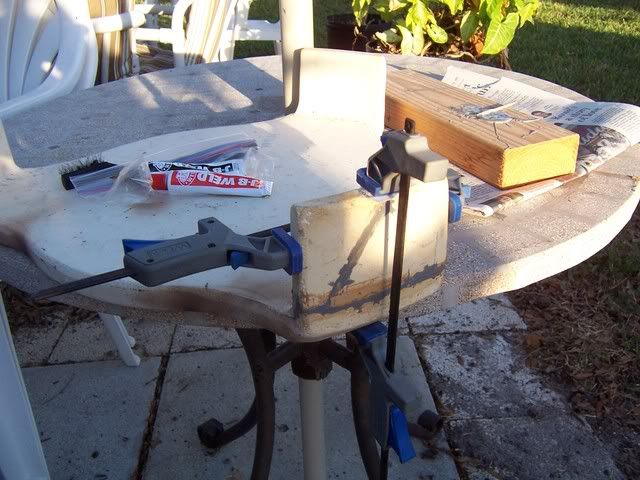
Broken plate setter

Egganomics
Posts: 7
Any ideas for a fix?
http://i726.photobucket.com/albums/ww266/egganomics/IMG_0344.jpg
And any help on how I can post the pic here would be appreciated.
http://i726.photobucket.com/albums/ww266/egganomics/IMG_0344.jpg
And any help on how I can post the pic here would be appreciated.
Comments
-
JB Weld usually works.
This might help the photo situation.
Notes about Photo Posting in the New Greeneggers Forum
Notes compiled by DynaGreaseball, updated 19 Mar 08
Your Digital Camera There is a setup function on most digital cameras for selecting picture size. The choices of size are limited by the amount of memory capacity (mega pixels) that the camera contains. The best setting for your camera should be determined by how you intend to use it most often. If you ever plan to have enlargements (say 8” x 10” prints) made, you should always choose the largest setting that your camera allows. If you only intend to send photos in e-mails across the internet to friends and family, then a smaller setting of 640 x 480 is about all that is required. The problem with choosing a small setting is that once you’ve selected it, all your pictures will be produced in that smaller size (until the setting is changed). In the event that you happen to take that “perfect picture” of a favorite grandchild with your camera having been set to the smaller size, the photos can’t be used to make very large prints without being fuzzy (pixilated). Some people set their cameras to the largest setting available, just in case; and then they reduce the size of each photo after it has been uploaded to their computer. Photobucket’s photo re-sizer will accomplish this task for us (more about that below). Some use their own photo editing software to accomplish re-sizing. Many new cameras come bundled with editing software.
Posting Pictures in the Forum The new forum has glitches and inconsistencies. It allows photos of up to certain sizes in some views, and up to different sizes in other views. Once uploaded to the forum, the maximum width of a posted photo will not exceed 1024 pixels (1024 x 768 is a popular setting in most digital cameras), but such large photos can only be seen in the forum, whenever a user’s display is not set to be viewed in the Wide View mode. To ensure that everyone using the forum can see your posted photos—no matter which display they’re using—pictures should be no larger than 800 pixels wide. (800 x 600 is the largest size picture that may be seen in the Wide View mode). It’s new software, and it’s a little squirrelly, but this inconsistency will probably be corrected in the future.
Using Photobucket’s Edit/Re-Sizing Tool Once you’ve logged into Photobucket.com, and your album has been selected, there are tools found above each photo that are available to you—one of which is an editing option. It is a drop down window giving specific re-sizing options. If the selected picture is 1024 x 768, then the next choice for a smaller size will be 800 x 600. Just click on that option and the photo will be re-sized and saved automatically. Note. Once a photo has been reduced in size, it cannot be made larger using the Photobucket Editing Tool.
Photobucket also provides a tool that allows us to set the maximum size of all photos that will be uploaded into an album. Found at the top of the upload section where the three browser fields are located, you may select the “Max Image Size (Option)” and customize it as a preference for your account.
Copying a Photo From Photobucket to the Forum Text Editor There are four options listed below each photo in your album. Each one has a specific purpose. The bottom choice (IMG Code – Forums & Bulletin Boards) is the only one that is useful to most of us in the forum. It is simply a copy function that works by left clicking the data inside the option. This will copy the photo to your clipboard with all the necessary code needed to paste it into the forum’s text editor. Once the picture has been copied, it is not necessary to use any of the html coding options likefound above the forum’s text editor. To paste the contents of your clipboard, drop the cursor at the location in your text where you wish the photo to appear, and right click your mouse. Then choose paste.
The Preview option at the bottom of the text editor will not show your picture(s). This doesn’t mean it was incorrectly posted. Only the text (and some graphics, like smiley faces) and the link to the picture will appear inside the preview window.
Posting Profile Pictures It is not necessary to use a third party photo host to handle a photo that will be used for your profile picture. You may store this photo on the hard drive of your PC, and “browse” directly to it from within your profile page. Once you’re logged in, and have accessed the forum’s main page, scroll down to where you’ll find the green “Profile” button. Click on it in order to access your profile page. Under the silhouetted place-holder, choose Update Your Image. Then use the browser to find the photo on your hard drive and select it from there. This photo must not be any larger than 200 x 500. A photo editor can be used to obtain a picture that fits this field. Note. Once you’ve completed posting your profile picture, it will not be seen right away. Profile photos are first reviewed to make sure they are appropriate.
Posting an Avatar It is not necessary to use a third party photo host to handle a graphic file which will be used for an avatar. There are, however, some hitches to this process—all of which must be satisfied before they can be successfully posted.
· First, the image may only be one of three file types: .JPG .GIF or .PNG
· Second, the image may not be any larger than 70 x 70 pixels. (If your image is not square, try making the longest side 70 pixels and let the shorter side fall to whatever it will be.
· Third, the file name must only contain alphanumeric characters (only letters and/or numbers). No special characters, such as slashes, dashes, underlines or asterisks may be used. Animated avatars will work, but it may take special software to resize it and preserve the integrity of the animation.
After logging into the forum, you must first be viewing any post. Then, the location on the forum for posting an avatar is found by clicking in the header which looks like this: -
Like Richard said, JB Weld

-
JB Weld is the perfect fix. I broke mine much like yours and used JB weld. The package might say only rated to 500f, but I've had mine at 700 without issue.Knoxville, TN
Nibble Me This -
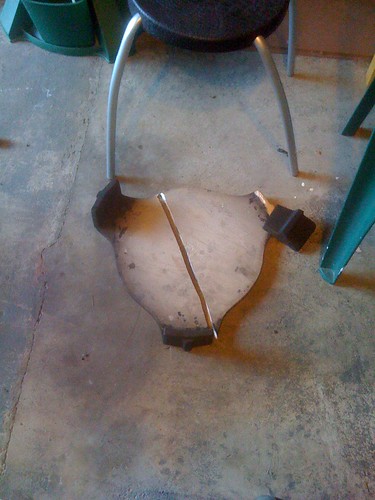
Just broke mine this weekend too -- I thought mending it would be a lost cause, but apparently not. I'll give JB Weld a shot.
(Though my break is much worse ... )


Categories
- All Categories
- 182.7K EggHead Forum
- 15.7K Forum List
- 459 EGGtoberfest
- 1.9K Forum Feedback
- 10.3K Off Topic
- 2.2K EGG Table Forum
- 1 Rules & Disclaimer
- 9K Cookbook
- 12 Valentines Day
- 91 Holiday Recipes
- 223 Appetizers
- 516 Baking
- 2.4K Beef
- 88 Desserts
- 163 Lamb
- 2.4K Pork
- 1.5K Poultry
- 30 Salads and Dressings
- 320 Sauces, Rubs, Marinades
- 543 Seafood
- 175 Sides
- 121 Soups, Stews, Chilis
- 35 Vegetarian
- 100 Vegetables
- 312 Health
- 292 Weight Loss Forum