Welcome to the EGGhead Forum - a great place to visit and packed with tips and EGGspert advice! You can also join the conversation and get more information and amazing kamado recipes by following Big Green Egg to Experience our World of Flavor™ at:
Want to see how the EGG is made? Click to Watch
Facebook | Twitter | Instagram | Pinterest | Youtube | Vimeo
Share your photos by tagging us and using the hashtag #BigGreenEgg.
Share your photos by tagging us and using the hashtag #BigGreenEgg.
Want to see how the EGG is made? Click to Watch
How to raise grate at bottom of firebox?
Options

Peter Creasey
Posts: 253
Someone suggested using 3 SS Carriage Bolts to raise the grate about 1/4" from bottom of the firebox so as get better air flow.
Can someone provide more exact details or perhaps a diagram?
Thanks!
Can someone provide more exact details or perhaps a diagram?
Thanks!
Comments
-
Put the bolts in at 12, 4ish, and 8ish o'clock it should raise the grate just a hair off the ceramic material. I did mine about two years ago and it appeared to help quite a bit with air flow.
stike will likely post a drawing with his Crayola set for you.
Good luck. -
-

you don't need stainless. there's no danger at all from galvy or just "regular" steel...ed egli avea del cul fatto trombetta -Dante -
i posted it twice! so you are wrong. you have been wrong a lot lately. what happened to you anyway? you went missing? someone scare you away?
(posted twice because i got some weird error. the browser hung for a minute or so. i thought it didn't go through)ed egli avea del cul fatto trombetta -Dante -
Hey Stike..Hey Stike..Did you Know...Did you Know...You posted it twice...You posted it twice... :silly:SEE YOU IN FLORIDA, March 14th and 15th 2014 http://www.sunshinestateeggfest.com You must master temp, smoke, and time to achive moisture, taste, and texture! Visit www.bubbatim.com for BRISKET HELP
-
stike wrote:you don't need stainless. there's no danger at all from galvy or just "regular" steel...
S, Thanks for the good info!
Can you say what length and width the carriage bolts should be so as to be the best fit? -
for the last few days and I just got it back this afternoon.
Scare me away? I doubt it!
However, I did get a scathing email from a guy whose panties are in a twist over one of my posts before the 'puter went south.
DO have to email him back in the next day or so and straighten the problem out.
Boy! Some folks are really thin skinned aren't they? -
yep. i did.
was weird. got some sort of error message and the firefox window said "done" down left at the bottom. seemed frozen. so i re-did it, and dontcha know. two posts. now this makes four. i wonder why my post count is at 9700+?!?!?! because it takes three tries to get it right i guess ed egli avea del cul fatto trombetta -Dante
 -
sucks getting old, don't it?SEE YOU IN FLORIDA, March 14th and 15th 2014 http://www.sunshinestateeggfest.com You must master temp, smoke, and time to achive moisture, taste, and texture! Visit www.bubbatim.com for BRISKET HELP
-
mine are welded 3/8" rod, but what I like about this alteration is that I no longer tilt the grate thus dumping my lump when I vigorously stir my lump.
 Re-gasketing America one yard at a time.
 -
One of your posts? I have never known you to be anything but a gentleman.
-
every year i make a mistake. once i made it all the way to December 4th.
October 1 is still pretty good.ed egli avea del cul fatto trombetta -Dante -
anyone heard from him he has been missing for a while??
bill -
Can I get carriage bolts at a large well equipped hardware store?
What lengths do they come in? Or do I have to have them cut to a particular length? -
I did my large and medium with 4 x 5/8" carriage bolts - head of the bolt on the bottom of the egg. I used fender washers above and below the fire grate. On each bolt there are 2 nuts and 2 washers - one of each above and below the grate to hold it level.
Works great. I noticed a huge improvement with my medium after I did it. -
Most big box stores will have them. They don't need to be cut to length. If some bolt sticks up into the lump - no big deal.
-
Fidel wrote:I did my large and medium with 4 x 5/8" carriage bolts - head of the bolt on the bottom of the egg. I used fender washers above and below the fire grate. On each bolt there are 2 nuts and 2 washers - one of each above and below the grate to hold it level.
Fidel, Thanks!
I just now finished doing mine with 4.5" x 1/2" carriage bolts with, as you say, the head of the bolt on the bottom of the egg.
I didn't see any need for washers. Did I make a mistake by not having washers?
I ESTIMATE that I raised my grate about 1/4" which isn't really very much. Is this probably enough? -
uhm...prolly a dumb question..but arent threaded rod and carriage bolts galvanized steel and contain, zinc and other nasties in them that leech out at the temperatures they will see at bottom grate level??
-
1/4' rise is plenty. It lets ash fall through much better and gives better air flow in my opinion.
As long as the nuts don't slip through the grate holes you are fine. -
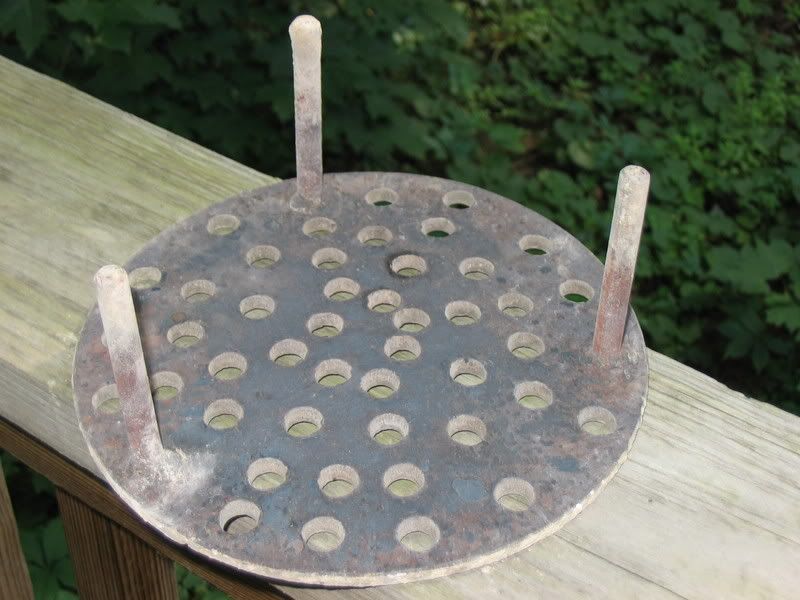
Here is my mini grate with legs. I cut the bolts to the length I needed so the grate stands without making contact with the firebox.


I have two other eggs with legs attached to the grate. All hardware is stainless steel from my local True Value hardware store. -
Yes, what Fidel said.
I'm glad you did it. When I did it it made it easier to keep the ash out and improved airflow considerably. Someone calculated the area of additional ventilation you get when you raise it 1/4" and it was a significant increase.
one thing I noticed the other day, I was getting a significantly better burn (hot spot) on the back side of my Egg. Then after, when I was stirring the lump to get rid of the ash, I noticed that the grate had moved forward, increasing the gap at the back and eliminating the gap at the front. It is not uncommon when raking out ash from below, for the ash tool to catch on the carriage bolt "legs". Apparently I had done this enough times with reckless abandon to move the grate to the front. -
This is a easy way to get the end result and a lot easier to fine tune your set up.All you have to do is tirn the washer in or out to get the amount of air flow that you need.I used the long bolt method and when you try to remove ash you tend to hit one of the bolts and things get out of line.All you need to do this is three 1/2 inch bolts with small and large washers.
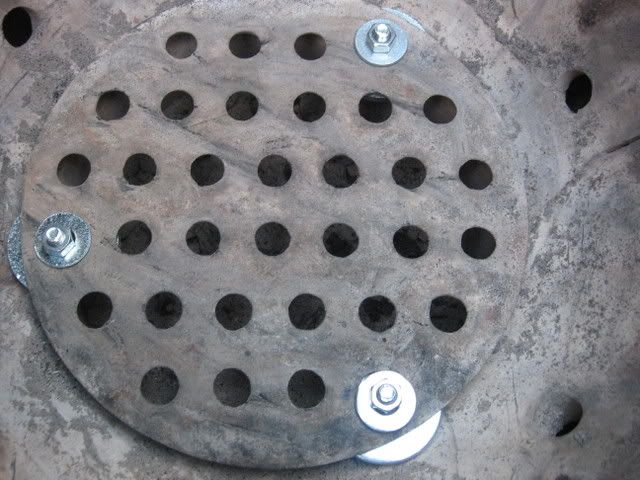
The other side.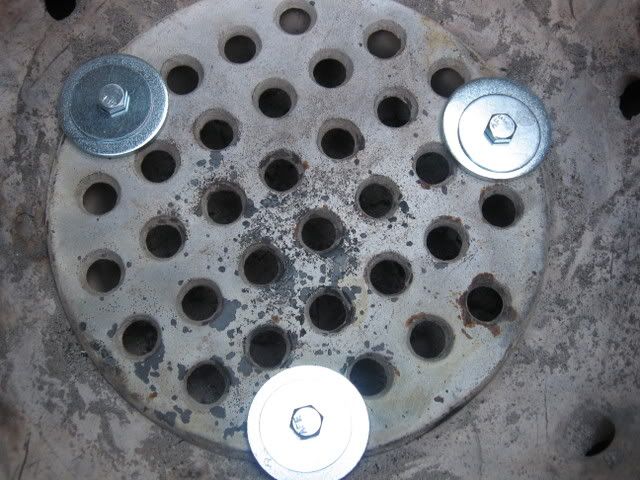
-
huh? you talkin to me? :laugh:
I don't think so - so maybe somebody will read your question and answer.Re-gasketing America one yard at a time. -
while your stubby solution makes sense it still will rock and roll with the vigorous stirring I like to do with my lump before adding new lump!
These welded rod legs still sit proud and sturdy after 7 years of use. Re-gasketing America one yard at a time. -
By the looks of the rods they must weigh about one to one and a half pounds each.But how many Eggers out there have access to a welder? As to the stirring you usually do that before the cook and you can make sure that the grate is level before the lump is lit.
-
The promptness and the quality of the replies and diagrams on this matter totally validate the value of this BGE Board.
All of the feedback in this thread is very much appreciated as it steered me to the solution that I was hoping to achieve. -
I like that solution. So no rods runnning down to the bottom. It rests on the washers? Is that right?
-
You got it.I found with the long bolt method it is a bear to get the right adjustment for the air flow. In a lot of cases the grate it self will warp and change the setting of the gap around the firebox.I just got tired of all of the fiddling that you had to do to get a even spacing there had to be another method to make it easy and simple.I thin my idea will do just that.
-
The Mini solution shown blocks 3 of 17 ventilation holes on the Mini. This corresponds to an air blockage of nearly 18%.
Obviously there would be increased airflow around the sides of the elevated grate, but be aware that you're making a tradeoff.
I congratulate you if your experiments have led to improved performance on your Egg.


![[Deleted User]](https://secure.gravatar.com/avatar/72d0f3cf94935edd82517c944261e7bc/?default=https%3A%2F%2Fvanillicon.com%2Fec59a68092abc911e04ea514ec094e05_200.png&rating=g&size=200)


Categories
- All Categories
- 182.7K EggHead Forum
- 15.7K Forum List
- 459 EGGtoberfest
- 1.9K Forum Feedback
- 10.3K Off Topic
- 2.2K EGG Table Forum
- 1 Rules & Disclaimer
- 9K Cookbook
- 12 Valentines Day
- 91 Holiday Recipes
- 223 Appetizers
- 516 Baking
- 2.4K Beef
- 88 Desserts
- 163 Lamb
- 2.4K Pork
- 1.5K Poultry
- 30 Salads and Dressings
- 320 Sauces, Rubs, Marinades
- 543 Seafood
- 175 Sides
- 121 Soups, Stews, Chilis
- 35 Vegetarian
- 100 Vegetables
- 312 Health
- 292 Weight Loss Forum