Welcome to the EGGhead Forum - a great place to visit and packed with tips and EGGspert advice! You can also join the conversation and get more information and amazing kamado recipes by following Big Green Egg to Experience our World of Flavor™ at:
Want to see how the EGG is made? Click to Watch
Facebook | Twitter | Instagram | Pinterest | Youtube | Vimeo
Share your photos by tagging us and using the hashtag #BigGreenEgg.
Share your photos by tagging us and using the hashtag #BigGreenEgg.
Want to see how the EGG is made? Click to Watch
Those Darn Gaskets - Removing & Replacing...
Options

Grandpas Grub
Posts: 14,226
Finally got around to doing something I have been going to do for some time now… I wanted a quick and easy way to remove the old gasket without using flame, power tools or sanding.
In the past gasket replacements I tried a lot of different solvents and it took hours and hours to accomplish the removal. Talking with BGE I was told not to sand or use any power tools or I would void the warranty. So here is what I tried and used.
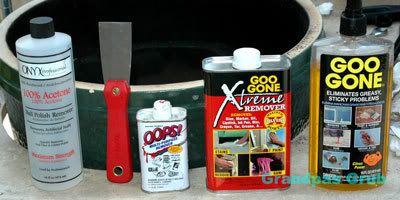
Goo Gone was very slow and hard to use – tossed it out for this application.
Extreme Goo Gone was a little easier but still not very good – tossed it out for this application.
Aaaah yes – the good stuff. Oops! – Now that’s just what the Doc ordered & the stuff to use.
2.5” stiff stubby putty knife.
Acetone (too hard to use to clean) but used it as a final clean before putting on the new gasket.
Hint… Don’t buy acetone in paint section – very expensive. Get 100% acetone in the beauty section of walmart. Gals use it for removing fake fingernails. Very cheap.
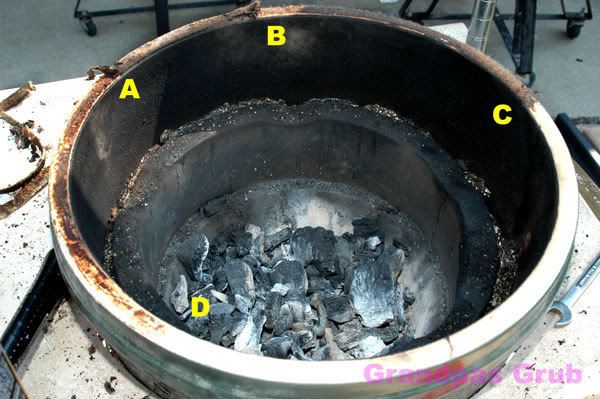
Points A to B were the best part of the old gasket.
I worked up a part of the gasket, splitting the felt from the adhesive. Got a grip and simply pulled what I could of the gasket from the egg. You can see the pulled gasket upper mid left of picture. Points B to C below show the remaining ‘furry’ gasket & adhesive from the initial pull.
Points B to C - I found working within 3 to 6 inches at a time was best. I poured a liberal amount of Oops! and let it sit and do its job and get at that adhesive. I took the putty knife and with just a small amount of pressure scooped up the gasket. That first scrape was from point D to A.
Again working in short distances I again put Oops! on the rim, let it sit and then scraped, using a little more Oops! then a paper towel folded to clean. That worked up the rest of the adhesive & stain. The result being points C to D.
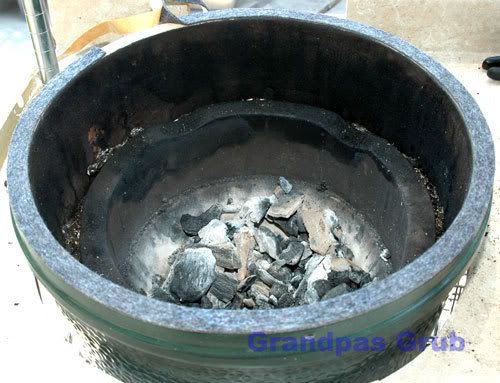
I felt the surface for any roughness or remaining particles. All clean. Only then did I apply a liberal amount of acetone to clean out anything remaining. Acetone evaporates quickly so again work in short stretches. I brushed off the rim with my hand and let it sit for a little while.
I put on the gasket material in short distances and never stretching whatsoever.
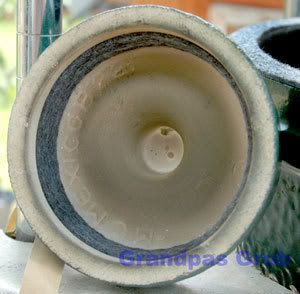
There was a little extra gasket material so I treated the ceramic dome to a little gasket for a tighter seal and so the cap won’t happen to launch into space when opening the dome. I heard someone was launching caps when opening the eggs. Anyway, back to the task at hand.
It was much easier to remove and replace the gasket with the dome off than it was when I tried it with the dome on previously.
Gasket replacement doesn’t have to be a long and hard process. The process was simple and with the help of Oops! took less than 30 minutes – start to finish!
Now to align the dome so far for me is a real PITA.
Grandpas Grub.
In the past gasket replacements I tried a lot of different solvents and it took hours and hours to accomplish the removal. Talking with BGE I was told not to sand or use any power tools or I would void the warranty. So here is what I tried and used.
Goo Gone was very slow and hard to use – tossed it out for this application.
Extreme Goo Gone was a little easier but still not very good – tossed it out for this application.
Aaaah yes – the good stuff. Oops! – Now that’s just what the Doc ordered & the stuff to use.
2.5” stiff stubby putty knife.
Acetone (too hard to use to clean) but used it as a final clean before putting on the new gasket.
Hint… Don’t buy acetone in paint section – very expensive. Get 100% acetone in the beauty section of walmart. Gals use it for removing fake fingernails. Very cheap.
Points A to B were the best part of the old gasket.
I worked up a part of the gasket, splitting the felt from the adhesive. Got a grip and simply pulled what I could of the gasket from the egg. You can see the pulled gasket upper mid left of picture. Points B to C below show the remaining ‘furry’ gasket & adhesive from the initial pull.
Points B to C - I found working within 3 to 6 inches at a time was best. I poured a liberal amount of Oops! and let it sit and do its job and get at that adhesive. I took the putty knife and with just a small amount of pressure scooped up the gasket. That first scrape was from point D to A.
Again working in short distances I again put Oops! on the rim, let it sit and then scraped, using a little more Oops! then a paper towel folded to clean. That worked up the rest of the adhesive & stain. The result being points C to D.
I felt the surface for any roughness or remaining particles. All clean. Only then did I apply a liberal amount of acetone to clean out anything remaining. Acetone evaporates quickly so again work in short stretches. I brushed off the rim with my hand and let it sit for a little while.
I put on the gasket material in short distances and never stretching whatsoever.
There was a little extra gasket material so I treated the ceramic dome to a little gasket for a tighter seal and so the cap won’t happen to launch into space when opening the dome. I heard someone was launching caps when opening the eggs. Anyway, back to the task at hand.
It was much easier to remove and replace the gasket with the dome off than it was when I tried it with the dome on previously.
Gasket replacement doesn’t have to be a long and hard process. The process was simple and with the help of Oops! took less than 30 minutes – start to finish!
Now to align the dome so far for me is a real PITA.
Grandpas Grub.
Comments
-
very good description, thanks!
-
Is that foil I'm seeing around the rim of your firebox? Mine is a loose fit so that might be a good idea.
-
I think it would be best to leave the air gap between the firebox and the dome. I just center the firebox in the opening and fill with lump.
-
Yup, foil it is. The fire ring has about a 2.5 inch gap in the diameter from the outside of the egg. Bugs the heck out of me.
I use the foil to keep the cips and lump from falling down between the ring and side of the egg.
Also, to prevent air from flowing between the egg, firebox, fire ring. Seems to me I will get better lighting and heat out of the lump if all incoming air is funneled up inside the firebox and up through the holes in the firebox.
GG -
Wondering why you feel the air gap between the egg and firebox/fire ring is good or important?
The small egg has the same gap but not as bad as my medium (2.5" gap).
GG -
The best gasket removel I have used was a 3M paint stripper wheel for an electric drill with final removal touch up using a Pumie stone stick like the kind plumbers use to clean porcelin worked great no chemicals at all no damage to egg. Entire procedure can be found on Naked Wiz website under Rutland gasket replacment.
FireWalker -
As I said above - I didn't want to use power tools but wanted an easy, quick way to clean and replace the gasket.
Call BGE and ask what happens to your warranty when you use power tools, sanding and pumice stones on the egg.
With that said, if the dome or bottom of the egg never needs replacement then there are no problems. Will BGE check to see if someone used power tools, and such, probably not.
Nevertheles, using Oops!, putty knife and some acetone along with 20 to 30 minutes wasn't much effort bottom gasket replacement.
I don't cook on the gasket area so for me solvent or acetone wasn't a problem for me.
GG -
No were in the BGE applied warranty or the BGE Home page gasket removel instructions does it prohibit or even mention the use of power tools or Pumice stones, but it looks like you did a good job with out power tools.
FW -
No trying to argue with you my friend, but what I stated above was told to me first hand from John Creel at BGE.
Now if you don't like that or think I may be trying to fool folks please feel free to call John at 770-938-9394 ext 118 or email him.
It was a pretty short sentence, and possibly I heard wrong or the policy my have changed since last December, but I really don't think so.
John and I had a pretty long phone as well as several emails regarding gaskets and related issues.
Here is part of one of the emails I received from John...
Thanks for the email I can help. The eggs are made with a very tight tolerance, most people don't realize it but we go to great lengths to make sure your grill will seal with ease and without any kind of after market upgrades. Just to make a point of the thousands of grills that we sell only about 2% will have gasket issues that are actually gasket issues the rest are usually a ceramic problem or just a bad assembly. To find out if your good to go or if you need more help what we suggest is this....
I know I am not the smartest person in the world but it is somewhat logical that sanding, grinding, or power sanding with a flap sander or any other sanding material may change that 'very thight tolerance' John was talking about.
Anyway not trying to get into a pissin contest here, so call John and let me know if I am wrong. However, I am thinking you will get the same answer I did.
My above goal was share the easy and quick way I replaced a gasket.
Kent


Categories
- All Categories
- 182.7K EggHead Forum
- 15.7K Forum List
- 459 EGGtoberfest
- 1.9K Forum Feedback
- 10.3K Off Topic
- 2.2K EGG Table Forum
- 1 Rules & Disclaimer
- 9K Cookbook
- 12 Valentines Day
- 91 Holiday Recipes
- 223 Appetizers
- 516 Baking
- 2.4K Beef
- 88 Desserts
- 163 Lamb
- 2.4K Pork
- 1.5K Poultry
- 30 Salads and Dressings
- 320 Sauces, Rubs, Marinades
- 543 Seafood
- 175 Sides
- 121 Soups, Stews, Chilis
- 35 Vegetarian
- 100 Vegetables
- 313 Health
- 293 Weight Loss Forum