Welcome to the EGGhead Forum - a great place to visit and packed with tips and EGGspert advice! You can also join the conversation and get more information and amazing kamado recipes by following Big Green Egg to Experience our World of Flavor™ at:
Want to see how the EGG is made? Click to Watch
Facebook | Twitter | Instagram | Pinterest | Youtube | Vimeo
Share your photos by tagging us and using the hashtag #BigGreenEgg.
Share your photos by tagging us and using the hashtag #BigGreenEgg.
Want to see how the EGG is made? Click to Watch
Not Satisfied with Ribs Cooked Indirect in the Egg
Options

When I cook babybacks or spares over plate setter with drip pan they come out tender and pull off the bone, but they don't have a very distinct smoked taste and they are a little too moist to suit my taste. A year or so ago, I think I remember cooking a couple of racks direct, on a raised grid, and got better results. But my memory fails me. If any of you cook your pork ribs direct, I'd appreciate a little advice on dome temp and anything else. (I don't want to do the 3/2/1 thing, or variations of it. I can't tell when ribs are done if they are wrapped in foil. Will appreciate any and all replies.
Comments
-
Chuck/Tx,[p]Have you considered adding more wood or as I do layer several pieces in the charcoal and over 5-6 hours indirect no foil the smoke is very good.
-
Richard Fl , I placed several wood chunks down in my charcoal, and put some on top, but may not have used enough. But, right now, I'm more interested in hearing from anyone that cooks them direct. Thanks for the reply.
-
Chuck/Tx,[p]I was looking for a way to cook ribs fast and the only recipes I have found was to boil them first and grill them direct on the Egg for 20 minutes. I don’t know how much smoke flavor that will give them but I am going to try it one day.[p]There is a guy in town that smokes ribs direct on a Big Drum Smoker. This is a 55 gal drum smoker. I bet there is a distant of 35” between the fire and the ribs. At that distant you can cook low and slow direct with no problem and get plenty of smoke flavor. I don’t think you can achieve that on an Egg. The distance between the fire and ribs on the Egg is not great enough to cook ribs low and slow without the risk of charring. [p]Bon Appétit[p]
-
Chuck/Tx,[p]I cook them direct a fair amount. I followed Tim M's method of flipping every 45 minutes or so. 225 to 240 degrees. I cut each rack in half for easier flipping. Baby backs take 2 1/2 to 3 hours. You only need smoke until the meat hits about 140 degrees. This happens quicker than you think. If you over smoke, they'll taste bitter. I never soak the wood and use chunks usually. Here's a pic of them done this way...[p]
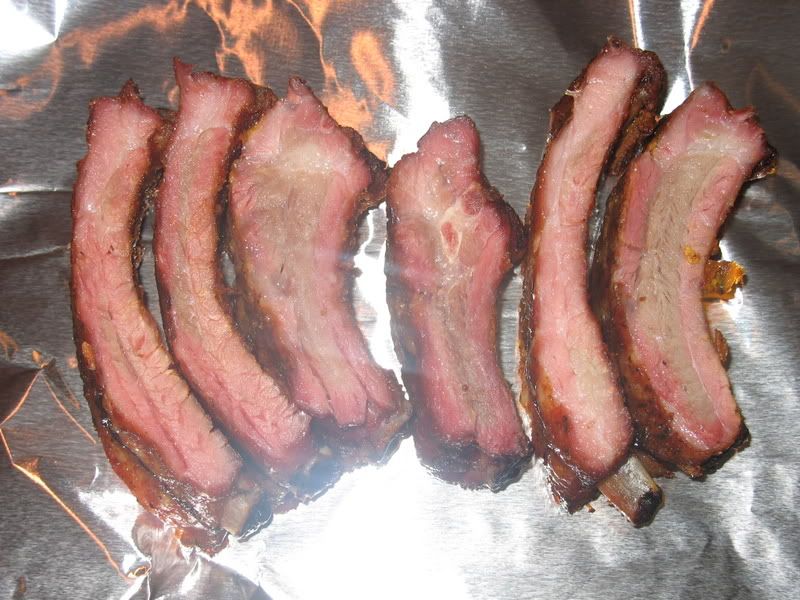
[ul][li]http://www.tm52.com/bge[/ul] -
<p />amini1,
Sorry. Pic didn't post.
-
Chuck/Tx,[p]I do "St.Louis" spares direct, on a raised aparatis a fair amount![p]There is, (in the recipe archives) a proceedure done by one of the origional's around here.."JSlot", that is a great recipe, and is a direct method![p]I think CarWashMike cooks ribbers direct these days also![p]I frankly hardly ever cook Loin Back ribs anymore...so I can't comment on whether thay will work for these methods.[p]Evans
I spent most of my money on good bourbon, and bad women...the rest, I just wasted!! -
Chubby,
Rib cut pork chops maybe.
No direct and no foil. LOL[p]Mike
-
Chubby,
Tis bee wat yu lookn for honey? LOL[p] Pork, Rack, Ribs, Technique, JSlot
Part I- The Preparation
1 Your ribs should be purchased at least 24 hours in advance of cooking and the following steps completed. The first thing you must do is select your ribs. I prefer to cook pork spares, but this method works on baby backs as well. I buy my ribs at Sam's Club. They are consistently good. Sam's carries them in the cryovac packages containing three slabs weighing about 3½ lbs each. You can get a better price if you buy them by the case. Ask the meat manager at Sam's for the case price. Don't just buy ribs from any grocer. Do some investigating and find a good source. It will pay off in the long run. The first thing you need to do is cut the end of the ribs that contains the cartilage, or knuckles, off of the slab. Cut this portion off as close to the end of the rib bone as you can. Save these pieces to cook for family, not for presentation to guests. They eat just as well, but they don't look as nice! Removing this portion also allows for more even cooking of the ribs. Now, cut each slab of ribs in half to make two racks. This will allow more ribs to fit on the grill and also allows the racks to cook more evenly.
2 The next step is to remove the membrane from the back of the ribs. The best way to do this is to slide the edge of a knife or screwdriver under the edge of the membrane on the first rib and pull gently o the membrane. A paper towel makes gripping the membrane very easy once you have it started, although I still prefer using catfish skinnin' pliers, since I keep them handy. With a little practice, you will be able to remove the membrane in one piece most of the time.
3 Now we are ready for the fun part!! Take each rack and rub generously, VERY generously, with French's mustard. Coat each rack of ribs with your favorite rub until you can't see the mustard any more. I have a crushed red pepper shaker (taken from Pizza Hut in my larcenous younger days, I must admit) with large holes that I use to dispense my rub. It works great! Place ribs in an airtight container, ziploc bags, or wrap in plastic wrap for 24 hours or until you are ready to place ribs on the cooker. The ribs can be prepped just before cooking if necessary.
Part II- The Fire
1 Elder Ward covered the fire starting technique very well, so I will reference anyone who has questions to his text for assistance if needed. I'll quickly go over how I start my fire for the record.
2 First, I remove the grill and fire ring from the Egg. Then, I stir the remaining charcoal with the ash tool until all the ash and small pieces of coal have fallen through the fire grate. If needed, I then empty the ash from the bottom vent. I don't feel it is necessary to do this every time. I do it about once every two weeks and don't have any problems. Next, I fill the Egg with charcoal to the top of the firebox and place 3-4 fist sized chunks of hickory (not soaked) on top and spaced evenly around the outer edge of the fuel.
3 With the lower vent wide open and top up, I place a starter cube in the center of the charcoal and light it. I let the starter work with the top open while I go remove the prepped ribs from the refrigerator. This is a good time to arrange your ribs on the rack for cooking. I'll cover the arrangement in more detail in the next section. In about 7-8 minutes, the charcoal is burning well. Once your fire is ignited, reassemble the Egg. If you have a plate setter, place it on top of the fire ring with legs facing up, place a drip pan on it, and place the regular cooking grid on the legs. If not, set up as you usually do for an INDIRECT cook. The main point is to get ceramic between the fire and the food. I use disposable 9" x 13" foil pans ($5.75 for twenty at Sam's) as drip pans, BTW. At this point, the bottom vent is still wide open. Now close the lid on the Egg, leaving the top vent uncovered. Allow the dome temperature to rise to ~300°, then place your daisy wheel or slide top in place with vents wide open. Allow temp to rise to 350° and then close vents to stabilize the dome temp. Your target temperature is 375°. This is wide open with my daisy wheel and half open on the bottom damper. Adjust as needed to maintain 375°. Now you can place the ribs on the grill!!
Part III- Cooking
1 By now you're probably all thinkin' that ol' Jim's done lost his mind and I would've thought the same thing a month or two ago!!! Cook ribs at 375°? What happened to 200-225°? Well, the pizza stone or place setter in the bottom of the Egg changed everything. So, just trust me and go with it!! It is extremely important to be sure your thermometer is reading the proper temp. Check it with the boiling water method if you have any doubts. If you haven't already done so, now you will need to place your ribs in the rib rack. I prefer the el-cheapo Home Depot rib rack (about $8) over the inverted V-rack. It holds five racks of ribs easily and they can't flop around as much. Place ribs in the rack and transfer to the Egg in the middle of the grill. If you have another rack or two of ribs, place them on the grill leaning them against the outer edge of the ribs in the rack taking care that all of the meat is protected by your drip pan.
2 Grab a cold beverage of your choice, or a glass of JD, and sit back for about 3-4 hours or so and watch the grass grow. DO NOT open the lid on the Egg for any reason!! I mean DO NOT even think about it, not never, not no how!!! The beauty of the Egg is the wonderful moisture retention quality and that is diminished by opening the lid, IMO. I never, ever, open the lid when cooking on the Egg until I feel the food should be done, or the Polder tells me to! OK, if you really feel the need to peek, go ahead! LOL. Close to 3 hours into the cook, check your ribs. The rub should have formed a nice crust and the meat should have pulled back about a ¼" on the bone. Try to twist a rib off of one of the racks (careful! it's hot!!). If you can pull one off easily, they are done. If not, close Egg and cook for another 15 minutes or until done.
Part IV- Serving
1 To serve the ribs, separate ribs into single bone pieces and place on a platter or in a pan. If your ribs are done properly, you should be able to pull them apart easily one rib at a time. You can use a knife to separate them if you like, but it should not be needed. Disposable foil pans work great for holding ribs if you are not going to eat right away (betcha can't keep from nibblin'!!!). IMHO, ribs done properly should never need sauce and I don't put any on mine. However, different strokes for different folks, as they say, so use sauce by all means if you want it. Apply sauce every 10 minutes during last half hour of cooking to prevent scorching. Enjoy!!!!
Notes from the Kitchen Table
1 I routinely cook 20-30 lb. of ribs at a time and have developed a loyal customer base for some small time catering. Any questions or comments are welcome and if you want some help, always feel free to ask!! I would also like to add a note of thanks to Char-Woody and Spin for pioneering the firebrick/pizza stone idea and all the resulting experiments that made this method possible!!
Servings: 1
Recipe Type
Main Dish, Meat
Recipe Source
Author: JSlot[p]Source: BGE Forum, JSlot
[p]
-
Richard Fl,[p]You, my Friend.....are quick with a link!![p]You drew that like a sword!![p]LOL!!!!![p]Evans
I spent most of my money on good bourbon, and bad women...the rest, I just wasted!! -
Chubby,[p]TOUCHE!
-
amini1, those sure look good. Do you cook on the regular grid or the raised grid?
-
Chuck/Tx,[p]That was on the regular grid. The only problem with direct is you can't "set it and forget it." If I'm feeing lazy or need to be outside with the kids and/or drinking cocktails. I do indirect and don't foil. I actually prefer direct.
-
Appreciate the replies. I've printed out the J/Slot recipe and will go "study" it. I'll also try the method described by Amini1. Thank ya, thank ya.
-
amini1, sounds good to me. I'll definitely try it. Many thanks.
-
Chuck/Tx,
I haven't looked at all of the replies but I do ribs direct at 225° dome bone side down flip every 30 minutes after 3 hrs until done. I only add one chunk of apple wood at the beginning. I check with a toothpick to see when they are done.To me baby backs have less of a leeway of when they are done than spares.
We luv em' this way. To each their own!
-
Gadgetman, the only thing that surprises me is that you don't turn them until they have cooked for 3 hours. But, I guess the low cooking temperature (225*) permits you to wait that long. Hmmm. Thanks.
-
Chuck/Tx,
Sometimes I don't wait the entire 3 hrs. until I start to flip them. It depends on the fires hot spots and the location of the ribs...it's an art!
Also doing ribs can be a pain because if you do 2 slabs and lets say they look just the same one could be done in 4 hrs. and one might take 5 1/2 hrs.[p]
-
Gadgetman,
I forgot to mention Raised Grid!
-
Lost in Utah,
-
Gadgetman, glad you thought of it; raised grid makes the process sound more realistic.


Categories
- All Categories
- 182.7K EggHead Forum
- 15.7K Forum List
- 459 EGGtoberfest
- 1.9K Forum Feedback
- 10.3K Off Topic
- 2.2K EGG Table Forum
- 1 Rules & Disclaimer
- 9K Cookbook
- 12 Valentines Day
- 91 Holiday Recipes
- 223 Appetizers
- 516 Baking
- 2.4K Beef
- 88 Desserts
- 163 Lamb
- 2.4K Pork
- 1.5K Poultry
- 30 Salads and Dressings
- 320 Sauces, Rubs, Marinades
- 543 Seafood
- 175 Sides
- 121 Soups, Stews, Chilis
- 35 Vegetarian
- 100 Vegetables
- 312 Health
- 292 Weight Loss Forum