Welcome to the EGGhead Forum - a great place to visit and packed with tips and EGGspert advice! You can also join the conversation and get more information and amazing kamado recipes by following Big Green Egg to Experience our World of Flavor™ at:
Want to see how the EGG is made? Click to Watch
Facebook | Twitter | Instagram | Pinterest | Youtube | Vimeo
Share your photos by tagging us and using the hashtag #BigGreenEgg.
Share your photos by tagging us and using the hashtag #BigGreenEgg.
Want to see how the EGG is made? Click to Watch
mundane burn out & reason why
Options

RRP
Posts: 25,897
Of late I have noticed my small is sluggish getting up to temperature. Normally I can reach 750 to 770 with a little patience. My fire box has been in 4 pieces for at least 5 years now and I have a replacement in the garage, but see no need to use it yet. I decided to do a burn out yesterday and thorough cleaning afterward today. Even with all my usual coaxing methods I couldn't get above 660 yesterday so I knew the holes around the perimeter had to be severely clogged. And right I was! I cleaned out a full half gallon of fine ash from behind the firebox walls! Put the 4 pieces snuggly back together without using any refractory cement and I'm ready to roll! 770 here I come again!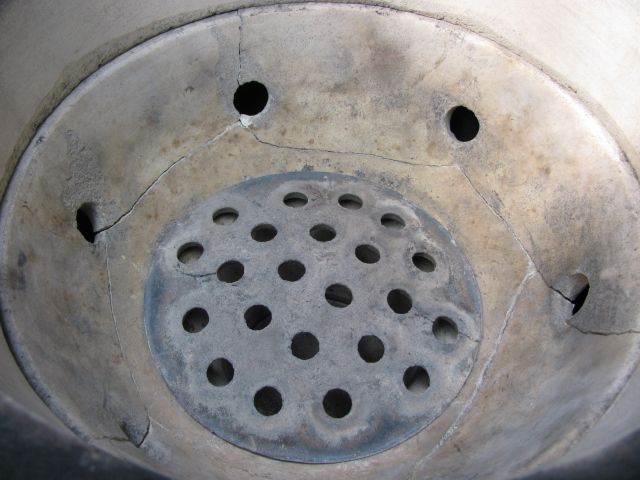
Re-gasketing America one yard at a time.
Comments
-
I bet you were good at puzzles Ron!
 Louisville, GA - 2 Large BGE's
 -
LOL - secret is to first study it and figure out which piece is the keystone. Otherwise it can be tricky even with just 4 pieces. For years my large was in 8 pieces!johnkitchens said:I bet you were good at puzzles Ron!Re-gasketing America one yard at a time. -
Ron I see you have your grate in place with the chamfer on the holes facing upwards...I was told by someone on the forum they should face downward to aid in the small ash lumps to fall through..Can you shed some light on that or is it just a preference thing..Thanks.Greensboro North Carolina
When in doubt Accelerate.... -
I have been told chamfer should go up and told should go down. I have used both ways did not see a difference in performance on any of the eggs.Large, small and mini now Egging in Rowlett Tx
-
My way of thinking is the actual hole in the grate is the same size regardless of it being up or down. After many high temperature cooks the cast iron warps and becomes dish shaped. Whenever I do a clean out I reverse it which is what I did again today.Re-gasketing America one yard at a time.
-
OTOH the machine shop made grate fro my large egg was made of 5/16" plate steel and it does not warp like the cast iron. Note the 3 legs welded on which keep it stable plus makes it stand a little proud and not wobble while resting on the bottom of the fire box. I can stir the used lump vigorously without it turning or tilting and dumping the lump into the pit below.RRP said:My way of thinking is the actual hole in the grate is the same size regardless of it being up or down. After many high temperature cooks the cast iron warps and becomes dish shaped. Whenever I do a clean out I reverse it which is what I did again today.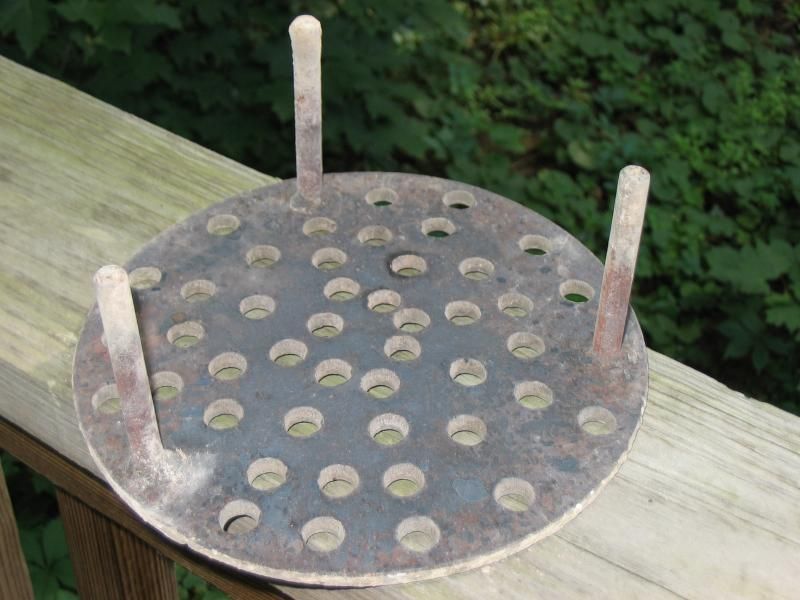 Re-gasketing America one yard at a time.
 -
OTOH the machine shop made grate fro my large egg was made of 5/16" plate steel and it does not warp like the cast iron. Note the 3 legs welded on which keep it stable plus makes it stand a little proud and not wobble while resting on the bottom of the fire box. I can stir the used lump vigorously without it turning or tilting and dumping the lump into the pit below.RRP said:RRP said:My way of thinking is the actual hole in the grate is the same size regardless of it being up or down. After many high temperature cooks the cast iron warps and becomes dish shaped. Whenever I do a clean out I reverse it which is what I did again today.
I like this. The tilting while stirring was my biggest gripe with the hi-que. -
Thanks...don't see why you can't do the same by adding 3 long stove bolts with a nut behind. My 3 legs were welded on and made of 3/8" steel rod. BTW this thing is 13 years old and other than minor surface rust it will outlast me!Re-gasketing America one yard at a time.
-
A couple weeks ago I could not get my LBGE lit for anything. 4 lighter squares and nothing would burn. I had the vent wide open on the bottom and scraped out the ash but no fire. Pulled it all down and the ash build up outside the box and ring was choked. The holes on the sides of the box completely blocked.Jacksonville FL
-
@RRP - I like that fire grate. Do the legs cause any clean out headaches with the ash tool? I use the St. Louis Charcoal stainless fire grates but I wish they would stay in place better when I try to knock the ash through. I may try some stainless bolts to put in place of your legs.L x2, M, S, Mini and a Blackstone 36. She says I have enough now....eggAddict from MN!
-
No - not at all. when I place it in then two of the legs face outward toward the lower vent therefore meaning they are out of reach unless I really wanted to try to snag them and then the 3rd one is at the far backside. Does that make any sense to you?minniemoh said:@RRP - I like that fire grate. Do the legs cause any clean out headaches with the ash tool? I use the St. Louis Charcoal stainless fire grates but I wish they would stay in place better when I try to knock the ash through. I may try some stainless bolts to put in place of your legs.Re-gasketing America one yard at a time.


Categories
- All Categories
- 182.7K EggHead Forum
- 15.7K Forum List
- 459 EGGtoberfest
- 1.9K Forum Feedback
- 10.3K Off Topic
- 2.2K EGG Table Forum
- 1 Rules & Disclaimer
- 9K Cookbook
- 12 Valentines Day
- 91 Holiday Recipes
- 223 Appetizers
- 516 Baking
- 2.4K Beef
- 88 Desserts
- 163 Lamb
- 2.4K Pork
- 1.5K Poultry
- 30 Salads and Dressings
- 320 Sauces, Rubs, Marinades
- 543 Seafood
- 175 Sides
- 121 Soups, Stews, Chilis
- 35 Vegetarian
- 100 Vegetables
- 313 Health
- 293 Weight Loss Forum