Welcome to the EGGhead Forum - a great place to visit and packed with tips and EGGspert advice! You can also join the conversation and get more information and amazing kamado recipes by following Big Green Egg to Experience our World of Flavor™ at:
Want to see how the EGG is made? Click to Watch
Facebook | Twitter | Instagram | Pinterest | Youtube | Vimeo
Share your photos by tagging us and using the hashtag #BigGreenEgg.
Share your photos by tagging us and using the hashtag #BigGreenEgg.
Want to see how the EGG is made? Click to Watch
My new table for LBGE - Philippine Mahogany
Options

ttime4four
Posts: 15
I've been scouring this site and others looking for ideas for my table for a Large Egg. I've landed on the following site ... http://sites.google.com/site/mybiggreenegg/home ... which not only had good photos, but also had 3D drawings with measurements. Props to his mad SketchUp skills. I settled in on his plans but made some minor changes to make it my own.
Wood - Philippine Mahogany (1x4 and 2x4 material) from Crosscut Hardwoods here in Portland.
Fasteners - SS Kreg screws for all but 8 SS carriage bolts, washers, nuts (yup - SS is expensive)
Wheels - two 10" inflatable wheels (I recall reading flatspotting hard rubber wheels)
Inlay - two Home Depot 12" tiles silicon adhesive together to make approx 3/4" to be flush with 1x4 boards
What I've learned:
If anyone has any last minute finishing suggestions, I'm open. As of right now, I'm planning on putting down Teak oil on all sides before assembly. I've looked at other products (Epifanes - 6+ coats with different thinning levels and 24 hr cures in warm weather = too much work) (WaterLox - 2 coats sealer + 3 coats finish = too much work and over $70 in product) (Home Depot stuff = well ...). I figured if needed, I can still add Epifanes or WaterLox on top of the teak oil treatment if needed.
More to come.
Wood - Philippine Mahogany (1x4 and 2x4 material) from Crosscut Hardwoods here in Portland.
Fasteners - SS Kreg screws for all but 8 SS carriage bolts, washers, nuts (yup - SS is expensive)
Wheels - two 10" inflatable wheels (I recall reading flatspotting hard rubber wheels)
Inlay - two Home Depot 12" tiles silicon adhesive together to make approx 3/4" to be flush with 1x4 boards
What I've learned:
- Ton of good information on forums / websites - THANK YOU!
- Measure twice, cut once ... Measure twice, cut once -- I've made two mistakes, but was able to recover without wasting wood
- Pick lighter wood and/or use 1x4 material for the table framing -- this thing is going to be a tank
- Don't only support the circle vertically from below when routing the 21" hole, but also make sure that support won't move horizontally - whoops!
- Buy a good set of drill bits and router bits -- it can be done with the stuff I had, but sharp tools are key with hard woods
If anyone has any last minute finishing suggestions, I'm open. As of right now, I'm planning on putting down Teak oil on all sides before assembly. I've looked at other products (Epifanes - 6+ coats with different thinning levels and 24 hr cures in warm weather = too much work) (WaterLox - 2 coats sealer + 3 coats finish = too much work and over $70 in product) (Home Depot stuff = well ...). I figured if needed, I can still add Epifanes or WaterLox on top of the teak oil treatment if needed.
More to come.
Comments
-
So your Egg is going into your living room? I am sorry but you will have to register on a much higher class forum than this or the other one...... All sir is said in fun, but.........Salado TX & 30A FL: Egg Family: 3 Large and a very well used Mini, added a Mini Max when they came out (I'm good for now). Plus a couple Pit Boss Pellet Smokers.
-
Beautiful, beautiful job, ttime4four! Anxious to see pics once the finish is on the wood, and again onced its "egged"!_____________
Remember when teachers used to say 'You won't have a calculator everywhere you go'? Well, we showed them.
-
Progress made, but not yet finished. Our weather has been just crap and I need some warmth / dryness in the air to let the Teak Oil "cure" some more. Now I'm thinking of doing a 400 grit sanding and applying WaterLox Marine varnish on top of the teak oil. I really like the color now but I need give the finish a bump.
As you can see from the second shot, the pocket screws are keeping the top surface boards clean.
Few more days and I think it will be "egged".

-
Looks beautiful sir!! Great job! =D>
I went with a teak finish too and am loving the outcome thus far! Looking forward to seeing your egg in it!Just a hack that makes some $hitty BBQ.... -
I am building my table as we speak. The top is done and I am starting the 2nd level shelf base. What did you do to support the patio stone in which the egg will sit? I'm having a brain fart with this. I will be using 6 split firebricks to create an 18 x 18 square.
-
 Here's a pic of the top.
 -
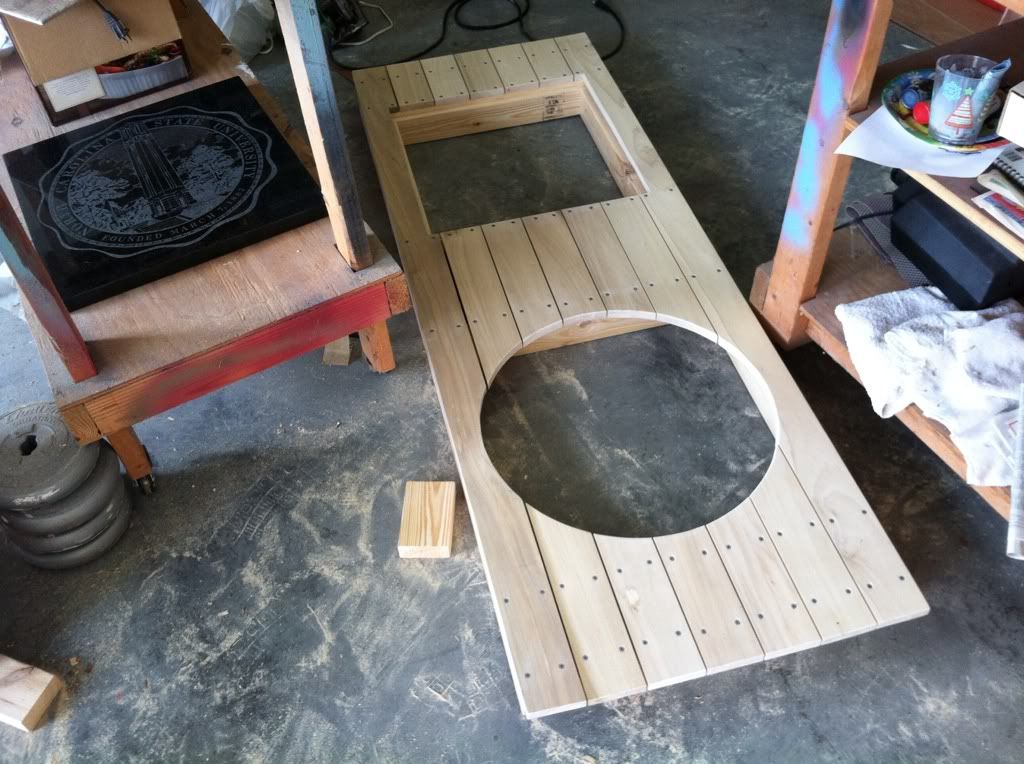
Mike,As I noted in my first post, I followed another Egg'ers design. Take a look at the frame image attached here -- the lower shelf is on the right and the 16" paver is supported by the two 2x4s running longitudinally. I didn't mess with the spacing and the paver sits above the finished lower shelf surface. I simply adjusted the relative distance from the paver to the finished upper table surface. I did accommodate for the egg's ceramic "feet".With using separate fire bricks, you might need to do something different.Hope that helps and your table is looking very nice indeed.Cheers!
-
T Time thank you for the diagram. I think I can modify a hair and come up with a solution.
-
Awesome. I would wreck that thing in 5 minutes! Great looking table.Keepin' It Weird in The ATX FBTX
-
It's all done and it's time to get cook'n!

All in all, there are 5 coats of Teak Oil the final elements of bling added. I did run into some hassle in that the feet were not included in the box from BGE and needed to make a separate run to the dealer. The gave them to me for free, but a hassle still.
One other key lesson - when the egg's dome is tilted back, the whole egg is off balance and wants to tip backward. In the framing of the lower section, I had put the support 2x4s to intersect at the 1/3 - 2/3 section of the paver. I found that when the egg's lid was up, the paver was tilting. Easy fix to pull out the egg and move the supports further apart.
I think chick breasts are first and I'll give the Maverick ET-732 a spin.
-
Love the finish! Great job with a very beautiful end result! Looking forward to seeing some of your cooks.Just a hack that makes some $hitty BBQ....
-
Great job on that table! It's beautiful!XL, Large, Small, Mini Eggs, Shirley Fabrication 24x36 Patio, Humphrey's Weekender, Karubecue C-60, MAK 1-Star General, Hasty Bake Gourmet, Santa Maria Grill, Webers: 14" WSM, 22.5" OTG, 22.5" Kettle Premium, WGA Charcoal, Summit S-620 NG
Bay Area, CA -
Very Nice!! Great job.
-
Very nice. I recommend the table nest instead of BGE feet and slab.Quebec - Canada
-
Awesome table. What did you use for the handle?
-
looks like a grab bar. nice and sturdy to move the thing around.
good looking table.
ed egli avea del cul fatto trombetta -Dante -
Awesome table. What did you use for the handle?
This was one of the 3 grab bars I was looking at so I think it's this one:Just a hack that makes some $hitty BBQ....


Categories
- All Categories
- 182.7K EggHead Forum
- 15.7K Forum List
- 459 EGGtoberfest
- 1.9K Forum Feedback
- 10.3K Off Topic
- 2.2K EGG Table Forum
- 1 Rules & Disclaimer
- 9K Cookbook
- 12 Valentines Day
- 91 Holiday Recipes
- 223 Appetizers
- 516 Baking
- 2.4K Beef
- 88 Desserts
- 163 Lamb
- 2.4K Pork
- 1.5K Poultry
- 30 Salads and Dressings
- 320 Sauces, Rubs, Marinades
- 543 Seafood
- 175 Sides
- 121 Soups, Stews, Chilis
- 35 Vegetarian
- 100 Vegetables
- 312 Health
- 292 Weight Loss Forum