Welcome to the EGGhead Forum - a great place to visit and packed with tips and EGGspert advice! You can also join the conversation and get more information and amazing kamado recipes by following Big Green Egg to Experience our World of Flavor™ at:
Want to see how the EGG is made? Click to Watch
Facebook | Twitter | Instagram | Pinterest | Youtube | Vimeo
Share your photos by tagging us and using the hashtag #BigGreenEgg.
Share your photos by tagging us and using the hashtag #BigGreenEgg.
Want to see how the EGG is made? Click to Watch
Finished Table
Options

SRB Dave
Posts: 10
Can't belive I waited so long!

First fire...

d
First fire...
d
Comments
-
Great job! You are going to love it!
Rich -
beautiful what kind of wood ?
-
That looks fantastic! I'm starting my table this week. How did you get the wood to look so shiny? Did you use a special stain?
-
Wow! That is some kinda table! I see you integrated a stone on the top of the table. I assume that is for cutting etc???
I've been wondering about that as I'm afraid that doing my prep work would allow blood etc to collect in the wood, making it unsafe... My wife would love to have me do that stuff outside and stop getting "stuff" all over her kitchen. I can't say that I blame her and I'd hate to give someone food poisoning...
Anybody have any thoughts on that?
Anyway, very nice work! -
Thank you all for the comments, it was a labor of love and makes a big difference during cooks.
It is oak, but not sure of the exact flavor... I got it from a family friend who has his trees milled into rough cut lumber and dried. The granite insert is actually 9 6x6 samples I purchased from our local Habitat for Humanity Restore for $1 each. Finished with 3 (4 on the top) coats of high gloss spar urethane. There is no "tint" in the urethane but it does bring out a very rich color in the wood.
Don't wait any longer; build your table it's worth the work...
Booking It, how bout them Hawks!
d -
Great looking table. Well Done.
")
-
What type of price range should i expect to pay for the supplie to build that table? I have the granite.
-
I used 80 bd feet of wood, which is high. But the wood was rough cut and I had a lot of waste. Then again, I only paid $1.50/bf.
I'm guessing I spent somewhere around $250. But I had most of the hardware I needed on hand except the casters.
d -
Really nice
-
I'm working on mine, but started with a table that came from my dealer and found it to be too small and weak.. the last thing I want is for my new BGE to fall to it's end. Your table... makes me want to start over. Wow, how nice it is. I really can appreciate your workmanship after fighting with mine for the last couple of days. Thank you for posting your piece of art!!!!
-
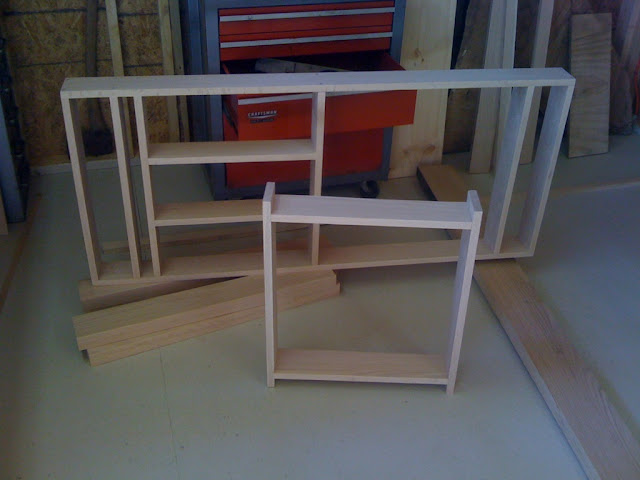
I started mine this past weekend and used red oak as well. My top is not solid like SRB Dave's and I bought 50 bd ft. Make sure that the pieces you buy are wide enough to get 2 boards out of them. That way you will not have as much left over. I spent about $250 on mine after all materials were bought. This is as far as I got for a days work.

-
Nice!
How did you get the top solid? Meaning, did you glue the boards together or just attach them butted up to each other. I think I like the solid look better for the top, but was wondering the best approach. Also, how did you attach the top, I don't see any nail heads or screws. Thanks for sharing! -
Think butcher block, it's glued edge grain 3/4" x 1 1/2". I used 2" SS screws in pocket holes to secure the top to the frame.
Where I inlaid the granite tile I used a router to create the recess and drilled drainage hole under each tile.
D -
I like the shine, looks great!
-
very nice table, now it is hard not to have a project ... isn't it. I keep thinking of my next, maybe a charcoal storage box or something of the like. Maybe, a custom (wood) ice chest that doubles as a seat.
Enjoy your EGG! -
Man, I am a novice when it comes to stuff like this, but I love trying things.
When you say 3/4 x 1 1/2, you mean 1 1/2 thick correct? And 3/4 inch side by side glued, so the strips you see from the top are the 3/4?
When you glued it, you just glued and clamped? Is the assumption with the glue and the sealer it won't come apart? Did you run it through a mill(?) after you glued it or can you keep it level enough you can just sand it?
If you happen to have your camera handy and could take a couple more detailed pics of the top or even other pics of the table, that would be great. I love the looks of it.
I will probably have more questions as I keep thinking if you don't mind.
Thanks! -
Thunder- The surface you do work on raw chicken: You need to be able to spay it down with a good cleaner like lysol or dilute clorox. It should be an solid surface that dose not absorb stuff and rot or grow bugs...Yes there are better words to use but the letter next to o isnt working on the key board!


Categories
- All Categories
- 182.7K EggHead Forum
- 15.7K Forum List
- 459 EGGtoberfest
- 1.9K Forum Feedback
- 10.3K Off Topic
- 2.2K EGG Table Forum
- 1 Rules & Disclaimer
- 9K Cookbook
- 12 Valentines Day
- 91 Holiday Recipes
- 223 Appetizers
- 516 Baking
- 2.4K Beef
- 88 Desserts
- 163 Lamb
- 2.4K Pork
- 1.5K Poultry
- 30 Salads and Dressings
- 320 Sauces, Rubs, Marinades
- 543 Seafood
- 175 Sides
- 121 Soups, Stews, Chilis
- 35 Vegetarian
- 100 Vegetables
- 313 Health
- 293 Weight Loss Forum